How to Save Contact Form 7 Submissions in WordPress

Contact Form 7 is installed on over 5+ million WordPress sites. None of them store a single submission in the database by default. Every entry goes out as an email notification that is the only record of it. One failed delivery due to a misconfigured mail server, a spam filter, or a full inbox, and that lead is gone permanently with nothing left to recover.
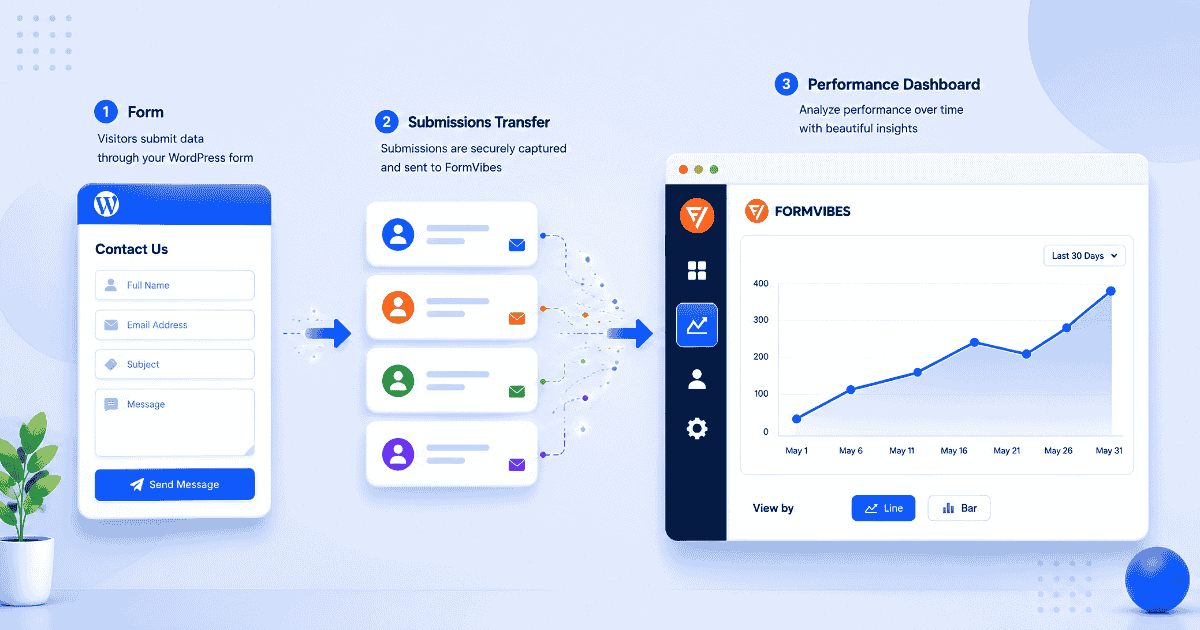
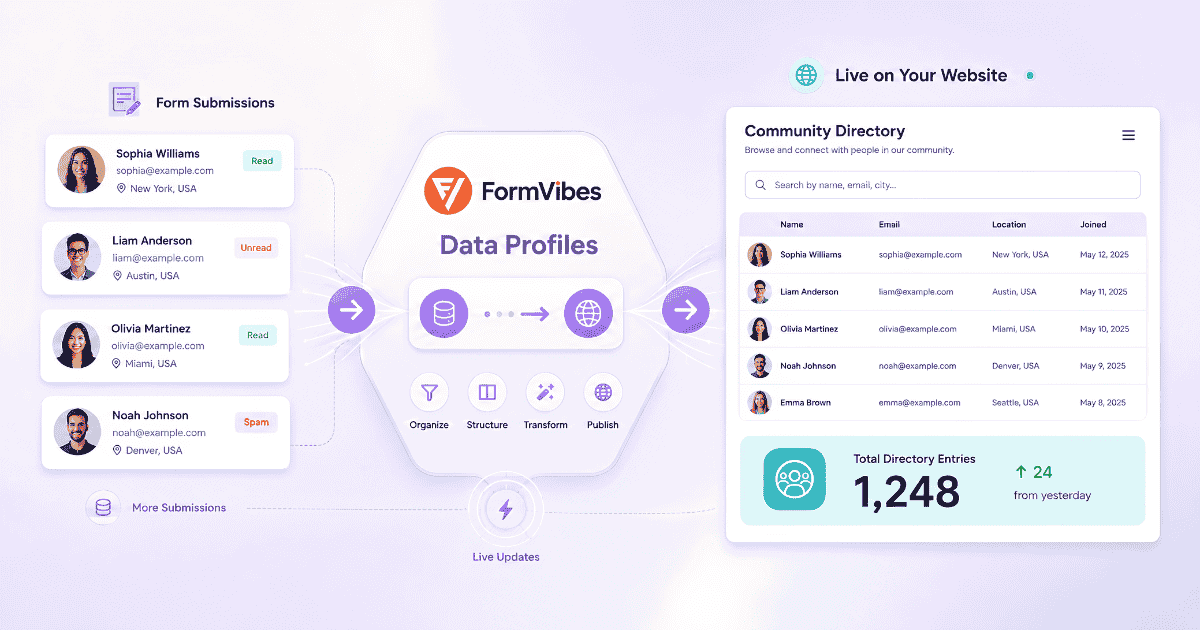
Form Vibes closes this gap in four steps. Install it alongside Contact Form 7 and every future submission is captured automatically the moment someone hits submit, no configuration inside CF7, no API keys, no webhooks.
Before You Start
Contact Form 7 installed and active on your site
At least one CF7 form published on a page
Admin access to your WordPress dashboard
Form Vibes free – install in the setup steps below
Does Contact Form 7 Save Submissions to the Database?
No. Contact Form 7 sends form submissions as email notifications and stores nothing in WordPress. This is a deliberate design decision, CF7 stays lightweight by leaving database storage to companion plugins.
The CF7 plugin author acknowledges this limitation and built a free companion plugin called Flamingo specifically for database storage. If you already have Flamingo active on your site, your CF7 submissions are being stored. The question then is not whether to save them but what you can actually do with them once saved and that is where the differences between tools matter.
If no database plugin is active on your CF7 site right now, any submission lost to a failed email notification is permanently unrecoverable.
Not sure why saving to the database matters beyond preventing email failures? See why you should save contact form submissions in your database.
What Are Your Options for Saving CF7 Submissions?
Two plugins are commonly used to capture Contact Form 7 submissions. Each is worth understanding before choosing one.
Flamingo is free and maintained by the CF7 author. Activate it and CF7 entries appear under Flamingo > Inbound Messages with no extra setup required for default field names (your-name, your-email, your-subject). Flamingo stores entries and lets you view them. No export, no analytics, no team workflow tools, no support for other form plugins.
Form Vibes is free and supports Contact Form 7 alongside eight other WordPress form plugins. It adds the same plug-and-play capture as Flamingo, and builds on it with a filterable submissions dashboard, analytics charts, an Event Log, a WordPress admin dashboard widget, and CSV export, all in the free version. Pro adds inline editing, submission status, notes, export profiles, Google Sheets sync, and a role manager.
Wondering how Form Vibes compares to Flamingo? See the full feature comparison.
Notes: Flamingo are perfectly reasonable choices if you only use CF7 and only need a basic record of submissions. Form Vibes becomes the stronger option when you need analytics, multi-plugin management, deletion tracking, or status-based team workflows.
No configuration needed inside CF7. Form Vibes starts capturing Contact Form 7 submissions the moment it is activated. Free, no account required
How to Save Contact Form 7 Submissions in WordPress
Here are the steps to save Contact Form 7 submissions in WordPress.
1
Install Both Plugins
Go to Plugins > Add New, search for “Form Vibes“, and activate it. If Contact Form 7 is not already installed, search for it and install it the same way. Both are free from the WordPress plugin directory.
2
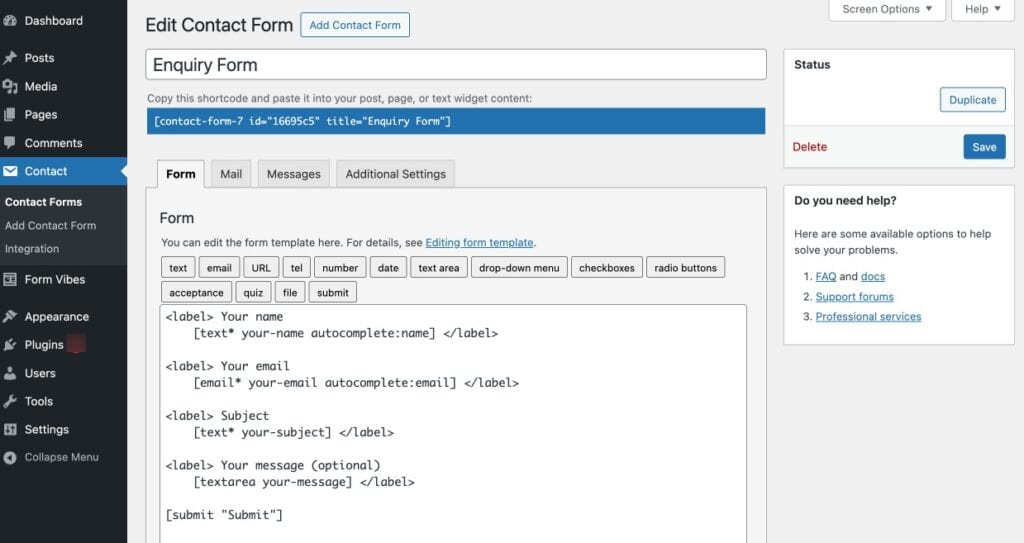
Create or Use an Existing CF7 Form
Go to Contact > Contact Forms in your WordPress admin. Click Add New to create a form, or open an existing one already live on your site. Add the form to any page using the CF7 shortcode – [contact-form-7 id="..." title="..."], or the CF7 Gutenberg block. No changes to CF7 form settings are needed.
New to Contact Form 7? See the complete guide on how to configure Contact Form 7 to capture leads before following the steps above.
3
Submit a Test Entry
Open the page containing your CF7 form on the frontend and submit a test entry with sample details. This confirms the form is firing correctly and gives you an entry to verify in Form Vibes immediately.

4
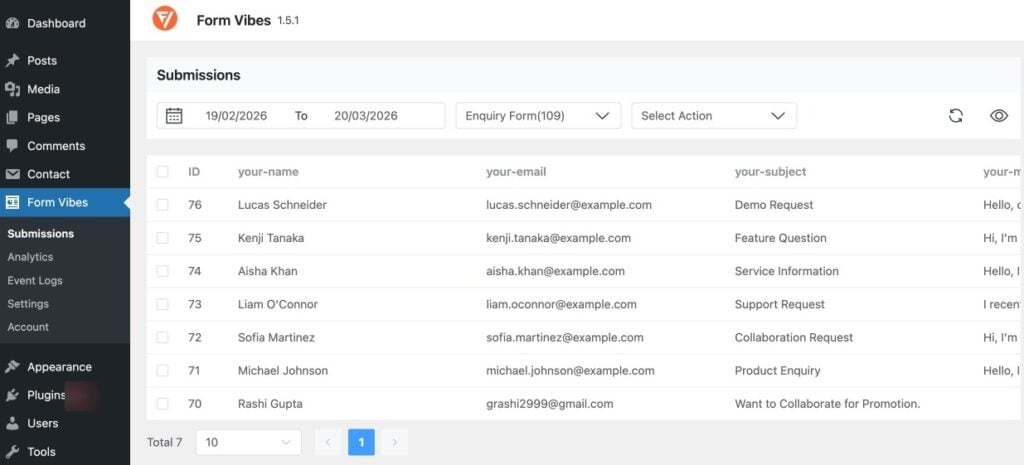
View the Submission in Form Vibes
Go to Form Vibes > Submissions, click the form dropdown at the top of the page, and select your CF7 form. Your test entry appears in the table. Every future CF7 submission is now captured and stored automatically.
What Can You Do with CF7 Submissions in Form Vibes?
Contact Form 7 on its own gives you an email for every submission. Form Vibes gives you a full management layer on top of that, filtering, deletion controls, status marking, and analytics that CF7 has no native equivalent for.
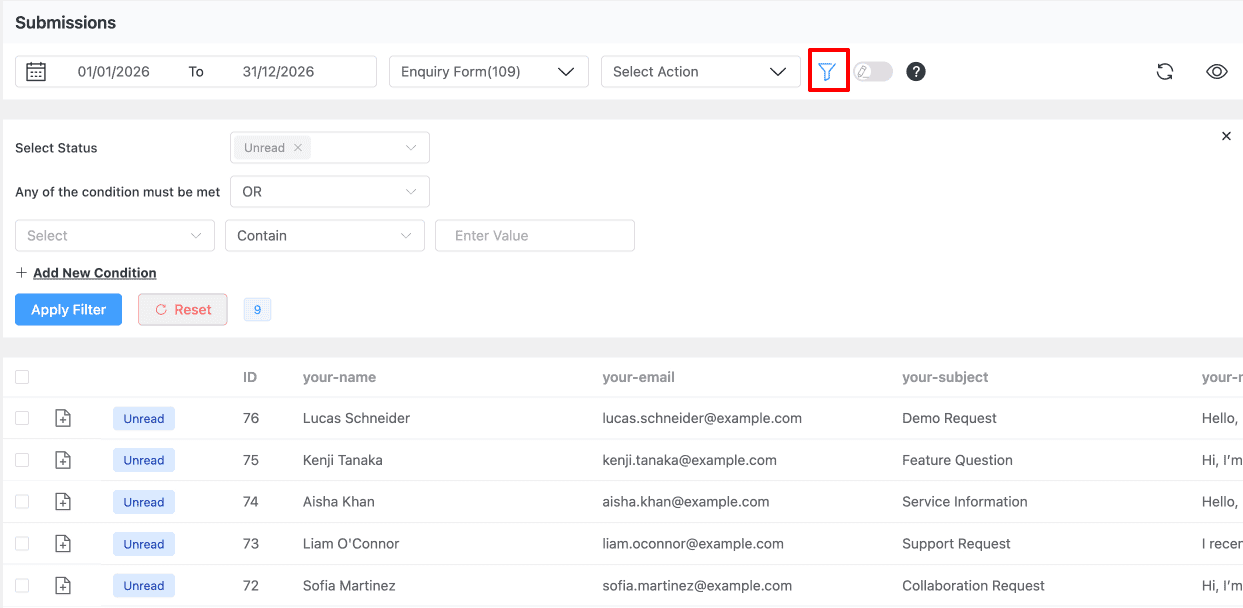
Filtering Submissions by Date and Field Value
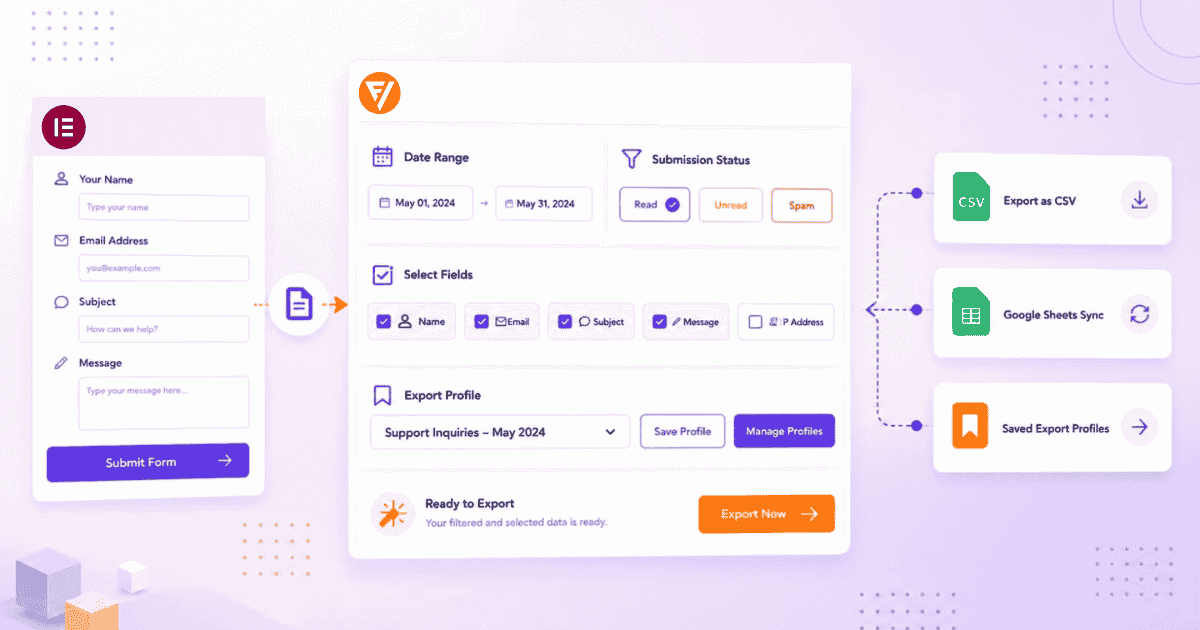
The Form Vibes submissions table includes date range presets – Today, Last Week, Last Month, Last Quarter, and a custom date picker for any specific window. Beyond date filtering, Form Vibes Pro adds advanced field-level filtering: filter CF7 entries by any specific form field value, page URL, or submission status, with AND/OR logic between multiple conditions.
This is the difference between “show me everything” and “show me every enquiry from the Services page submitted in the last 30 days where the budget field is above a certain value.”
Tips: Enable Save Page URL under Form Vibes > Settings to capture which page each CF7 submission came from. Filter the table by URL to separate leads by source, especially useful when the same CF7 form is embedded across multiple pages.
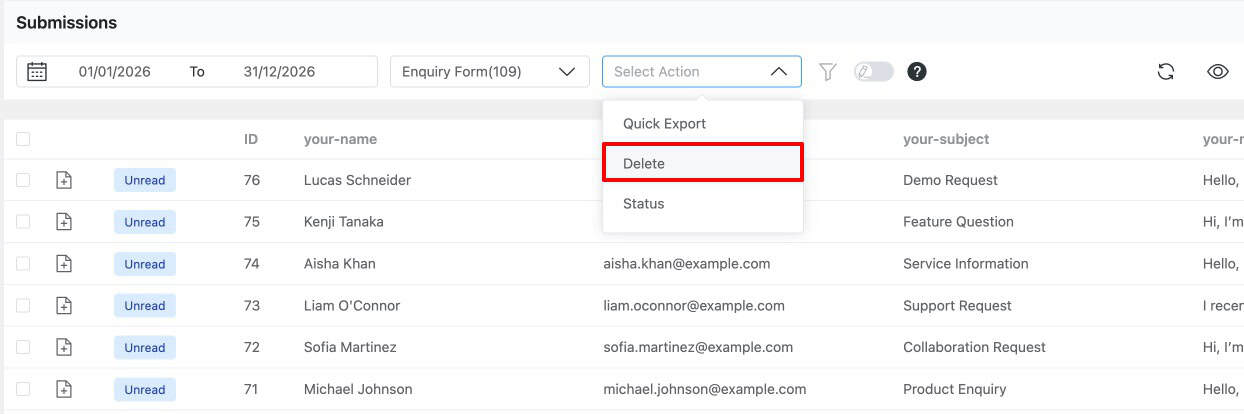
Deleting Unwanted CF7 Entries?
Not every submission belongs in your dashboard permanently. Test entries, duplicate submissions, and obvious spam that passed CF7’s filters can be deleted individually or in bulk directly from the submissions table.
Select the entries you want to remove using the row checkboxes, then use the bulk action to delete. Individual entries can also be deleted from the entry detail view. Deletions are recorded in the Event Log so you always have a record of what was removed.
Marking CF7 Submissions by Status
Form Vibes Pro adds a Submission Status feature that lets you mark any CF7 entry as Read, Unread, or Spam individually or in bulk. You can then filter the submissions table by status to run a triage workflow: open Form Vibes, filter to Unread, work through the new entries, mark them Read as you go.
For CF7 sites handling a steady volume of enquiries contact requests, quote forms, booking forms, status marking turns a flat list of entries into a reviewable queue.
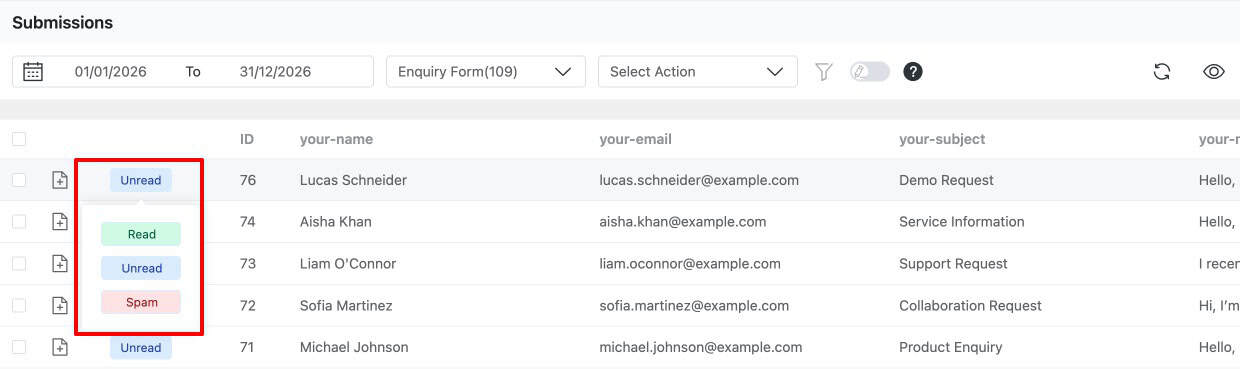
Pro Tip: Submission Status marking (Read, Unread, Spam) and advanced field-level filtering with AND/OR logic are Form Vibes Pro features. Date range filtering and deletion with Event Log tracking are available in the free version.
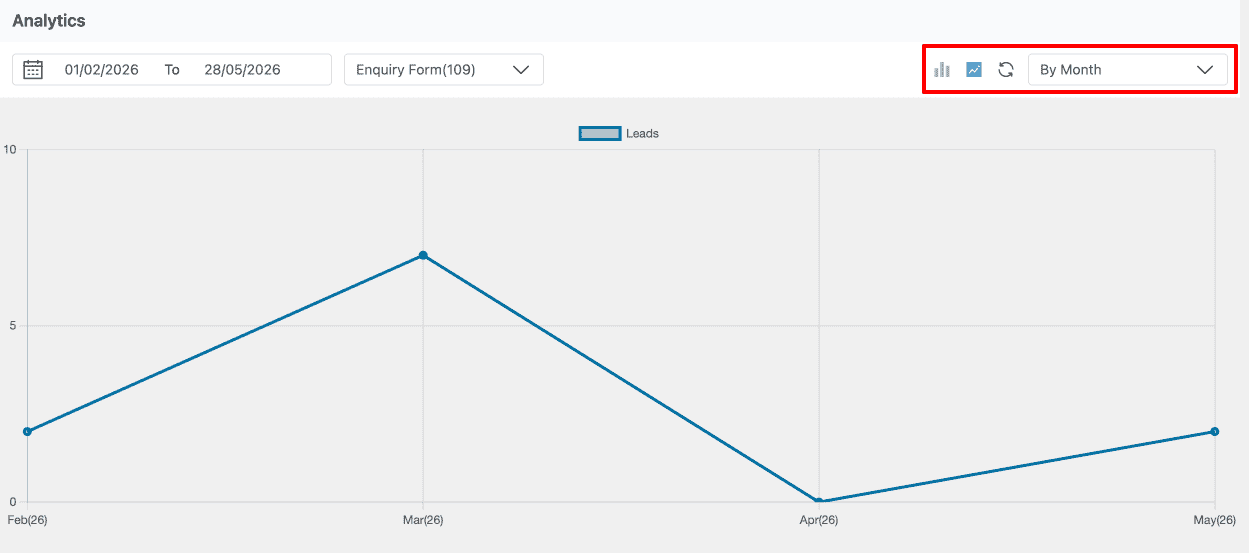
Analytics for CF7 Forms
Form Vibes includes an analytics dashboard at Form Vibes > Analytics. Select your CF7 form and you get a bar chart and line chart showing submission volume on a daily, weekly, or monthly basis across your chosen date range. Selections persist between sessions.
Contact Form 7 has no analytics capability at all, you cannot tell from CF7 alone whether your contact form received five enquiries this week or fifty. Form Vibes gives you that visibility without any third-party analytics tool.
A dashboard widget on the main WordPress admin screen gives you a quick submission count and trend line every time you log in, no need to navigate to the analytics page for a daily pulse check.
For a full export walkthrough including Export Profiles and Google Sheets sync, see how to export WordPress form submissions with Form Vibes.
Event Log Work for CF7 Submissions
The Event Log is a free Form Vibes feature. Every change made to a CF7 submission after it is captured, a field edit, a status update, a note added, a deletion is recorded with a timestamp and attributed to the user who made the change.
For CF7 sites with more than one person reviewing or managing submissions, this creates accountability. If a lead entry is deleted, the Event Log records exactly who deleted it and when. If a field value is corrected after the fact, the original value remains traceable.
The Event Log begins recording automatically from the moment Form Vibes is active. No configuration required.

Form Vibes vs Flamingo – Which Should You Use?
All capture CF7 submissions automatically on activation. The differences are entirely in what you can do with those entries after they are stored.
| Feature | Flamingo | Form Vibes |
|---|---|---|
| Date range filtering | No | Yes |
| WordPress admin dashboard widget | No | Yes |
| Analytics & reports | No | Yes |
| CSV export | Yes | Yes |
| Date range filters | No | Yes |
| Supports other form plugins | No | Yes |
| Submission Notes | No | Yes |
| Edit submissions | No | Yes |
| Role-based access manager | No | Yes |
| Google Sheets sync | No | Yes |
| Display submissions on frontend | No | Yes |
Key Takeaway:
Form Vibes Free does everything Flamingo do – plus analytics, date filtering, an Event Log, and a cross-plugin dashboard. You can also run Form Vibes alongside Flamingo simultaneously without conflict.
Conclusion
Contact Form 7 is deliberately lightweight database storage was never part of what it does. That is a reasonable design choice, and it makes every CF7 site without a database plugin one failed email away from a permanently lost lead.
Form Vibes closes that gap in four steps for free. Install it alongside CF7, submit a test entry, and every future submission has a permanent home in your WordPress database with filtering, analytics, deletion tracking, and an Event Log that none of the basic CF7 database plugins can match.
Not sure why saving to the database matters beyond preventing email failures? See the full Benefits for saving contact form submissions in the database.
Never lose a Contact Form 7 submission again
Form Vibes is free to install from wordpress.org. Works with CF7 immediately on activation, no configuration inside Contact Form 7 needed.
Frequently Asked Questions
Common questions about saving and filtering Elementor form submissions.
Does Contact Form 7 save submissions to the database?
No. Contact Form 7 sends submissions as email notifications only nothing is stored in the WordPress database. If an email notification fails to deliver, that submission is permanently lost. To save CF7 entries to the database you need a companion plugin: the Form Vibes.
Can I filter Contact Form 7 submissions by specific field values?
Date range filtering is available in Form Vibes Free. Advanced field-level filtering — filtering by any specific CF7 form field value, with AND/OR logic between multiple conditions is a Form Vibes Pro feature.
Can I mark Contact Form 7 submissions as Read, Unread, or Spam?
Yes, with Form Vibes Pro. The Submission Status feature lets you mark any CF7 entry individually or in bulk and filter the submissions table by status. This turns your CF7 submissions into a reviewable queue rather than a flat unmanaged list.
What happens if Contact Form 7 email notifications fail?
If email notifications fail and submissions are not stored in the database, the form data may be permanently lost. Saving submissions in the database prevents this issue.
Leave a Reply