How to Save WordPress Form Submissions to Google Sheets

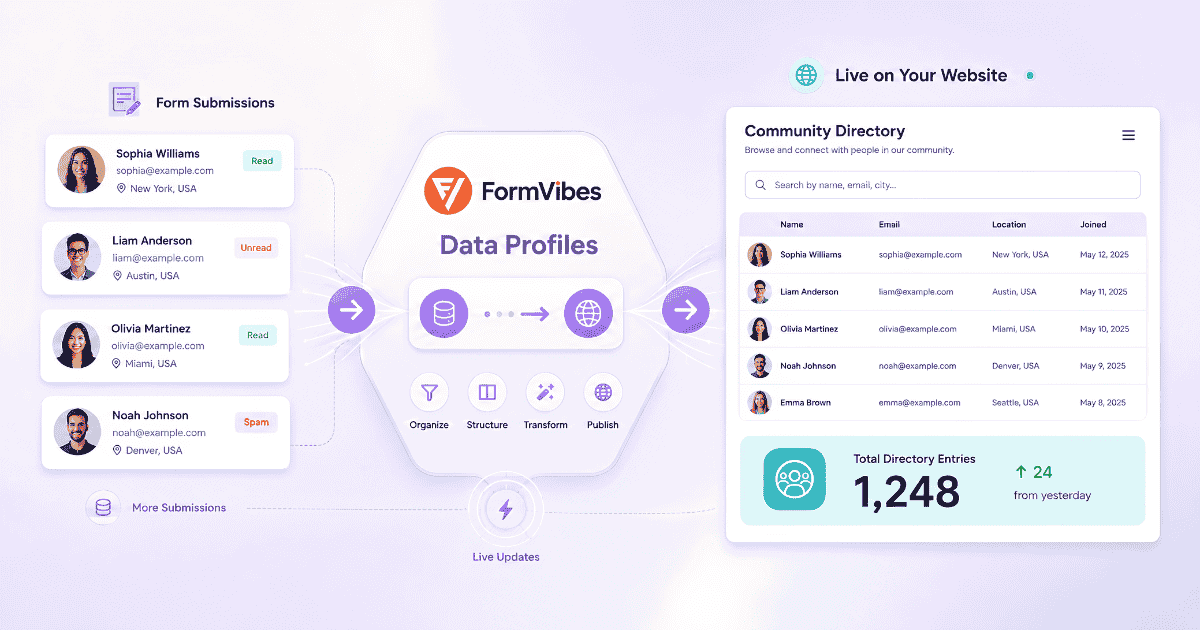
Most guides for connecting WordPress forms to Google Sheets involve a third-party automation tool, each with its own subscription cost and per-task limits. Form Vibes Pro does this natively through Export Profiles. Connect your Google account once via OAuth, map your form fields to sheet columns, and every new submission lands in the spreadsheet automatically. No automation platform, no additional cost, no ongoing configuration.
This guide covers the complete setup from start to finish, including the Google API credentials required for the connection and how to test that everything is working correctly.
Before You Start
Form Vibes Pro active on your WordPress site
A Google account with access to the spreadsheet
Access to Google Cloud Console to create the API credentials
Difference Between CSV Export and Google Sheets Sync?
Before setting up the integration, it helps to understand when Google Sheets sync is the right choice and when a simple CSV export is enough.
CSV Export is available in the free version of Form Vibes. Click the Quick Export button in the submissions toolbar and a CSV file downloads immediately containing all entries for the selected form. This is an on-demand, manual process. It works well for one-off backups, monthly reporting, and situations where you need a full dataset right now.
Google Sheets Sync is a Form Vibes Pro feature. Once set up, every new form submission is pushed to the connected spreadsheet automatically the moment it is received on your site. There is no manual step after the initial setup. The spreadsheet stays live and current without anyone logging into WordPress to download anything.
Use CSV export when you need data occasionally and prefer to control when exports happen. Use Google Sheets sync when you need a live, always-current spreadsheet that team members can access without WordPress login.
Tips: Use CSV export for manual downloads, and Google Sheets when you want submissions to update automatically in a shared spreadsheet that your team can access without logging into WordPress
Not on Pro yet? The free version of Form Vibes already stores every submission, shows analytics, and lets you export to CSV on demand. Upgrade to Pro when you need the spreadsheet to update itself automatically.
Setting Up the Google Sheets Connection
The full setup has three steps. Steps 2 and 3 happen inside your WordPress dashboard. Step 1 happens in Google Cloud Console.
1
Creating Your Google API Credentials
Google requires API credentials to allow Form Vibes to communicate securely with your Google account. These credentials consist of a Client ID and a Client Secret, both generated in Google Cloud Console.
Because this involves several screens inside Google Cloud Console, a dedicated step-by-step guide covers the full credential creation process. Follow that guide to generate your Client ID and Client Secret, then return here to continue with Step 2.
2
Connecting Form Vibes to Google Sheets
Once you have your Client ID and Client Secret from Google Cloud Console, go to Form Vibes > Settings > Google Sheet in your WordPress admin.
Paste your Client ID into the Client ID field and your Client Secret into the Client Secret field. Click Authenticate and sign in with your Google account when prompted. After approving the requested permissions, the connection status updates to show the account as connected.
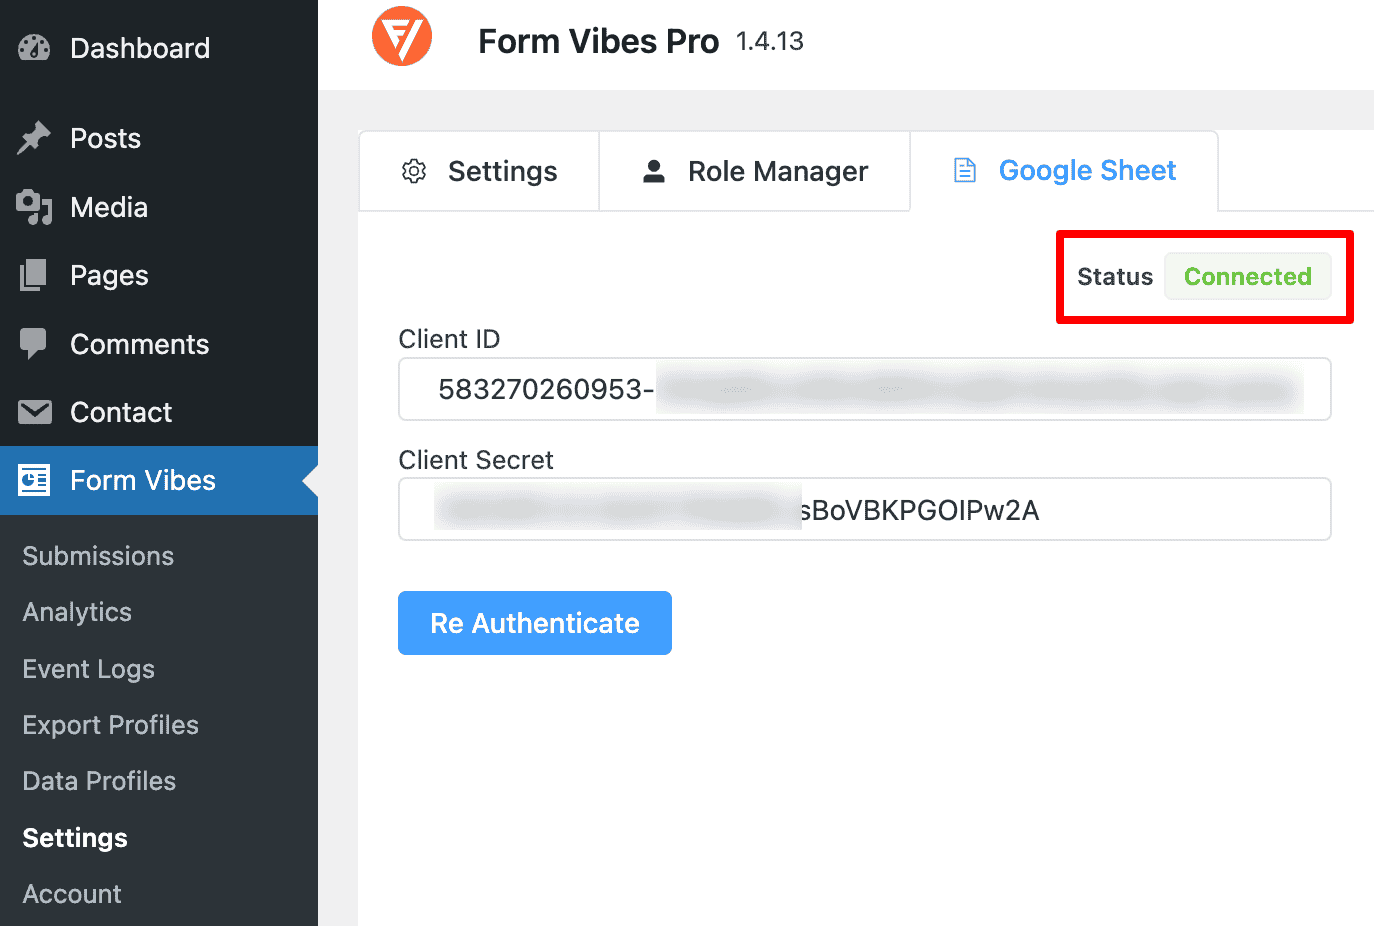
Tips: During authentication, Google will show an “App is not verified” warning. This is expected for a self-configured OAuth connection, it does not indicate a problem. Click Show Advanced, then Go to App, and approve all requested permissions. The connection completes normally
3
Creating a Google Sheets Export Profile
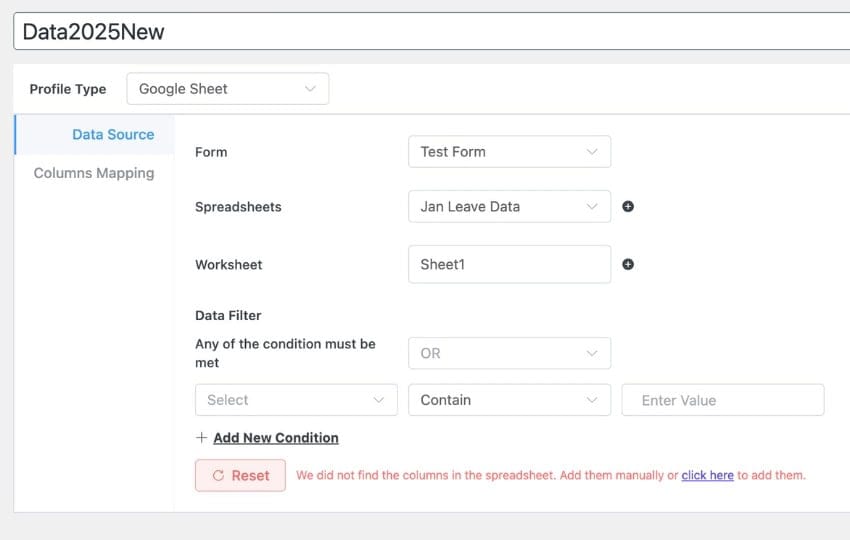
With your Google account connected, go to Form Vibes > Export Profiles and click Add New.
Under Profile Type, select Google Sheet instead of Local Download. This tells Form Vibes to push submissions to a spreadsheet rather than generate a downloadable file.

4
Configure the Export Profile Settings
Configure the profile with the following settings:
Form: Select the form whose submissions you want to send to Google Sheets. All supported form plugins appear in this dropdown.
Spreadsheet: Choose the Google Spreadsheet where data should be sent. If the spreadsheet you need does not appear, check that the connected Google account has access to it. To create a new spreadsheet directly from Form Vibes, click the plus icon next to the spreadsheet selector.
Worksheet: Select the specific worksheet (tab) within the spreadsheet. Create a new one using the plus icon if needed.
Column Headers: Add column headers manually by typing them in, or click the auto-populate option to create headers based on your form field names automatically. If you use auto-populate, review the generated headers before publishing to confirm each field is mapped to the right column.
5
Set Up the Column Mapping
Map each form field to its corresponding spreadsheet column. This ensures data lands in the correct place in the sheet. If your form has a Name field and your sheet has a Name column, connect them here.
Click Publish to save and activate the Export Profile.
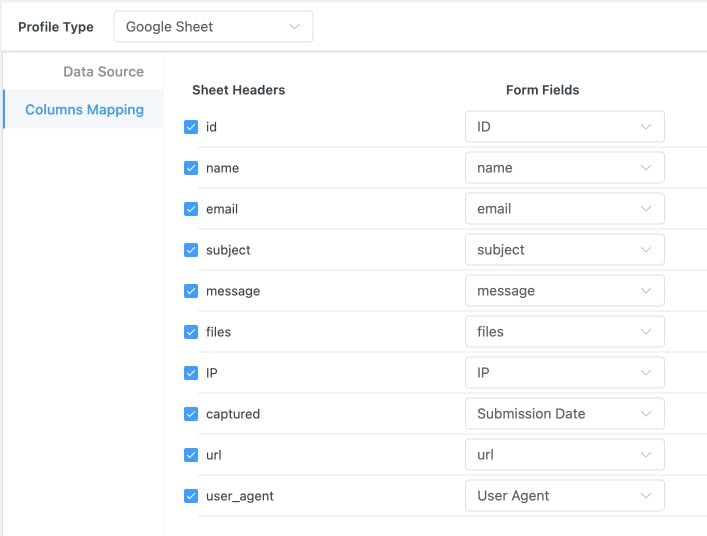
Important: The Export Profile must be in Published status for submissions to sync automatically. A profile left in Draft will not push any data to the spreadsheet. Always confirm the profile is published before sending a test submission.
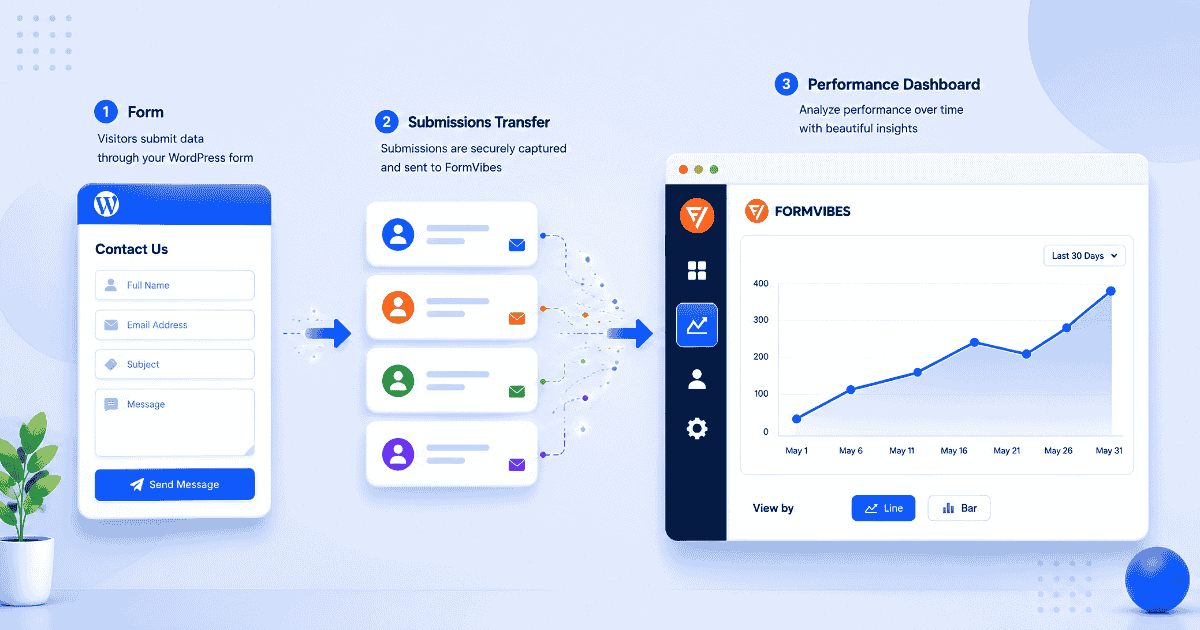
What Happens After a Form Is Submitted?
Once the Export Profile is published, no further action is needed. When a visitor submits a form on your site, Form Vibes captures the submission and immediately pushes a new row to the connected spreadsheet. Each form field appears in the column it was mapped to during setup.
The submission appears in the sheet within moments of the form being submitted on the frontend. Anyone with access to the Google Spreadsheet can see the new row without logging into WordPress. The spreadsheet updates automatically with every new submission from that point forward.
What If the Connection Is Not Working?
Before relying on the setup, submit a test form entry from the frontend of your website.
If submissions are not appearing in your spreadsheet, or if you encounter an error during setup, these are the five most common causes and their fixes.
Spreadsheet is not showing in the dropdown. Check that the Google account connected in Form Vibes Settings has access to the spreadsheet. If the spreadsheet is owned by a different Google account, share it with the connected account before trying again.
Redirect URI mismatch error. The redirect URI entered in your Google Cloud Console app settings must match exactly the one Form Vibes provides. Open your Google Cloud Console project, navigate to OAuth credentials, and verify the redirect URI matches the one shown in Form Vibes Settings.
App verification warning during authentication. This is expected for self-configured OAuth apps. Click Show Advanced, then Go to App, and approve all permissions. This warning does not indicate a problem with the connection.
Data is not appearing in the sheet after submission. Check four things: confirm the Export Profile is published (not in draft), confirm the correct form is selected in the profile, confirm the correct spreadsheet and worksheet are selected, and submit a fresh test entry from the frontend after publishing the profile.
Data is appearing in the wrong columns. Open the Export Profile and review the column mapping section. Update the field-to-column connections if your sheet headers or form field names have changed since the profile was last saved.
Conclusion
Form Vibes Pro connects your WordPress forms to Google Sheets natively. Set up the Google API credentials once, connect your Google account in Form Vibes Settings, create an Export Profile with your chosen form and field mapping, and every new submission lands in your spreadsheet automatically from that point forward.
For teams who review leads in Google Sheets, share data with colleagues who do not have WordPress access, or need a live dashboard that updates in real time, this integration removes the need for any manual export step.
Need a refresher on how Export Profiles work? See the complete guide on how to export WordPress form submissions with Form Vibes.
Save Form Submissions in Google Sheets
Form Vibes Pro pushes every new submission straight to your spreadsheet the moment it arrives. Set it up once and forget about manual exports.
Frequently Asked Questions
Common questions about saving form submissions in Google Sheet.
Do I need Form Vibes Pro to connect WordPress forms to Google Sheets?
Yes. The Google Sheets integration is a Form Vibes Pro feature. The free version of Form Vibes includes Quick CSV export for on-demand downloads. Real-time automatic sync to a Google Spreadsheet on every new submission requires Form Vibes Pro.
What does the Client ID and Client Secret do?
The Client ID and Client Secret are OAuth credentials generated in Google Cloud Console. They allow Form Vibes to communicate securely with your Google account and request permission to write data to your spreadsheets. They are entered once in Form Vibes Settings and do not need to be updated unless you regenerate them in Google Cloud Console.
Why is my spreadsheet not appearing in the Form Vibes dropdown?
The most common cause is that the Google account connected in Form Vibes does not have access to the spreadsheet. Share the spreadsheet with the connected account or use an account that already has access. Also confirm that the authentication step in Form Vibes Settings completed successfully and shows the account as connected.
Can I send filtered form submissions to Google Sheets?
Yes. When setting up the Export Profile, you can apply filter conditions under the Data Source settings. Only submissions matching your filter conditions will be pushed to the connected spreadsheet.
Does the Google Sheets integration work with all nine form plugins Form Vibes supports?
Yes. The Google Sheets sync works with any form plugin supported by Form Vibes. Select any supported form in the Export Profile and its submissions will be pushed to the connected spreadsheet automatically.
How do I confirm the connection is working correctly?
Publish the Export Profile, then open the form on the frontend of your site and submit a test entry. Open the connected Google Spreadsheet and check that a new row has appeared, the data is in the correct worksheet, each value is in the correct column, and the field mapping looks as expected. If the test row appears correctly, the integration is working.

Leave a Reply