How to Display Form Submissions on Your Website with Form Vibes
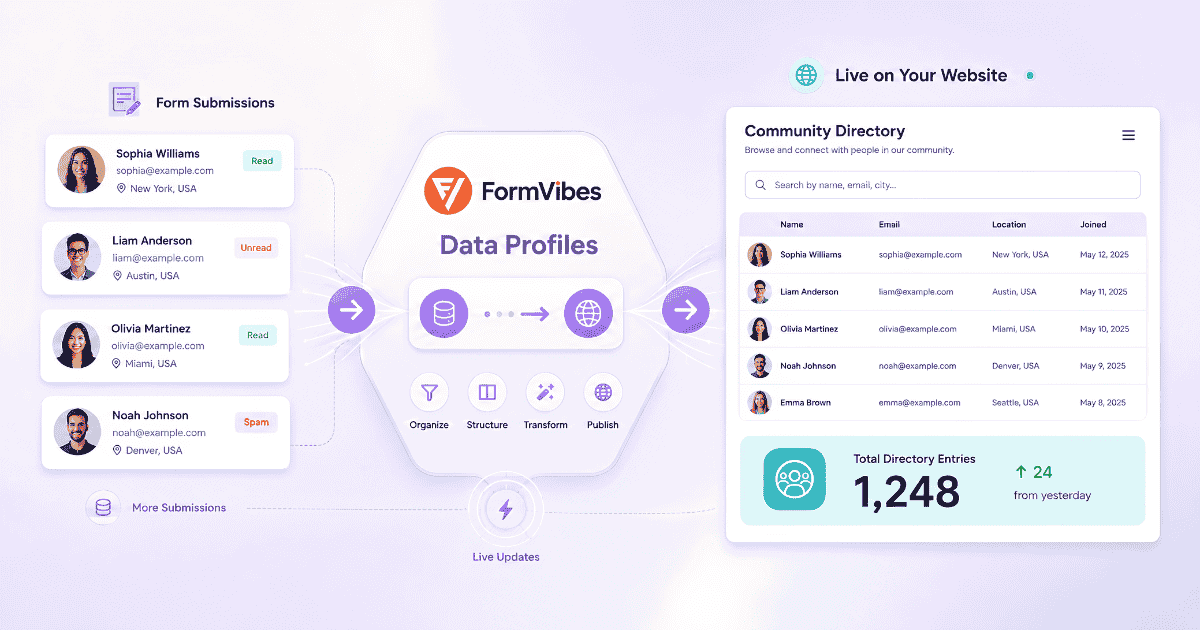
Form Vibes is not just a backend dashboard. It can also display form submissions data directly on the front end of your website visible to your team, your visitors, or anyone you choose.
This is done through a Pro feature called Data Profiles. You define which form data to show, apply any filters, and embed it on any page as a live table or counter. No coding required.
This guide covers what Data Profiles does, three real use cases, and how to set one up from start to finish.
What can you do with Form Vibes Data Profiles?
Data Profiles pulls submission data from any form and displays it on the front end of your website. No code, no separate plugin.
Two display types are available:
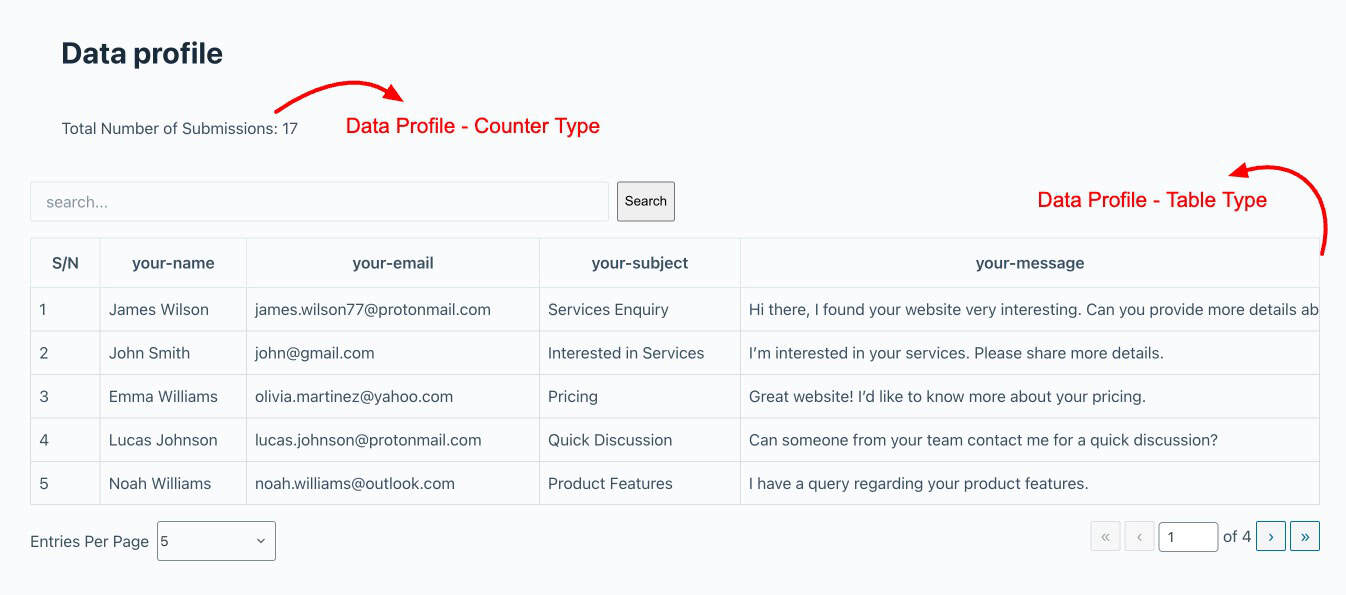
- Table – shows submissions as rows and columns on the page. Columns are configurable, column labels are editable, pagination is optional, and a live search bar can be enabled so visitors can find specific entries
- Counter – shows a single number showing how many entries match your filter criteria, with an optional custom message around it. Useful for registration counts, event sign-ups, or response totals
Data Profiles works with any form plugin supported by Form Vibes not just Elementor forms. The data pulls live from the Form Vibes database, so the table or counter always reflects the latest submissions without any manual refresh.
Pro: Data Profiles is a Form Vibes Pro feature. It is not available on the free plan. See the Form Vibes Free vs Pro comparison for the full feature breakdown.
What are the use cases for displaying form submissions?
Here are three common scenarios where Data Profiles saves time or replaces a manual process entirely.
Registration or sign-up counter You are collecting event registrations or newsletter sign-ups through a form. Embed a counter on the registration page showing how many people have signed up so far. It updates automatically with every new submission — no manual editing needed, and the social proof builds on its own.
Business or member directory Collect business or member information through a form and display it as a searchable table on a directory page. Visitors can search by name, category, or location. New entries appear automatically as forms are submitted. No dedicated directory plugin needed.
Internal team submission view Your team needs to see form data without logging into the WordPress dashboard. Create a password-protected page, embed a Data Profile table, and share the page password with your team. They get a clean, searchable view of the submissions, no WordPress admin access required.
Tips: For internal team views, use WordPress’s built-in page password feature. Go to the page settings, set a password, and share it with your team. The Data Profile table is only visible to anyone who enters the password.
Data Profiles is one of several Pro features that turns Form Vibes from a submissions inbox into a complete data management layer. See everything Pro unlocks.
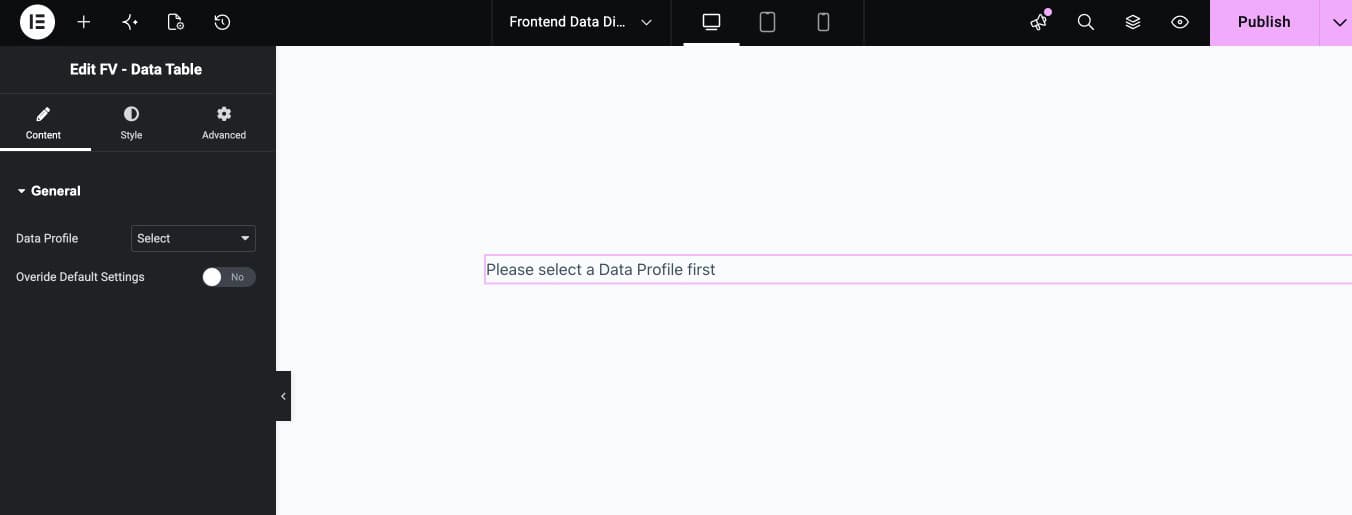
How do you create a Data Profile in Form Vibes?
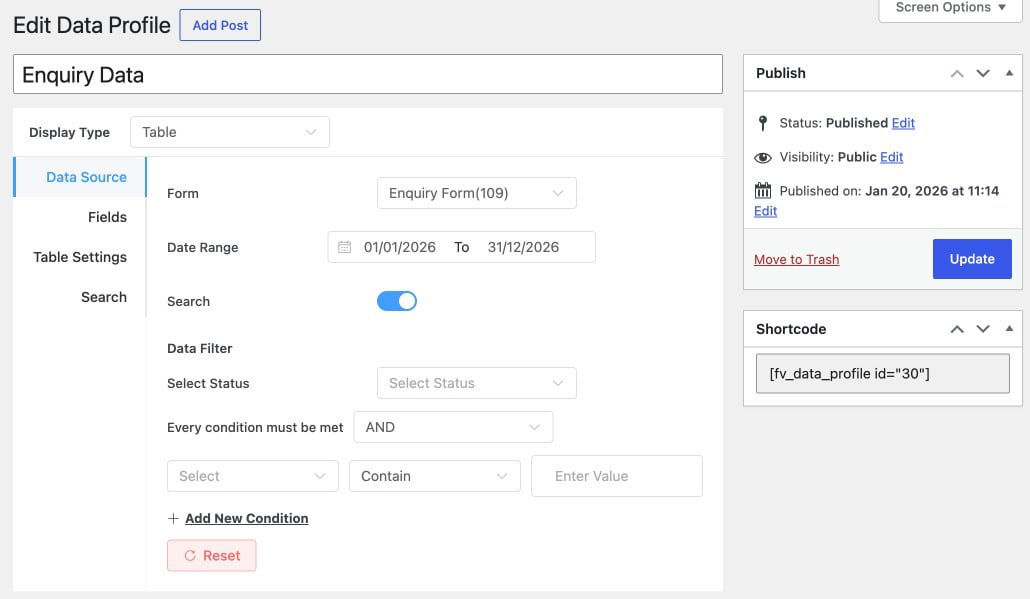
Go to Form Vibes → Data Profile in your WordPress dashboard and click Add New. The first thing to decide is your display type as Table or Counter because each has different configuration tabs. For the full technical reference, see the official Form Vibes Data Profile documentation.
Setting up a Table Data Profile
Table display type has four tabs: Data Source, Fields, Table Settings, and Search.
Data Source tab
This is where you define what data the profile pulls and any filters to apply before display.
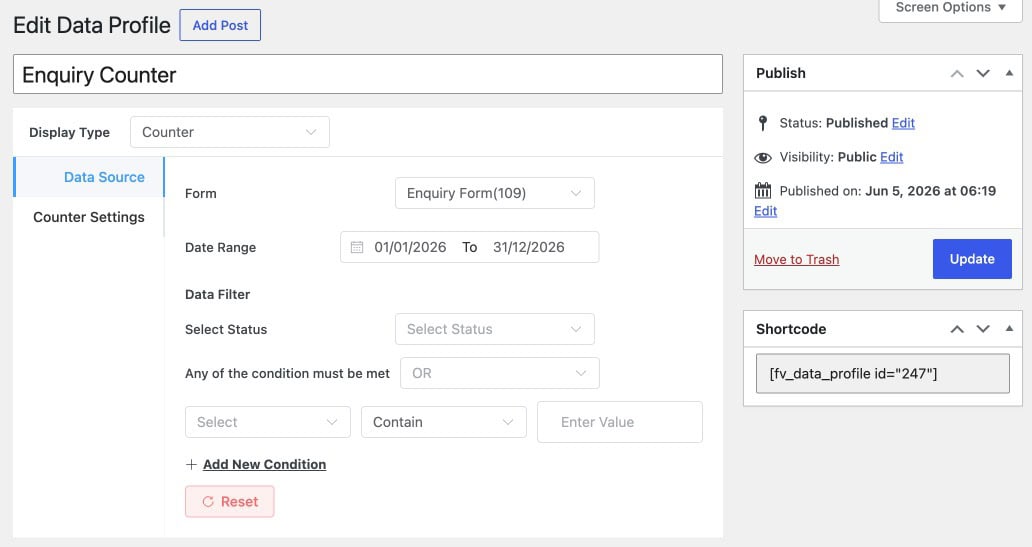
- Form – select the form whose submissions you want to display
- Date Range – set a custom date range (from and to) to control which submissions are included
- Search – toggle this on to enable the Search tab. When this is off, the Search tab is hidden entirely
- Data Filter – filter which submissions appear. Select a Status first, then set field conditions using the Select field → Contain operator → Enter Value row. Use Every condition must be met to set AND or OR logic between multiple conditions. Click + Add New Condition to stack more filters
Fields tab
The Fields tab controls which columns appear in the table and what they are labelled.
Every field from your selected form is listed here with three columns:
- Field Name – the internal field identifier
- Column Label – the heading shown in the table. You can edit this to use a friendlier label for visitors
- Column Visibility – click the eye icon to show or hide that column in the table
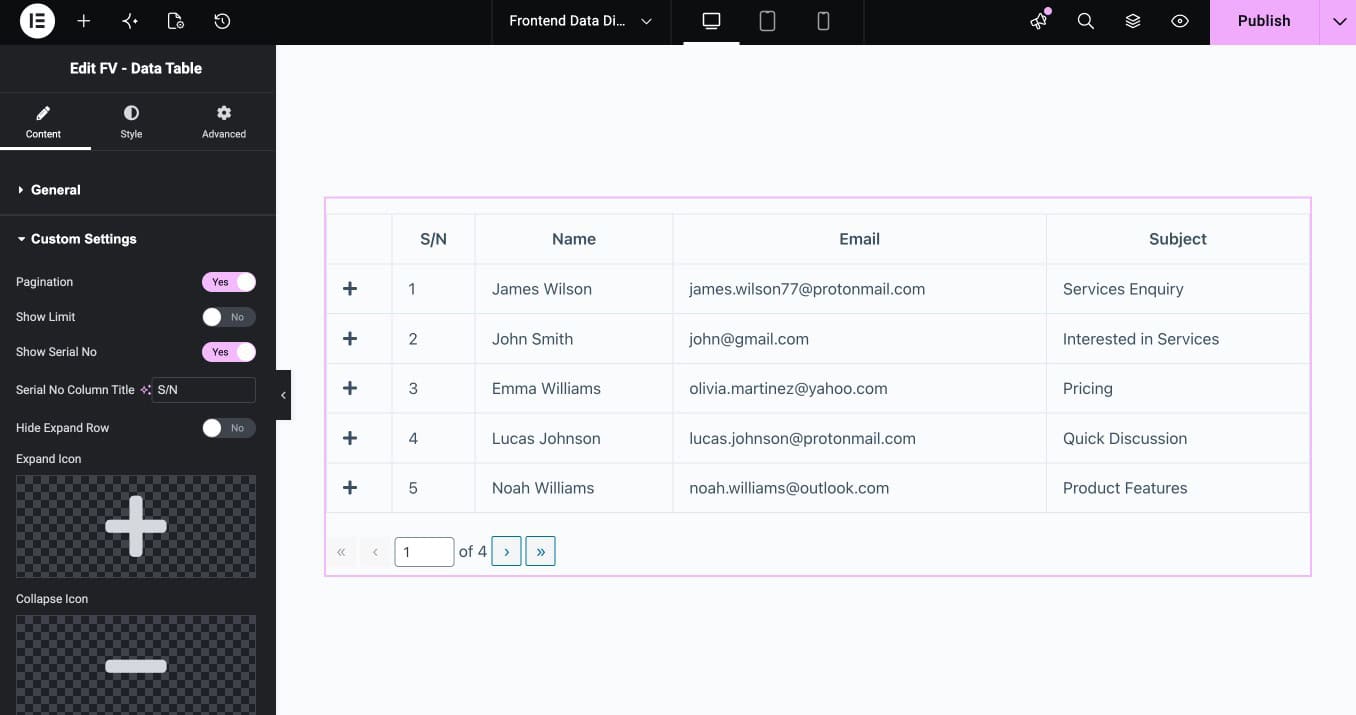
Below the field list, toggle on Show data on row expand to let visitors click any row and see the full submission details in an expanded view. A second field list appears Field to display on row expand where you control which fields appear in that expanded view.
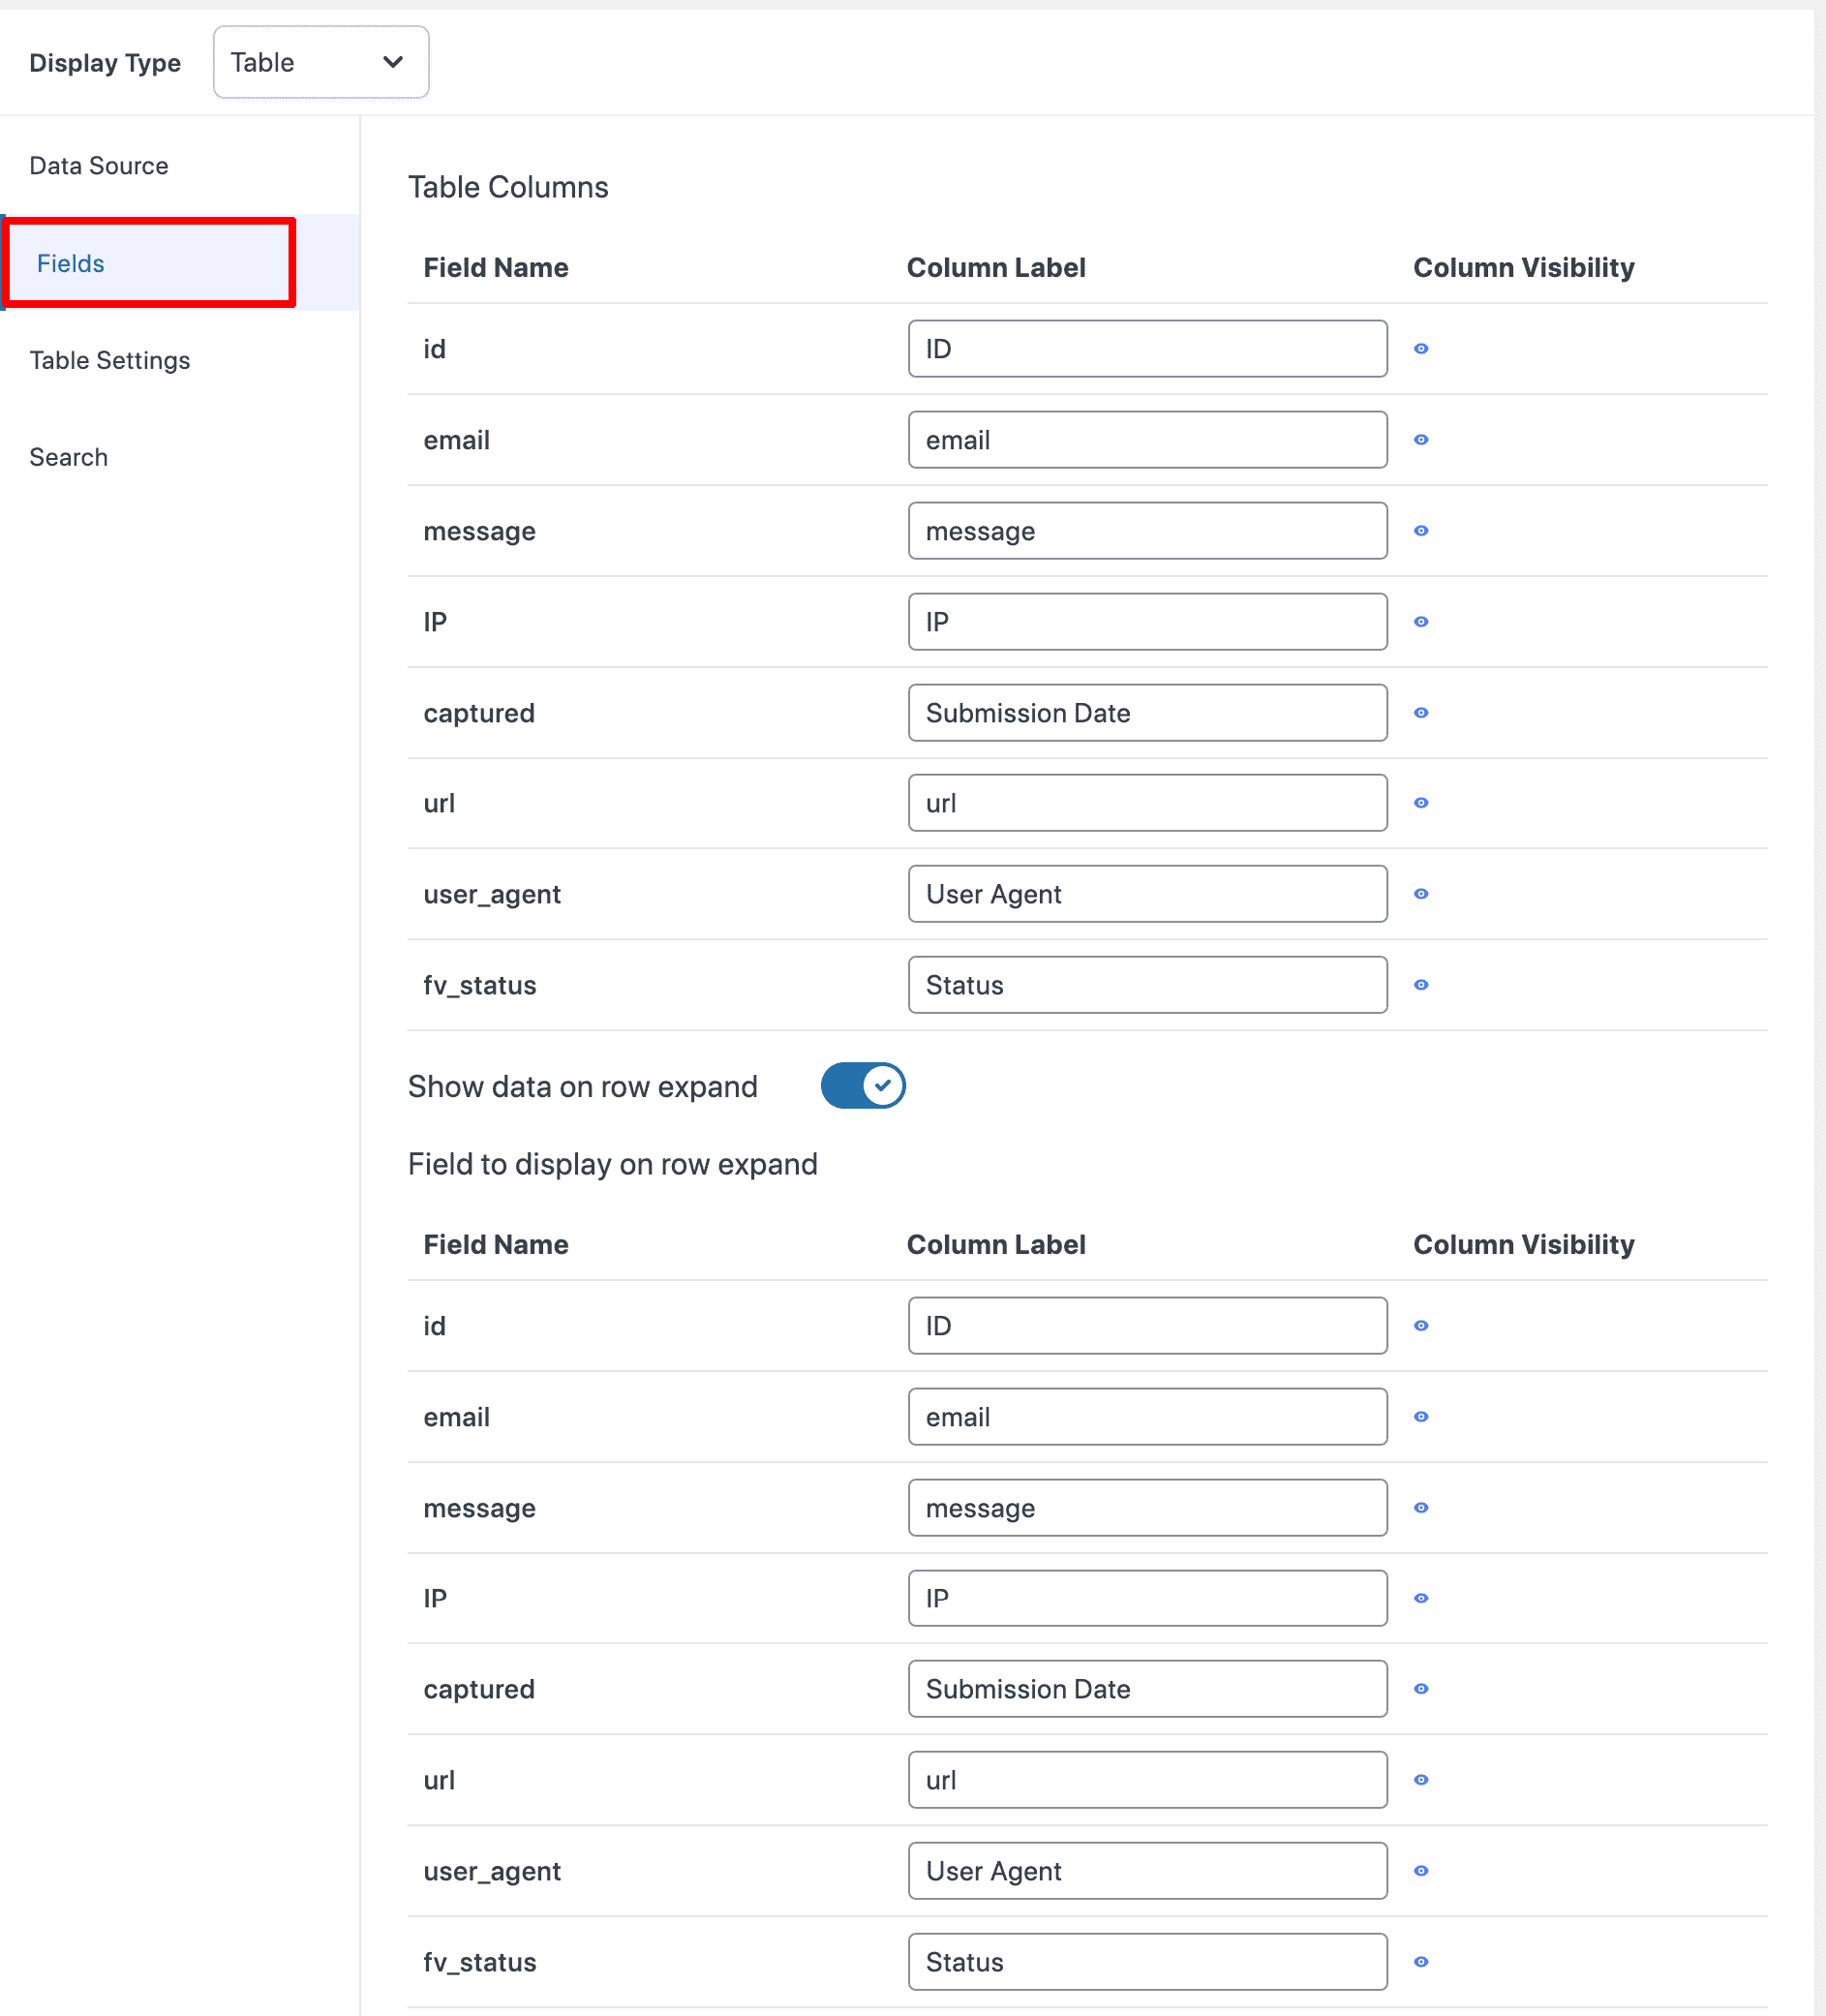
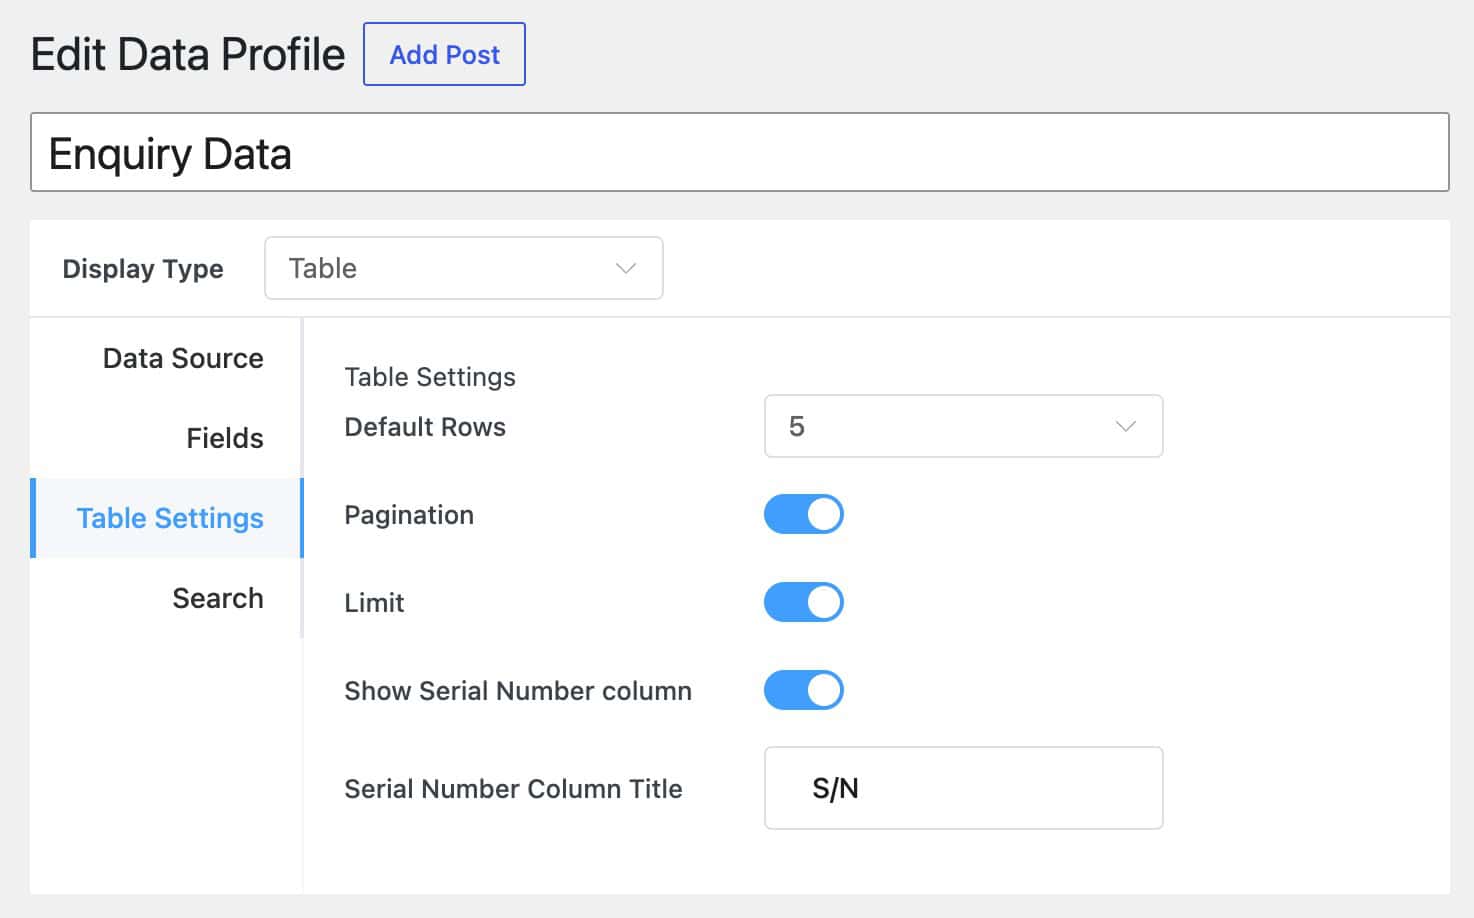
Table Settings tab
The Table Settings tab controls how the table behaves on the page.
- Default Rows – set how many rows appear per page (default is 5)
- Pagination – toggle on to add next/previous page navigation below the table
- Limit – toggle on to set a limit on total rows shown
- Show Serial Number column – toggle on to add a numbered column on the left
- Serial Number Column Title – customise the column header (default is “S/N”)
Search tab
The Search tab configures the live search bar and frontend filters that appear above the table.
- Search Columns – select which fields the search bar queries. At least one must be selected or the search bar will not appear on the frontend
- Search Operator – set the match logic (default: Contain)
- Display filter on frontend = toggle on to show filter dropdowns above the table so visitors can filter entries by field value
- Alignment – set whether the search bar and filters align left, right, or centre above the table
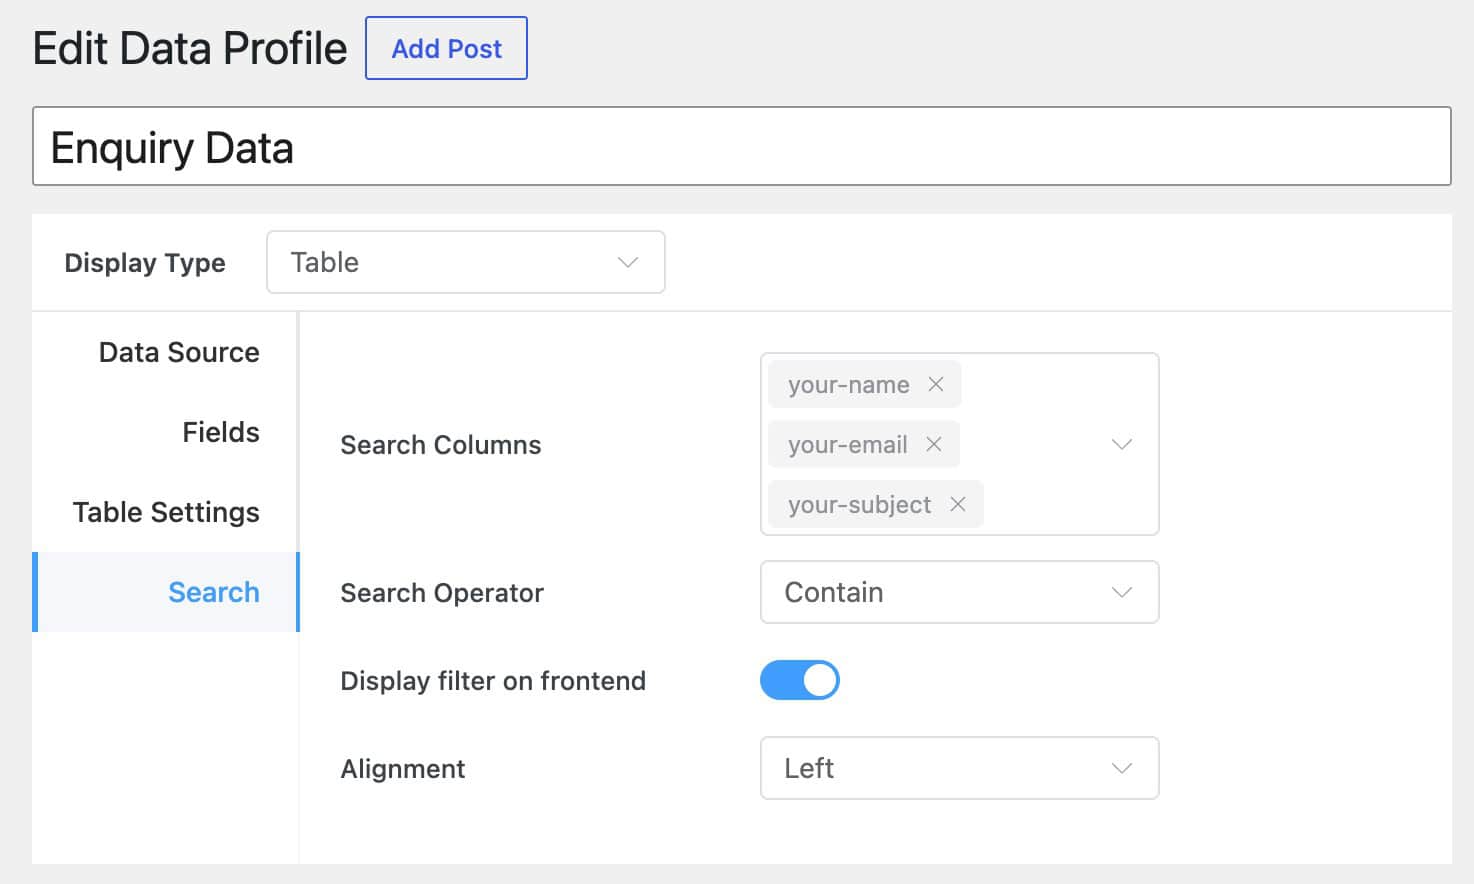
Notes: The Search tab only appears when the Search toggle in the Data Source tab is enabled. If you cannot see the Search tab, go back to Data Source and switch the Search toggle on.
Setting up a Counter Data Profile
Counter display type has two tabs: Data Source and Counter Settings.
Data Source tab
The Data Source tab for Counter works the same as for Table select your form, set a date range, and add data filters to control which submissions are counted. The Search toggle is not available for Counter type.
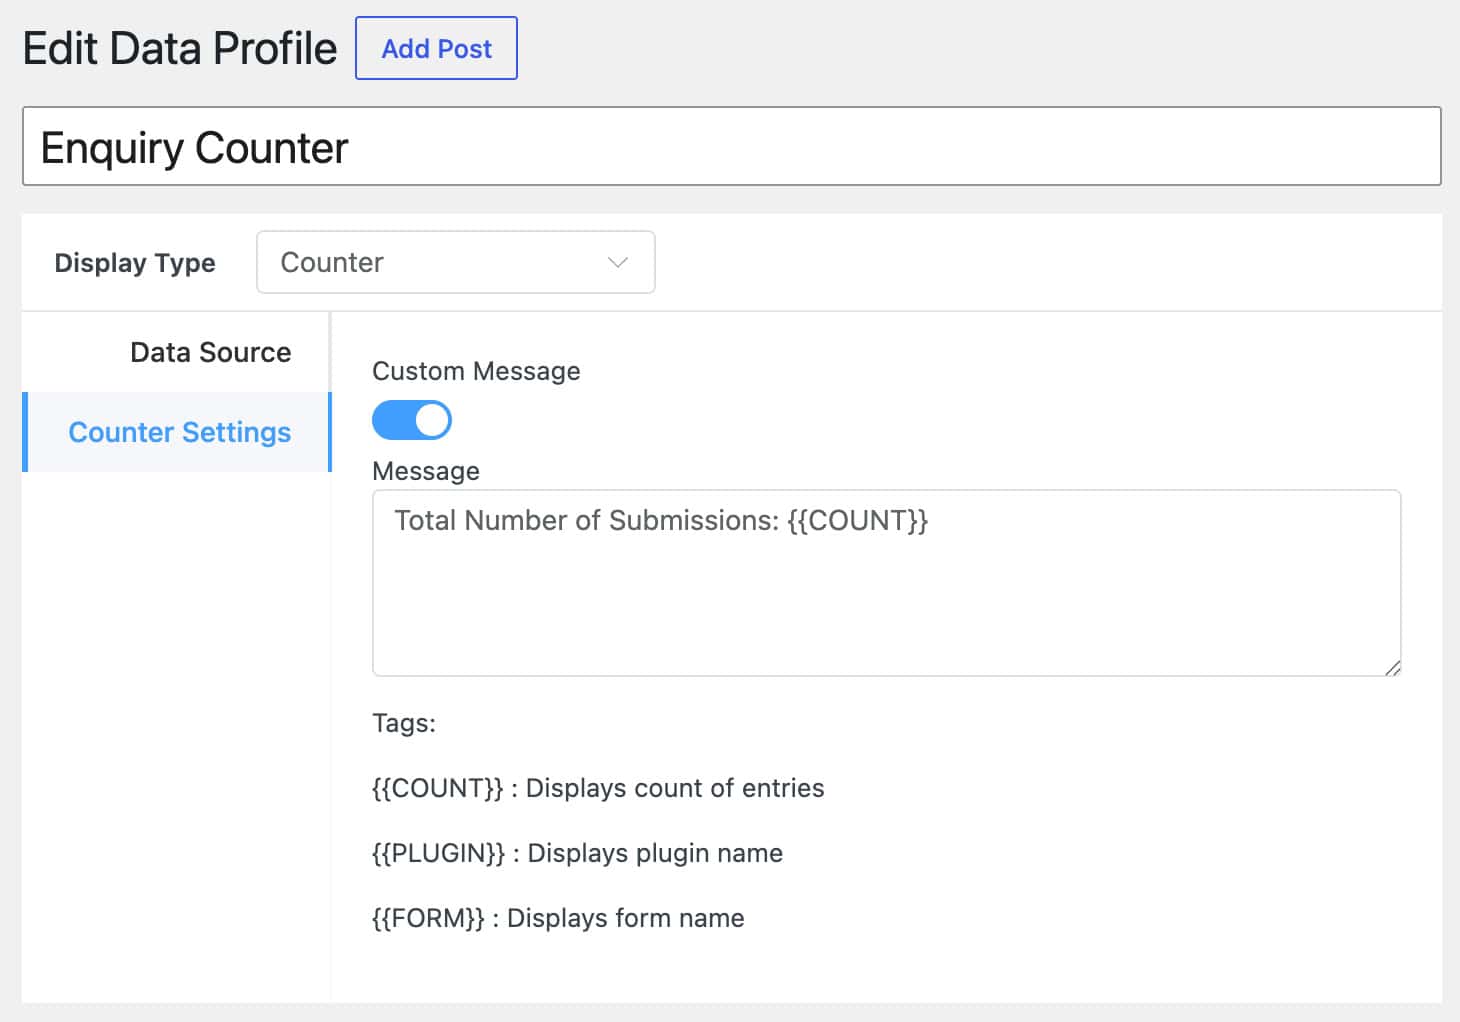
Counter Settings tab
The Counter Settings tab controls what is displayed alongside the count number.
- Custom Message – toggle on to add a message around the count
- Message – write the message you want displayed. Use dynamic tags to insert live values:
{{COUNT}}– inserts the number of matching entries{{PLUGIN}}– inserts the plugin name{{FORM}}– inserts the form name
For example, a message of Total registrations: {{COUNT}} displays as “Total registrations: 47” on the frontend, updating automatically with every new submission.
How do you display the Data Profile on a page?
Once the Data Profile is published, Form Vibes generates a shortcode automatically. There are two ways to embed it on a page.
Using a shortcode
1
Publish your Data Profile & copy the shortcode
Once all tabs are configured, click Publish. Form Vibes generates a shortcode automatically, it looks like [fv_data_profile id="X"]. Copy the shortcode shown on the profile page.

2
Paste onto your page
Go to the page where you want the data displayed. Add a Shortcode block in the WordPress block editor and paste the shortcode.

3
View on the frontend
Visit the page. The table or counter appears exactly where you placed the shortcode with live data from your form submissions.
Using the Elementor widget
If you use Elementor, the FV – Data Table widget gives you more control over placement and styling directly inside the editor.
1
Open page in Elementor and add FV – Data Table widget
Open the target page in the Elementor editor. Search for “FV” in the Elementor widget panel. Drag the FV – Data Table widget onto the page.
2
Select your Data Profile
In the widget’s Content tab, find the General section. Select the Data Profile you created from the Data Profile dropdown. The table loads in the editor preview immediately.
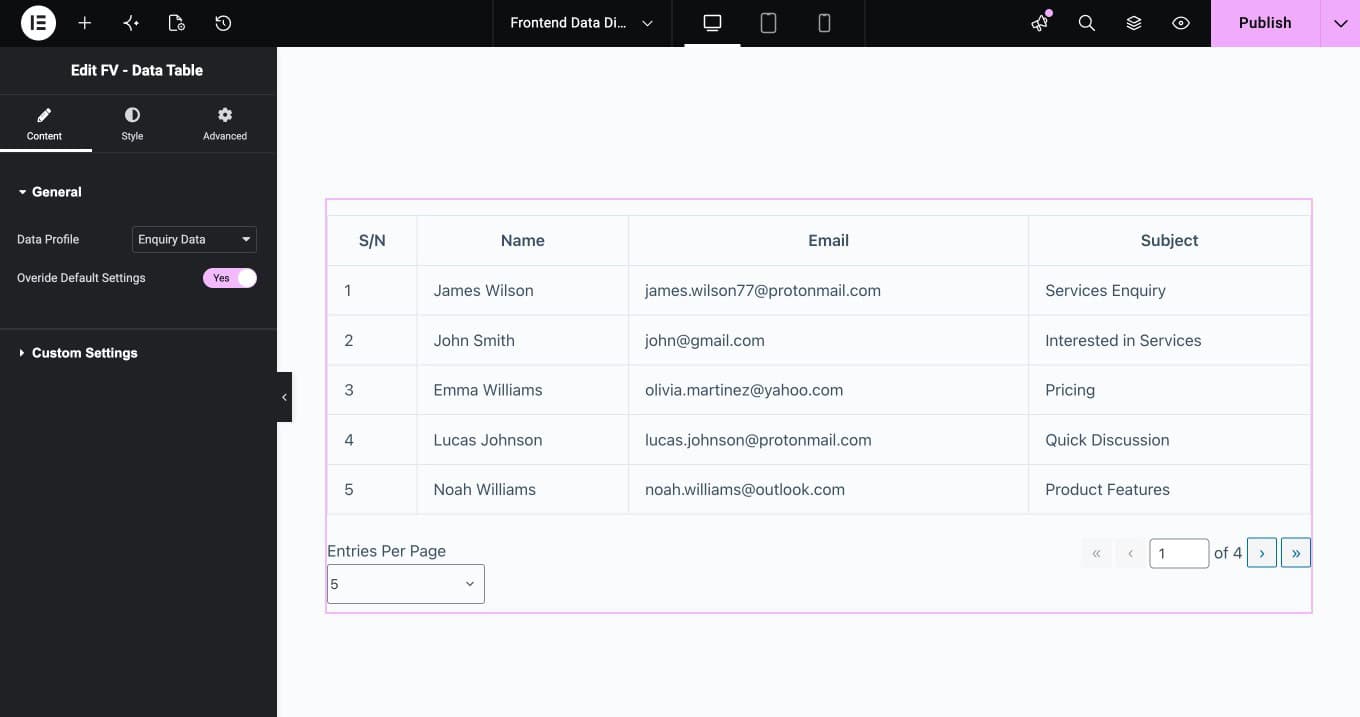
3
Override default settings (optional)
Toggle on Override Default Settings to customise the table behaviour directly in Elementor, you can control pagination, row limit, serial number display, column title, expand row behaviour, and expand/collapse icons without going back to the Data Profile configuration.
4
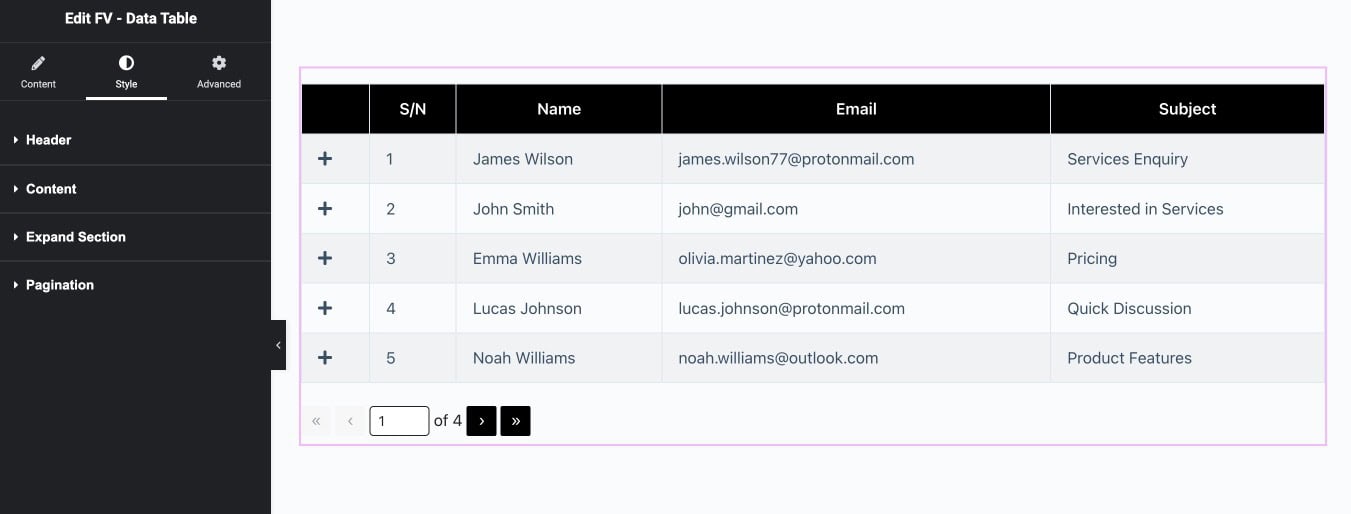
Style the table
Click the Style tab to customise the visual appearance. Four sections are available: Header, Content, Expand Section, and Pagination each with their own colour, typography, and spacing controls and click Publish to make the table live on the page.
5
Publish the Page.
Publish to make the table live on the page.

Tips: When Override Default Settings is off, the widget uses all the settings configured in the Data Profile itself. Turn it on only when you need the table on this specific page to behave differently from the profile defaults.
Conclusion
Data Profiles is one of those features that changes how you think about form submissions. Instead of data that sits in a dashboard waiting to be checked, it becomes live content your visitors and team can actually see and use.
No code, no extra plugin, no manual updates every time a new submission comes in.
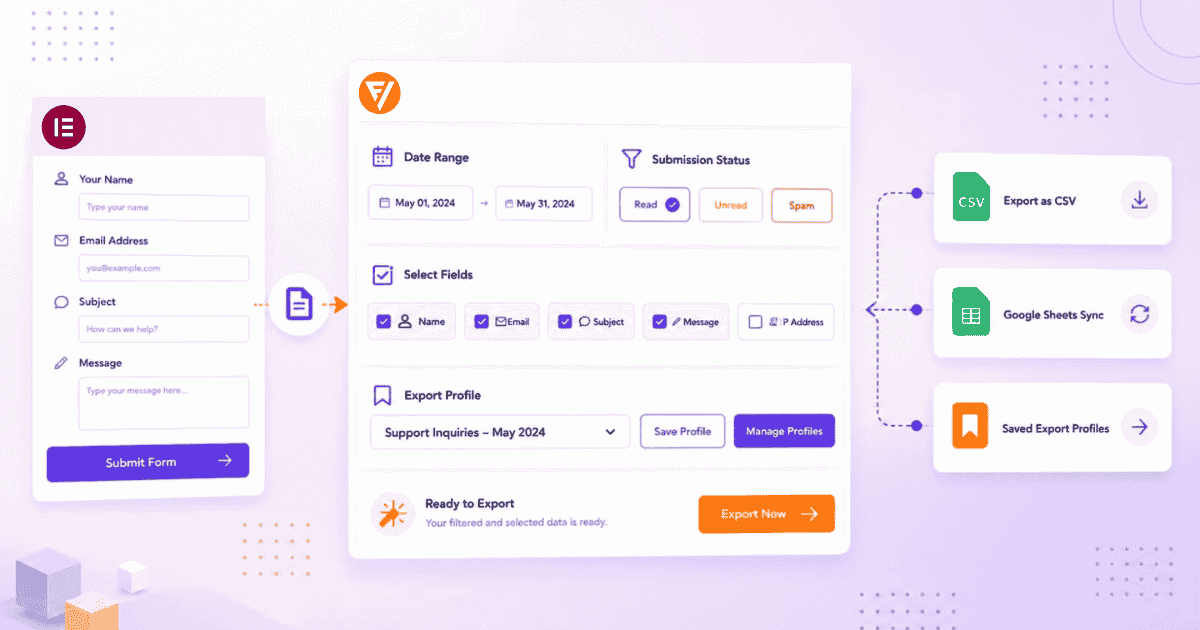
If exporting is more useful for your current workflow, the guide on how to export your form submissions covers every option available in Form Vibes.
Display Your Form Submissions in Frontend
Form Vibes Pro includes Data Profiles, display submissions as a searchable table or counter on any page.
Frequently Asked Questions
Common questions about displaying form submissions on frontend in WordPress.
Is Data Profiles available on the Form Vibes free plan?
No. Data Profiles is a Form Vibes Pro feature. Free users can view and manage submissions inside the WordPress dashboard but cannot display submission data on the frontend. See the Form Vibes Free vs Pro comparison for everything Pro includes.
Can I display submissions from any form plugin not just Elementor?
Yes. Data Profiles works with any form plugin supported by Form Vibes including Contact Form 7, WPForms, Gravity Forms, Ninja Forms, WS Form, and Elementor. You need the form’s submissions saved in Form Vibes first. If you are using Elementor, read the guide on how to save and manage Elementor form submissions to get started.
Can visitors search and filter the displayed submissions?
Yes, for Table display type. Enable the Search toggle in the Data Source tab, then configure the Search tab to set which columns are searchable and whether filter dropdowns appear above the table. The Counter display type does not include a search function.
What is the difference between the Table and Counter display types?
Table displays submissions as rows and columns with optional search, filtering, and pagination. Counter displays a single number showing how many entries match your filter criteria, with an optional custom message using dynamic tags like {{COUNT}}. Use Counter for registration totals or event sign-up counts where the number itself is what matters.
Does the displayed data update automatically when new submissions come in?
Yes. Data Profiles pulls data live from the Form Vibes database. Every new submission that meets your filter criteria appears in the table or updates the counter automatically, no manual refresh or republishing needed.
Leave a Reply