How To Configure Elementor Form To Capture Leads

Elementor Pro’s Form widget lets you build a lead capture form in minutes, fully customisable fields, flexible submission actions, and design controls built directly into the Elementor editor. The harder question is what happens to your leads after someone hits submit.
This guide covers both. The first part walks through building and configuring an Elementor lead capture form from scratch. The second part covers what you need to put in place so that every lead the form collects is permanently captured, filterable, and reviewable in WordPress, not just sitting in an email inbox waiting to be lost.
Before You Start
Elementor Pro licence active – the Form widget is a Pro-only feature
Admin access to your WordPress dashboard
A page ready to place the lead capture form on
Form Vibes installed to your website
Notes: The Form widget is an Elementor Pro feature. It is not available in the free version of Elementor. If you are running Elementor free, you will not see the Form widget in the widget panel.
How Do You Add the Elementor Form Widget to a Page?
Open the page where you want to place your lead capture form in the Elementor editor. This is typically a contact page, a landing page, or a dedicated lead generation page.
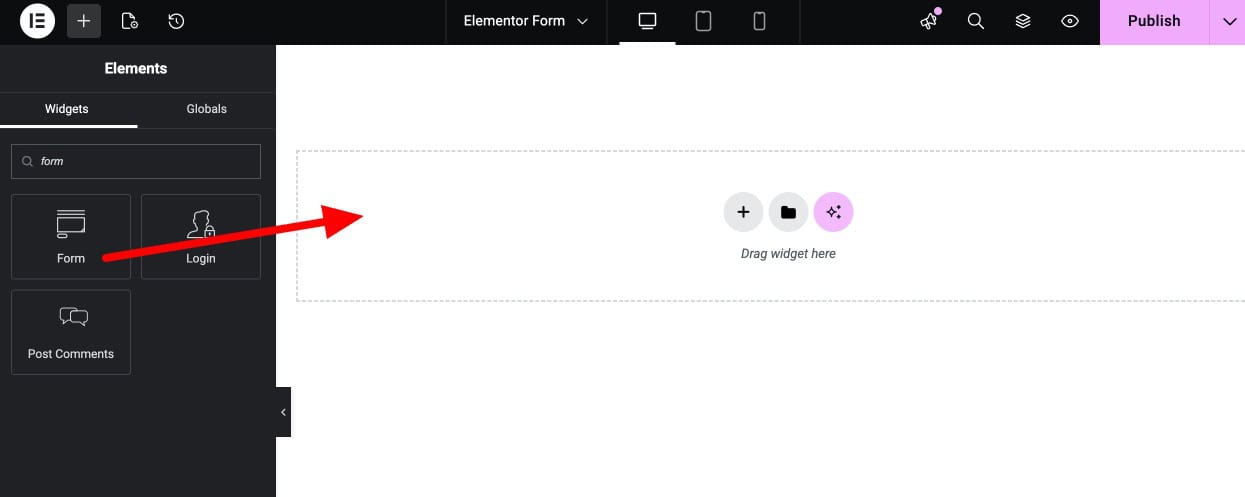
In the Elementor widget panel on the left, search for Form. Drag the Form widget onto the canvas and drop it into your chosen section or column.
Elementor automatically inserts a basic contact form with three default fields – Name, Email, and Message, and a Submit button. This is your starting point.
How Do You Configure Elementor Form Fields?
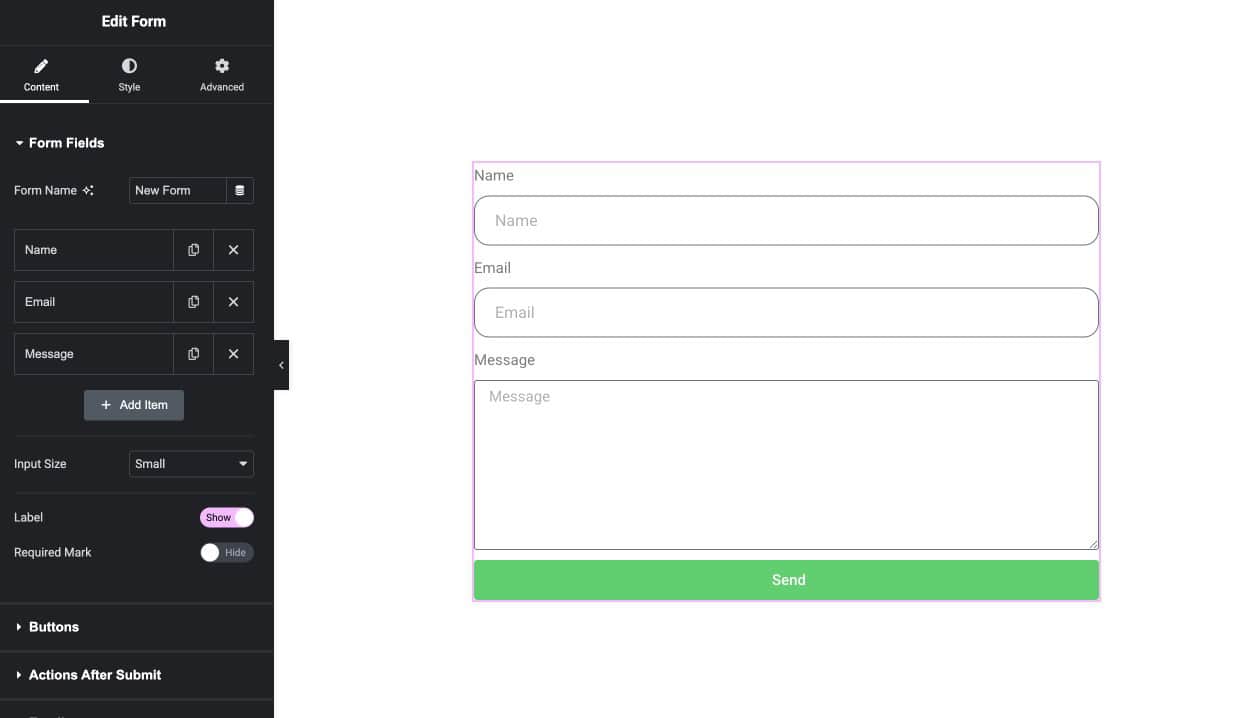
Click on the Form widget in the canvas to open its settings in the left panel. Go to the Form Fields section.
This is where you control exactly what information your leads provide when they fill out the form. Elementor gives you full control over each field:
- Add Item — adds a new field to the form. Choose from field types including Text, Email, Textarea, Select, Radio, Checkbox, Number, Date, File Upload, URL, Password, HTML, and reCAPTCHA.
- Label — the visible label shown above the field on the frontend.
- Placeholder — the greyed-out hint text shown inside the field before the user types.
- Required — toggle this on for any field that must be completed before the form can be submitted. Elementor displays a validation error if a required field is left empty.
- Column Width — controls how wide each field appears. Use this to place fields side by side (e.g., First Name at 50% width and Last Name at 50%).
Tips: Keep your forms short to increase submissions. Ask only for essential details, as adding too many required fields can reduce conversions and users are more likely to abandon lengthy forms.
How Do You Set Up Actions After Form Submission?
Still inside the Form widget settings, go to the Actions After Submit section. This controls what happens the moment a lead hits Submit.
Elementor supports multiple simultaneous actions, you can stack several triggers on the same form submission. Click Add Action to see the full list, which includes Email, Redirect, Webhook, ActiveCampaign, Collect Submissions, and others depending on your Elementor Pro version.
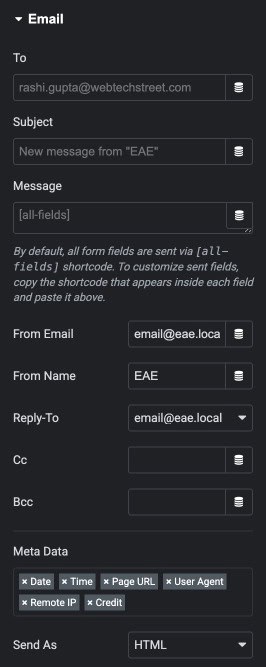
For lead capture, the Email action is the standard starting point. Select it and Elementor reveals the email configuration settings:

- To — the email address that receives the lead notification. Add multiple addresses separated by commas to notify several team members simultaneously.
- Subject — the subject line of the notification email. Use field shortcodes (e.g.,
[field id="name"]) to pull form data into the subject line. - Message — the body of the email. Insert field shortcodes to include all the lead’s submitted data.
- From Email / From Name — the sender details on the notification email.
- Reply-To — set this to
[field id="email"]so clicking Reply in your email client goes directly to the lead’s email address. - CC / BCC — optional fields for copying additional recipients.
How Do You Style Your Elementor Form?
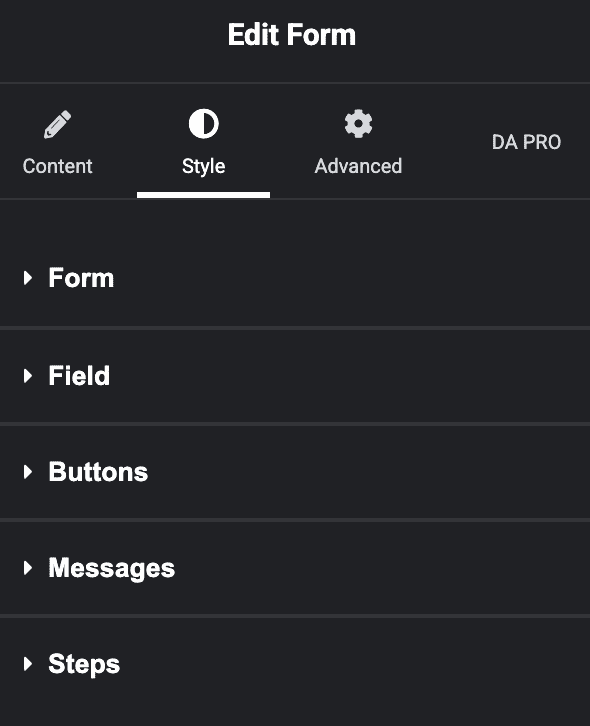
Once the form fields and actions are configured, click the Style tab to customise the form’s appearance.
Elementor gives you styling controls for every visual element of the form: field background colour, border style and radius, typography, label colour and spacing, button size and colour, and the success/error message styling. Use these controls to match the form design to your site’s branding.
Tips: Do not over-style your lead capture form. Clear labels, visible field borders, and a button colour that stands out from the background usually perform better than overly designed forms. Keep the form clean, simple, and easy to understand.
How Do You Publish and Test Your Elementor Form?
Click Publish or Update in the bottom left of the Elementor editor to make the form live. Then open the page on the frontend as a visitor would see it.
Submit a test entry with your own name and email address. Confirm that the email notification arrives in the inbox you configured. Then set up Form Vibes (covered in the next section) to ensure every future lead is captured to the database regardless of whether the email notification delivers successfully.

What Happens to Your Leads After the Form Is Submitted?
When a visitor submits your Elementor form, two things happen. First, the email notification fires and the lead’s details land in your inbox or don’t, if anything goes wrong with delivery. Second, if Elementor Pro’s native Submissions feature is active, a copy of the entry is saved to Elementor’s own submissions table viewable under Elementor > Submissions.
The native Elementor submissions panel covers basic storage and a simple CSV export. What it does not provide is the management layer a real lead workflow needs, no way to filter leads by the specific page or campaign they came from, no status system for tracking which leads have been reviewed, no analytics showing lead volume trends over time, and no action log for team accountability.
Form Vibes adds all of this on top of what Elementor already does without replacing it or requiring any changes to your Elementor form setup.
Your Elementor form is live. Add Form Vibes now so every lead it collects is saved permanently, even if the email notification never arrives.
Key Takeaway:
Elementor stores your leads. Form Vibes makes them actually manageable. If you have a team reviewing leads, run multiple forms, or want to see how your forms are performing over time – Form Vibes is the solution.
How Do You Manage Elementor Leads with Form Vibes?
Install Form Vibes from the WordPress plugin directory (Plugins > Add New, search “Form Vibes”, activate). From that moment, every Elementor form submission is captured automatically to the Form Vibes database and is available at Form Vibes > Submissions.
No changes are needed to your Elementor form. Form Vibes hooks into the Elementor submission event at the plugin level.

How Do You Find Leads from a Specific Campaign or Page?
If your Elementor form is embedded on multiple pages, a general contact page, a campaign landing page, and a blog post sidebar, for example – you need a way to separate leads by source. Form Vibes solves this with Page URL capture.
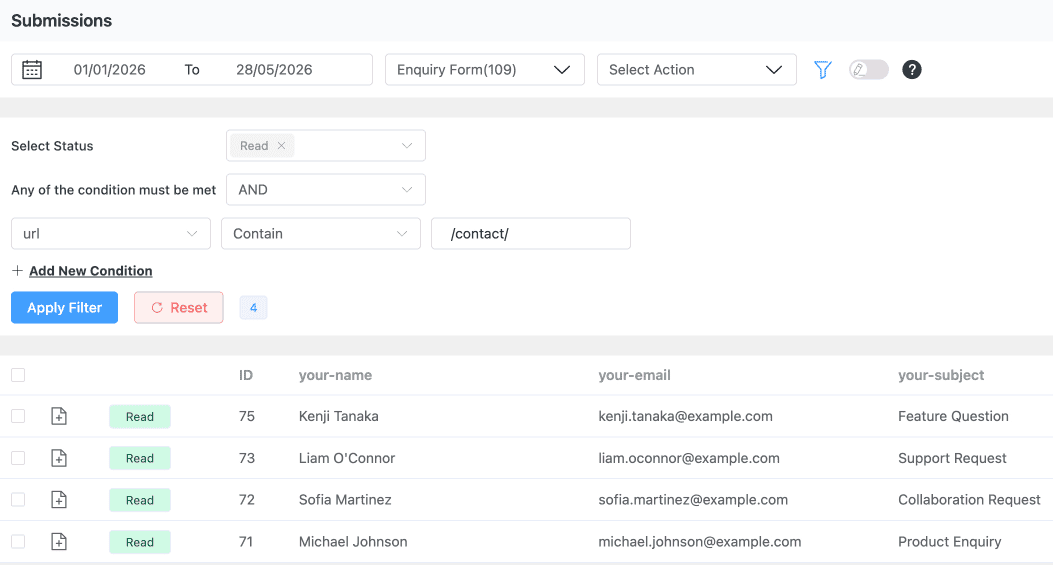
Enable Save Page URL under Form Vibes > Settings. From that point, every captured lead includes the full URL of the page where the form was submitted. You can then filter the submissions table by URL to isolate leads from a specific landing page, PPC campaign, or A/B test variant.
Form Vibes Pro’s advanced filtering goes further, filter by any specific form field value using AND/OR logic between multiple conditions. For example: show only leads submitted in the last 90 days where the page URL contains “/contact/” and whose status is “Read”.
How Do You Mark Which Leads You Have Reviewed?
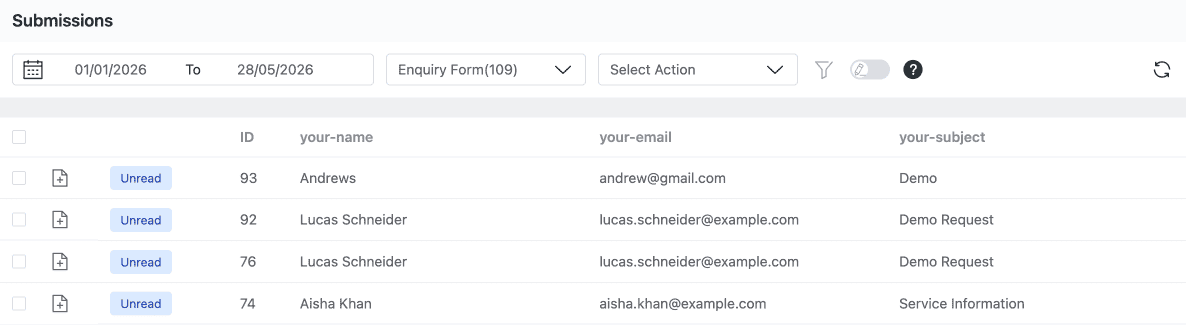
When new leads come in daily, you need a way to track what has been handled and what still needs attention. Form Vibes Pro’s Submission Status feature adds Read, Unread, and Spam states to every entry.
Filter the submissions table to show only Unread entries and work through new leads in order. Mark each one as Read once actioned. Flag obvious spam entries as Spam before deciding whether to delete them. All of this can be done individually per entry or in bulk for multiple entries at once using the row checkboxes and bulk action selector.
Pro: Submission Status (Read, Unread, Spam) is a Form Vibes Pro feature. Page URL capture, date range filtering, CSV export, analytics, and the Event Log are all included in the free version
How Do You Remove Test Entries and Spam Leads?
Test entries submitted during form setup and spam leads that pass Elementor’s validation should be cleared from the submissions table to keep your lead data clean.
Select entries using the row checkboxes individually or all at once and use the bulk delete action to remove them. Every deletion is recorded in the Form Vibes Event Log with a timestamp, so there is always a traceable record of what was removed and when.
Conclusion
Elementor Pro makes building a lead capture form straightforward, add the Form widget, configure your fields and email action, style it to match your site, and publish. The leads start coming in from that point.
What Form Vibes adds is the management layer: every lead permanently stored in your WordPress database, filterable by page source, trackable by review status, cleanable with logged deletions, and measurable with analytics charts. The two tools work alongside each other, nothing in Elementor needs to change.
Need a deeper look at everything you can do with Elementor form submissions once they are stored? See the complete guide on how to save and manage Elementor form submissions in WordPress.
Build the Elementor form & Capture Every Lead
Free to install. Works alongside Elementor Pro without touching your existing forms. Every lead permanently stored, filterable by source, and measurable from the first submission.
Frequently Asked Questions
Common questions about configuring Elementor form in WordPress.
Do I need Elementor Pro to use Form widget?
Yes, the Form widget is available on Elementor Pro plans.
Can I create multi-step forms using Elementor?
Yes. Elementor allows you to create multi-step forms using the Steps field. This helps break long forms into multiple sections, improving user experience and increasing form completion rates.
How do I make a field required in Elementor forms?
To make a field mandatory, enable the Required option inside the field settings. This prevents users from submitting the form unless the field is filled.
Where can I view Elementor form submissions?
You can view form submissions inside the WordPress dashboard under Elementor → Submissions. If you need advanced management options like filtering, exporting, and analytics, you can use tools such as Form Vibes.
How can I create a post using Elementor’s Form directly from the frontend?
To create a post using Elementor’s Form directly from the frontend, you need to download the Addon Elements for Elementor plugin. Once installed, follow our article and video tutorial for step-by-step guidance


Leave a Reply