A Complete Guide to Using Ninja Forms in WordPress
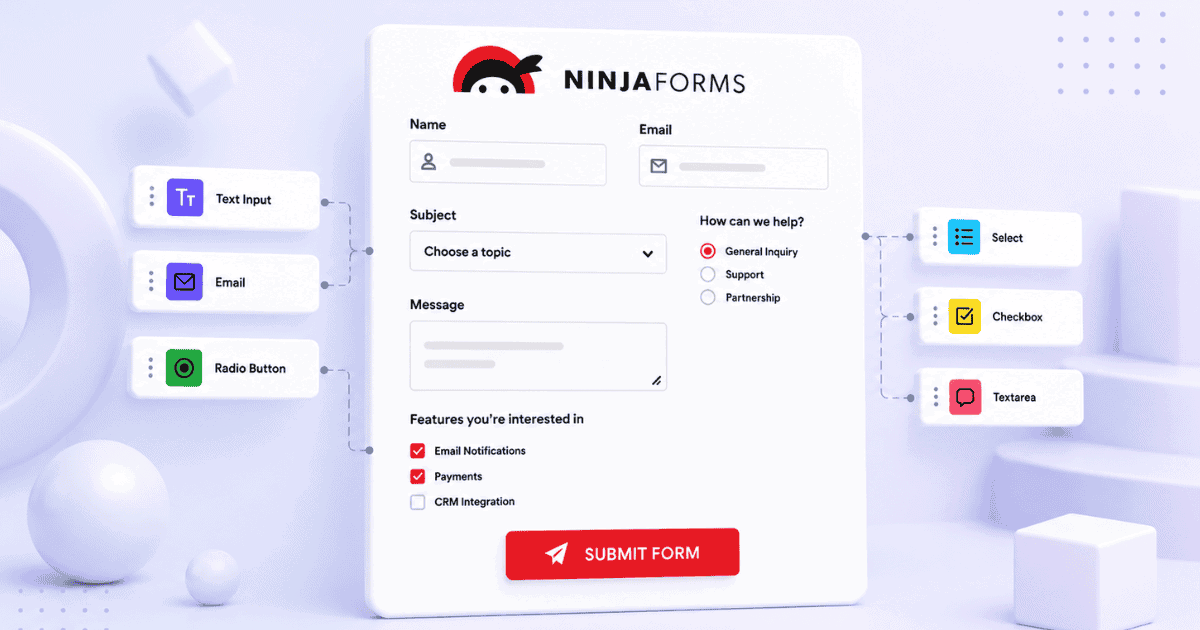
Ninja Forms is one of the oldest and most flexible form builders for WordPress. Its core is genuinely free and capable, a drag-and-drop builder, ready-made templates, built-in submission storage, bulk export across multiple forms, and email workflows are all available without a paid plan.
This guide covers the complete Ninja Forms workflow from installation through to submission management. The final section covers what Form Vibes adds for sites that need analytics, cross-plugin submission management, and team review workflows on top of what Ninja Forms already provides.
Before You Start
Admin access to your WordPress dashboard
At least one page or post ready to embed your form on
Form Vibes installed and active
What Do You Need to Get Started with Ninja Forms?
Install Ninja Forms from the WordPress plugin directory. Go to Plugins > Add New, search for “Ninja Forms”, click Install Now, then Activate. Once activated, a Ninja Forms menu item appears in your WordPress admin sidebar.
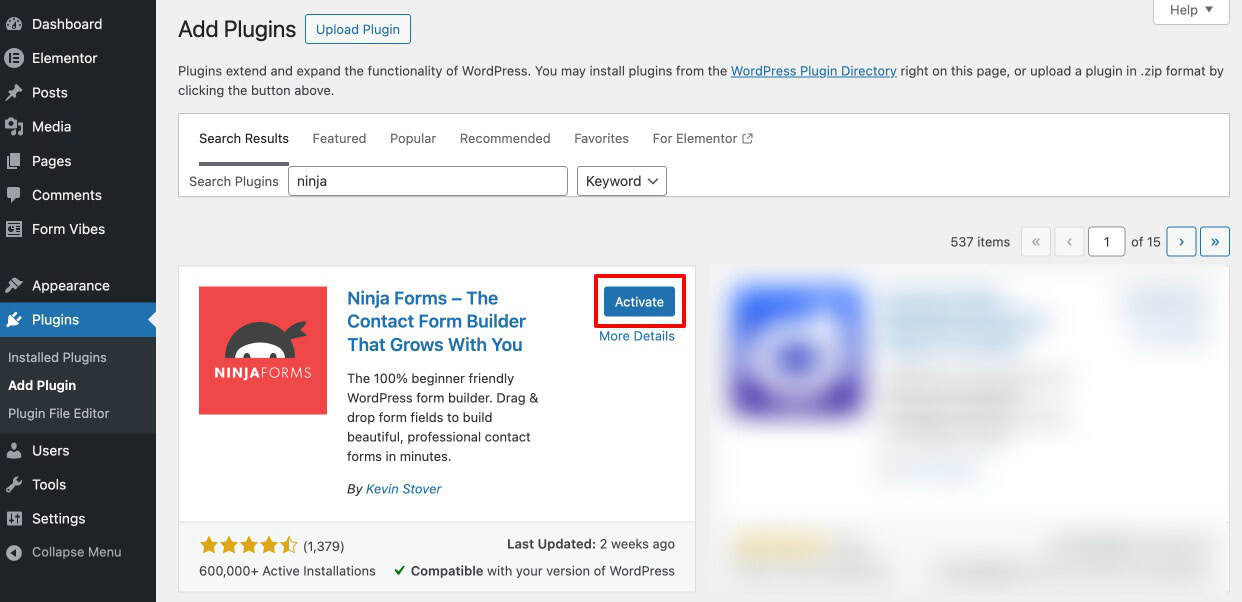
Notes: Ninja Forms offers both free and premium features. The free version is suitable for basic forms, while advanced features like Conditional Logic, file uploads, and provide premium add-ons.
How Do You Create a New Form in Ninja Forms?
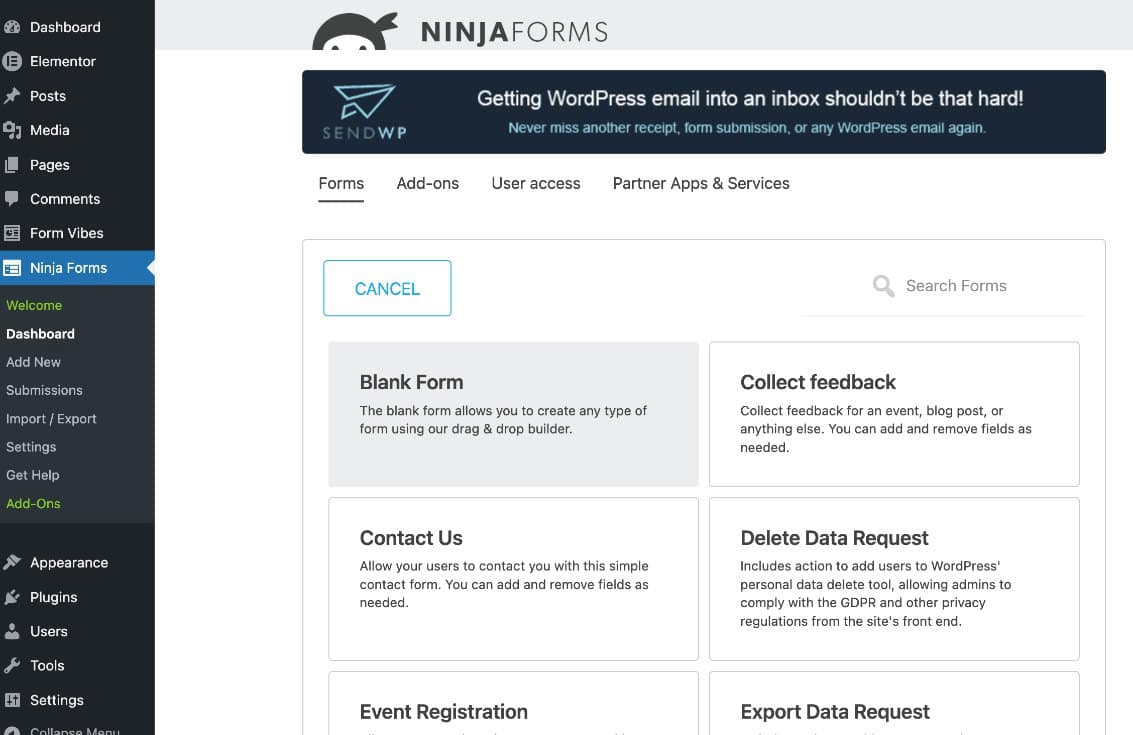
Go to Ninja Forms > Add New. The template selection screen presents several templates – Contact, Request a Quote, Registration Form, and others. Templates preload commonly used fields and basic settings, saving setup time. Select Blank Form if you prefer to build from scratch.
Customising Your Form Fields
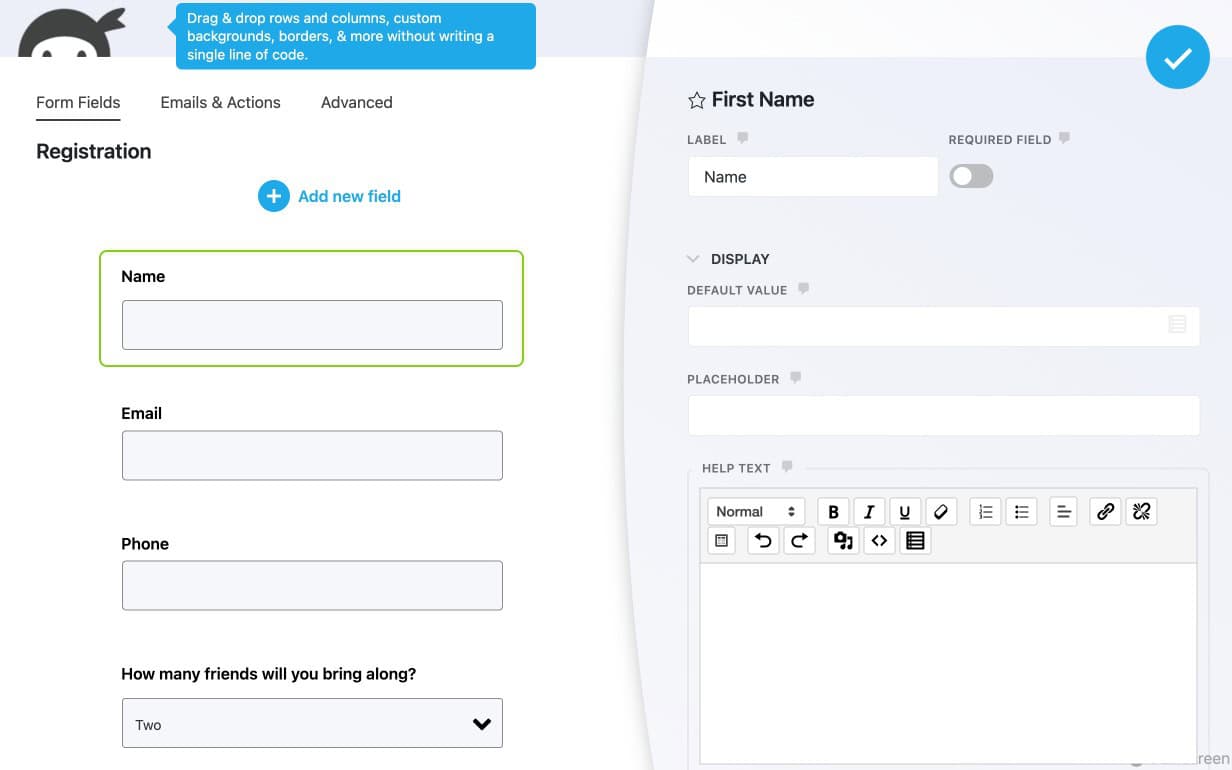
Once inside the form builder, add fields from the field panel on the right. Drag and drop fields into position on the canvas or click to add them. Click any field to open its settings — configure the label, placeholder text, required toggle, and validation rules. The builder updates in real time as you make changes.
Tips: Avoid adding unnecessary fields to your forms. Shorter forms are usually easier to complete and can improve submission rates.
What Happens After a Visitor Submits a Ninja Form?
In Ninja Forms, post-submission behaviour is managed inside the Emails and Actions tab of the form builder. This is where you control what happens the moment a visitor hits Submit. Multiple actions can be active on the same form simultaneously.
The following actions are available:
- Success Message displays a confirmation message to the visitor after a successful submission. Configure the message text to set clear expectations — “We will be in touch within one business day” is more useful than a generic thank-you.
- User Email Confirmation sends an acknowledgement email to the visitor who submitted the form. Configure the To field using the email field from your form, and write a brief confirmation message in the body.
- Admin Email Notification sends the submission details to the site administrator or any designated recipient. Configure the subject line, recipient address, and message body. Use merge tags to pull submitted field values into the email dynamically.
- Record Submission saves the form entry to the WordPress database. This action is enabled by default on all new forms. Disabling it means submissions are sent by email only with no database backup — leave it enabled.
- Redirect sends the visitor to a specific page or external URL after a successful submission. Use this to direct leads to a thank-you page, a booking confirmation, or a downloadable resource.
- Export Data Request allows visitors to request a copy of the data they have submitted. This is relevant for sites with GDPR obligations.
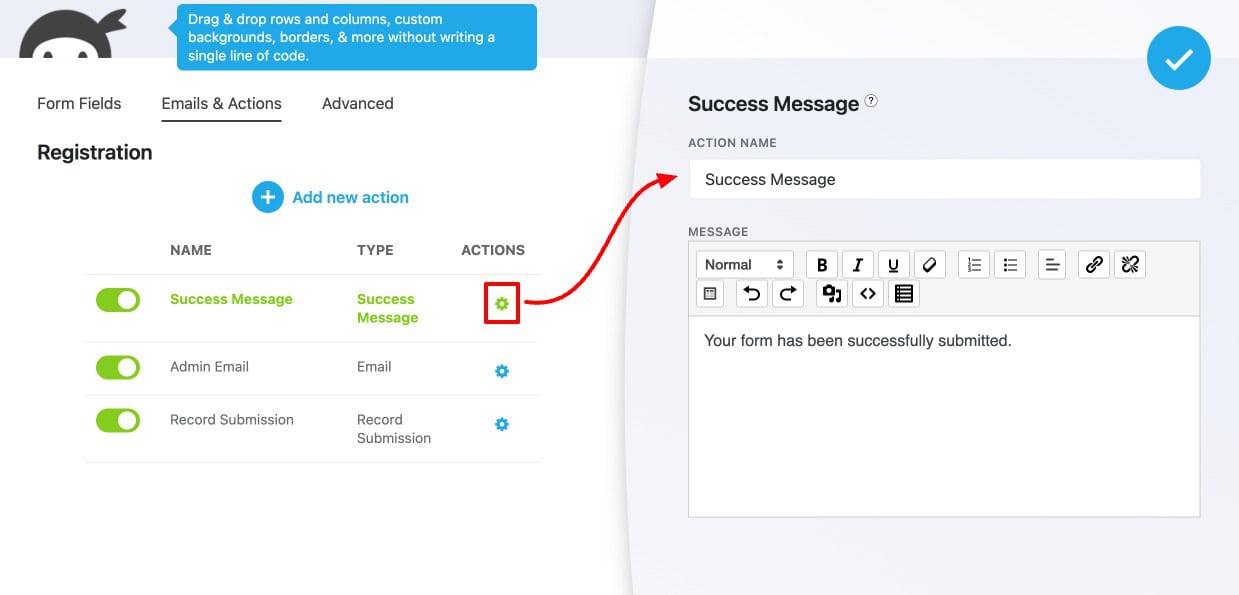
Additional actions can be added using the Add New Action button, giving you flexibility to build custom submission workflows.
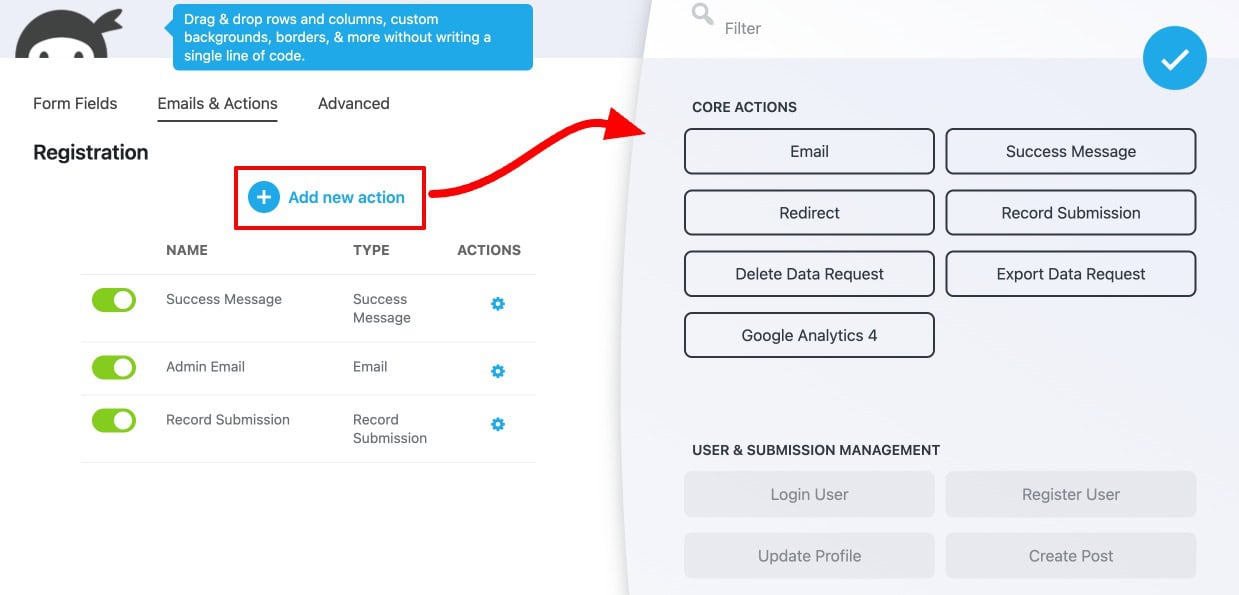
Tips: Do not disable the Record Submission action unless you have a specific reason to do so. If email delivery fails and Record Submission is off, that entry is permanently gone with no way to recover it.
Form Vibes captures Ninja Forms submissions after the plugin is installed. Any new entries submitted afterward are stored safely in the Form Vibes dashboard, even if email notifications fail.
What Does Ninja Forms’ Built-in Submission Manager Offer?
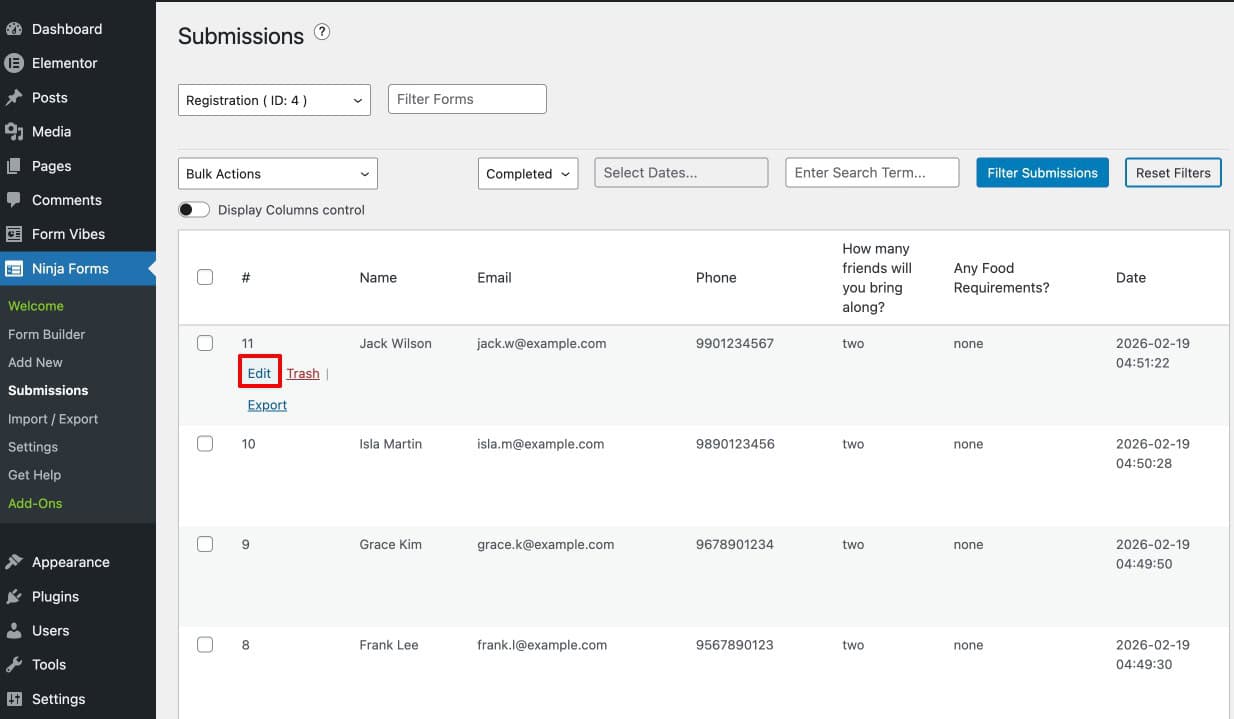
Go to Ninja Forms > Submissions to access entries from all your forms. The submission manager covers several tools for reviewing and working with your data.
View and Edit Submissions
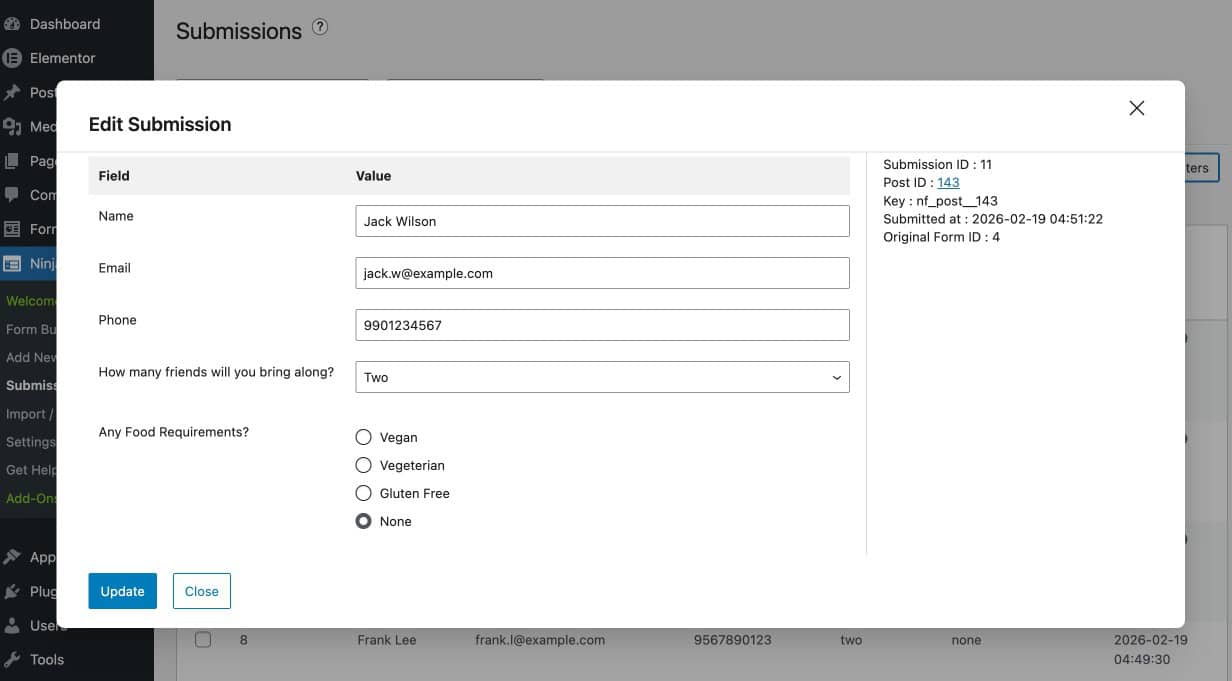
Click on any entry to open its full detail view. Ninja Forms allows you to edit submission data directly from the dashboard — click the edit button on any submission, make your changes in the popup that appears, and click Update to save.
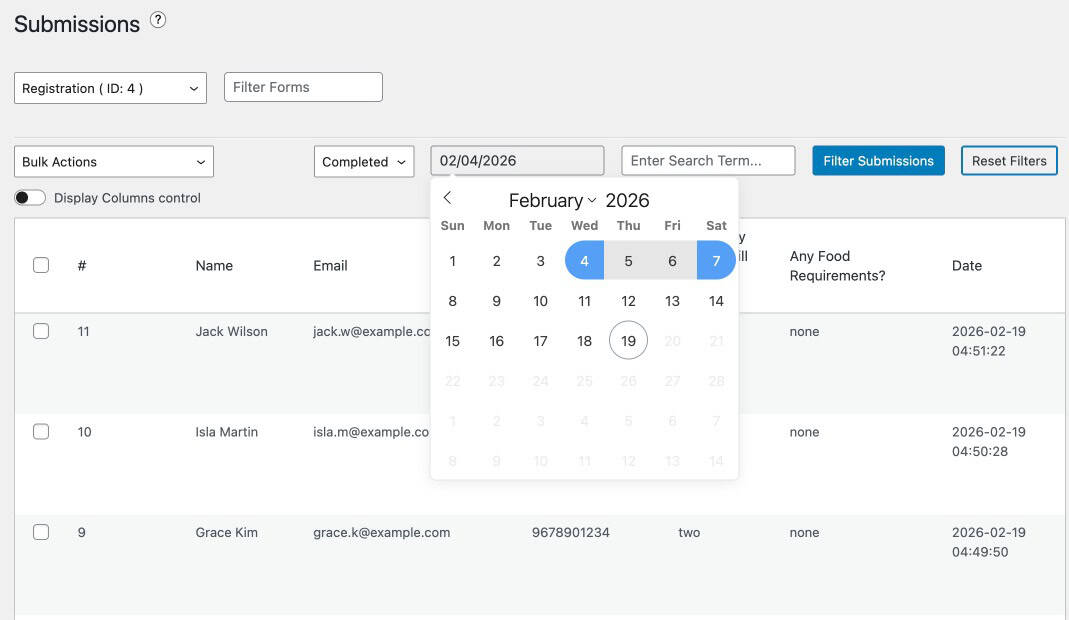
Filter Submissions by Date Range
If your forms receive a high volume of entries, use the date range filter at the top of the Submissions page to narrow results to a specific period. This is useful for reviewing entries from a campaign, checking activity over a specific month, or identifying a submission from a known date.
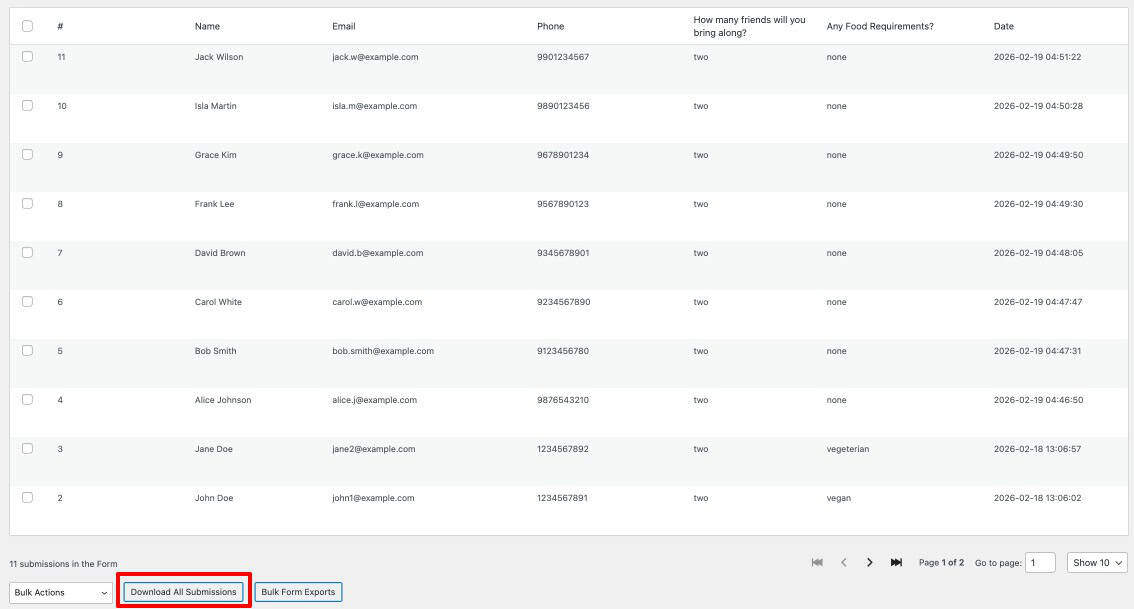
Download All Submissions
Click the Download All Submissions button at the bottom of the Submissions page to download a CSV file of all entries for the currently selected form. Use this for backups, reporting, and sharing data with your team.
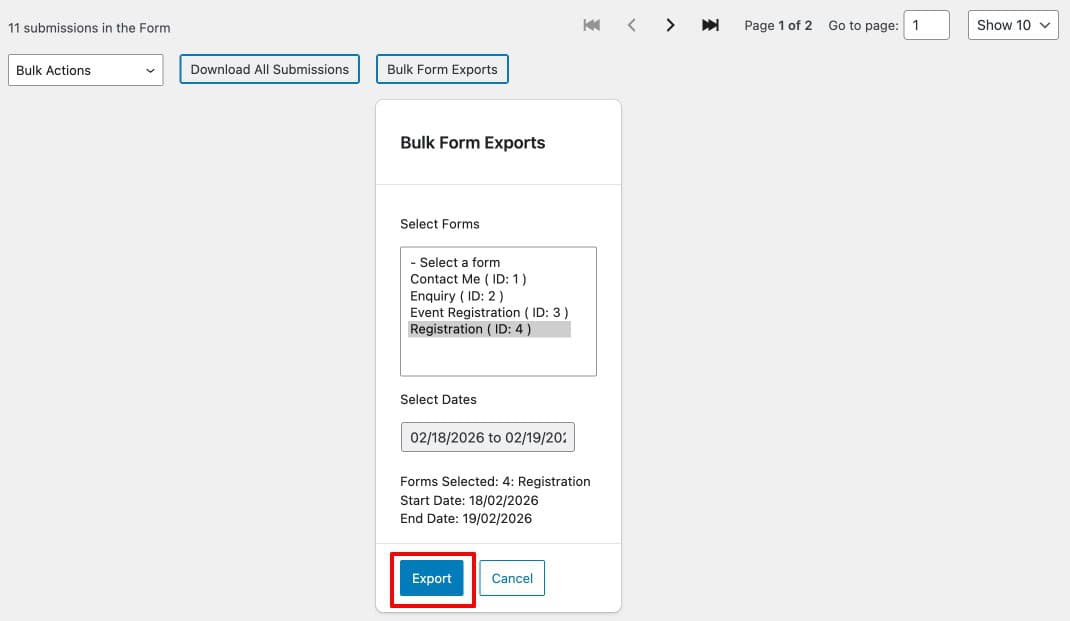
Bulk Export Across Multiple Forms
Ninja Forms provides a bulk export tool that lets you select multiple forms and export their submissions within a chosen date range in a single action. Click Bulk Form Export, select the forms whose data you want, set the date range, and click Export.
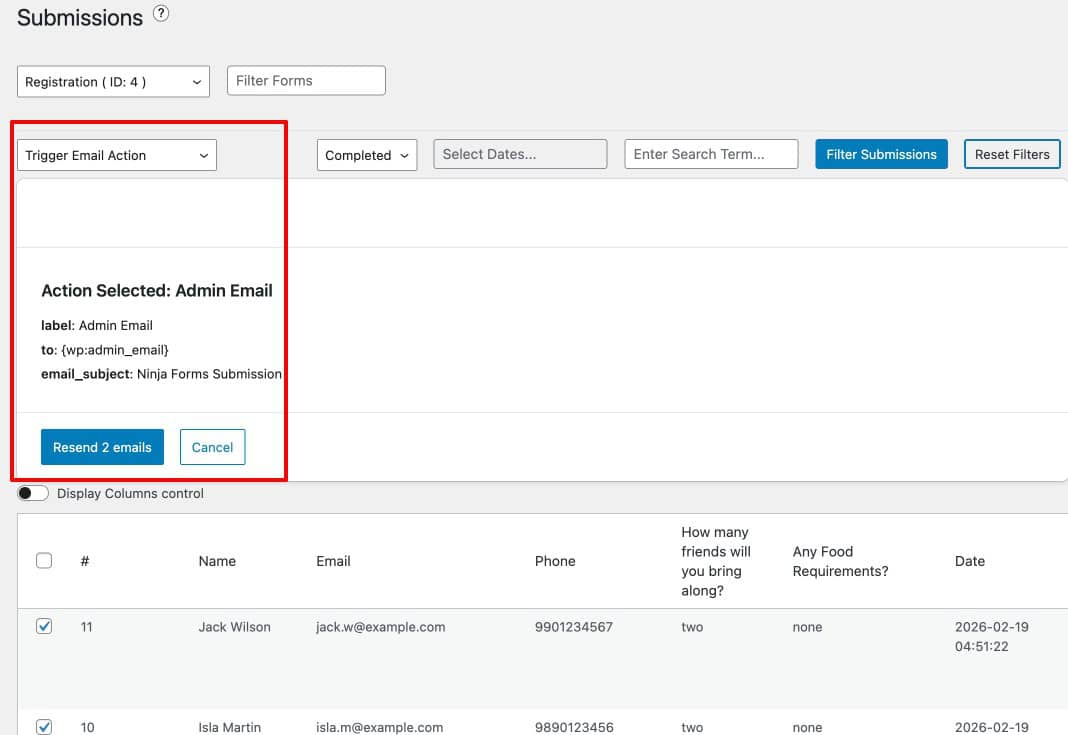
Re-trigger Email Actions
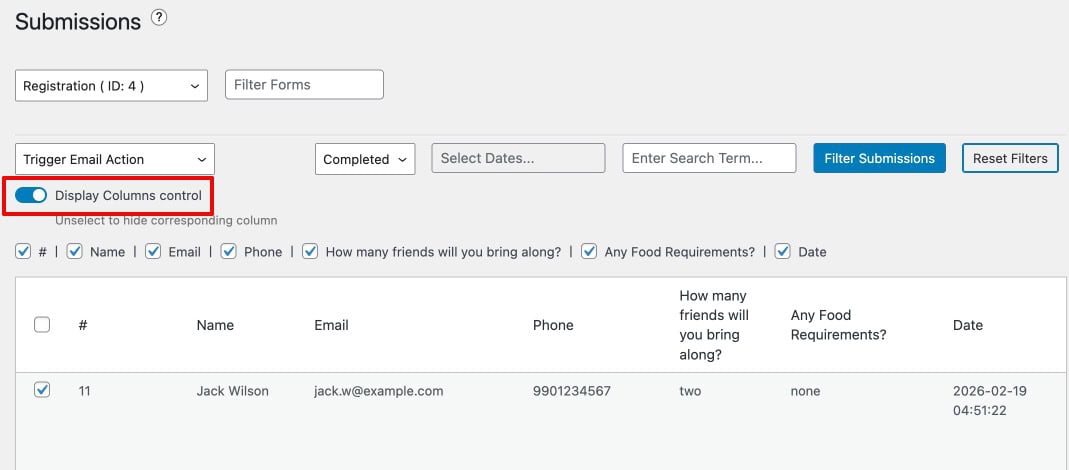
If you need to resend a submission notification, go to Submissions, select the entry or entries, choose Trigger Email Action from the Bulk Actions dropdown, and confirm. If the form has multiple email actions, Ninja Forms presents a selection window so you can choose which specific email to resend.
Column Display Controls
Use the Column Display Controls to show or hide specific fields in the submissions table. This reduces clutter when a form has many fields and lets you focus on the columns most relevant to your review workflow.
How Do You Import and Export Ninja Forms?
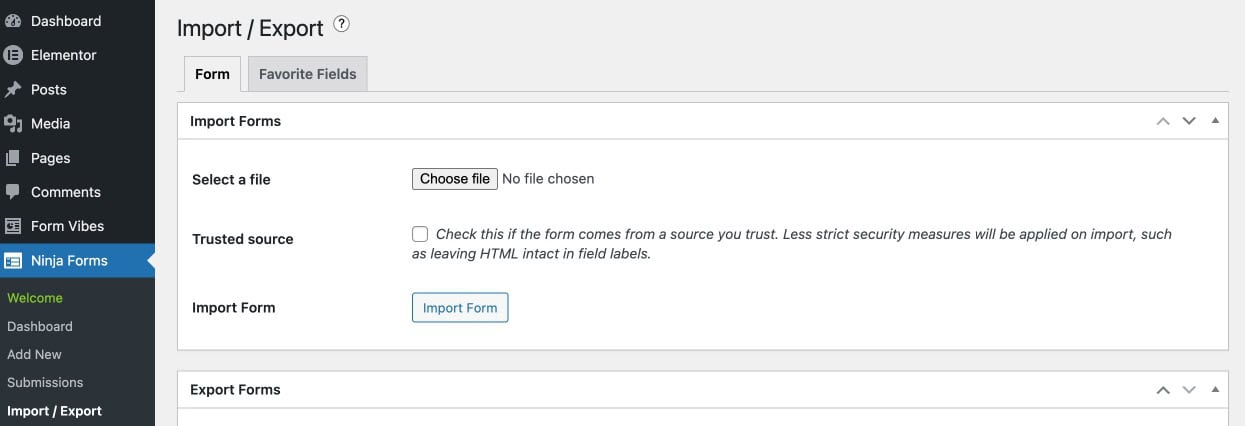
Go to Ninja Forms > Import/Export to access the form transfer tools.
Import Forms
To import a previously exported Ninja Form, upload the exported file on the Import/Export page and complete the import process. The imported form appears in your Forms list and can be edited immediately.
Export Forms
Under the Export Form tab, select the form you want to export and click the Export Form button. Ninja Forms downloads the form as a file that can be imported on any other WordPress site.

Import & Export Form Fields
Ninja Forms also allows you to import and export individual form fields using the Favorite Fields tab. This lets you reuse custom fields across forms and sites without recreating them manually.

How Do You Display Ninja Forms on Your Website?
After creating and configuring your form, Ninja Forms provides two methods for embedding it on any page or post.
Display Using Shortcode
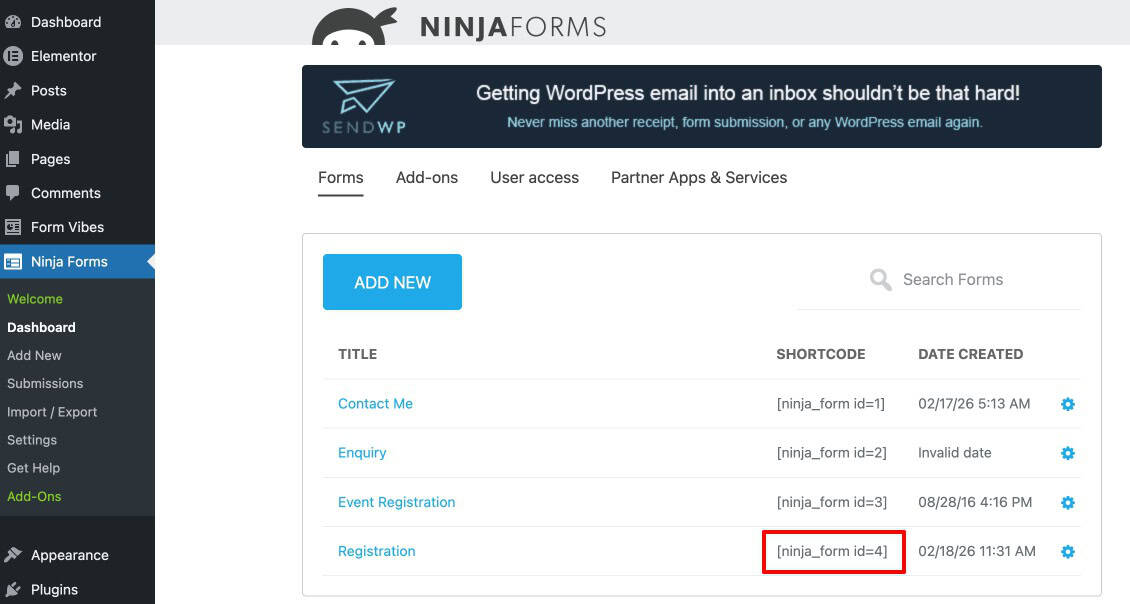
Go to Ninja Forms > Dashboard and copy the shortcode for the form you want to display. Open any page in the WordPress editor, add a Shortcode block, paste the shortcode, and publish or update the page. The form appears on the frontend at that location.
Display Using Gutenberg Block
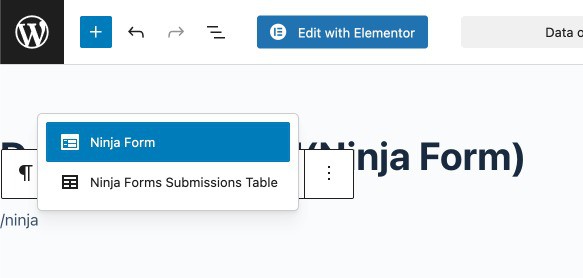
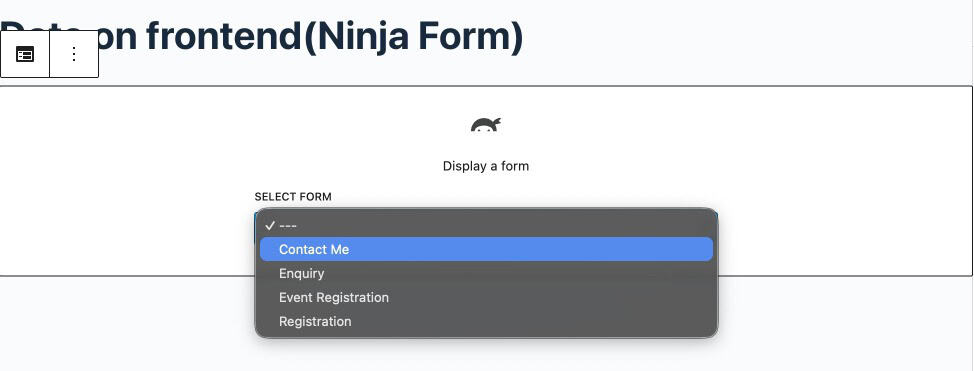
In the WordPress block editor, click Add Block, search for “Ninja Forms”, and select the block. Choose your form from the dropdown and publish or update the page. This method requires no shortcode copying and is the most straightforward approach for most users.
What Does Form Vibes Add for Ninja Forms Users?
Ninja Forms’ built-in submission manager is one of the strongest available natively in any WordPress form plugin. It stores every entry automatically, allows inline editing, date range filtering, bulk export across multiple forms, and email re-triggering. For many sites, that covers everything needed.
Three things the native submission manager does not provide are analytics charts, submission status marking for team review workflows, and a unified dashboard when Ninja Forms runs alongside other form plugins on the same site. Form Vibes fills each of those gaps specifically.
For a dedicated guide to managing Ninja Forms submissions with Form Vibes, see: How to Save and Manage Ninja Forms Submissions with Form Vibes.
| Feature | Ninja Form | Form Vibes |
|---|---|---|
| Date range filtering | Yes | Yes |
| Submission analytics | No | Yes |
| Submission Status | No | Yes |
| Cross-plugin view alongside other form plugins | No | Yes |
| Notes per submission for team review | No | Yes |
| Advanced submission filtering | No | Yes |
| Google Sheets sync | No | Yes |
| Role-based access manager | No | Yes |
Submission Trends and Analytics
Form Vibes includes an analytics dashboard at Form Vibes > Analytics. Select your Ninja Forms form from the dropdown and you get a bar chart and line chart showing submission volume on a daily, weekly, or monthly basis. Ninja Forms has no native analytics view, this is the only way to see whether your forms are generating more or fewer leads over time. The Form Vibes dashboard widget on the main WordPress admin screen gives you a quick count and trend line every time you log in without navigating away.
Key Takeaway:
Ninja Forms tells you what was submitted. Form Vibes tells you how many, when, and whether that number is going up or down. Both together give you the full picture.
Submission Status for Team Review (Pro)
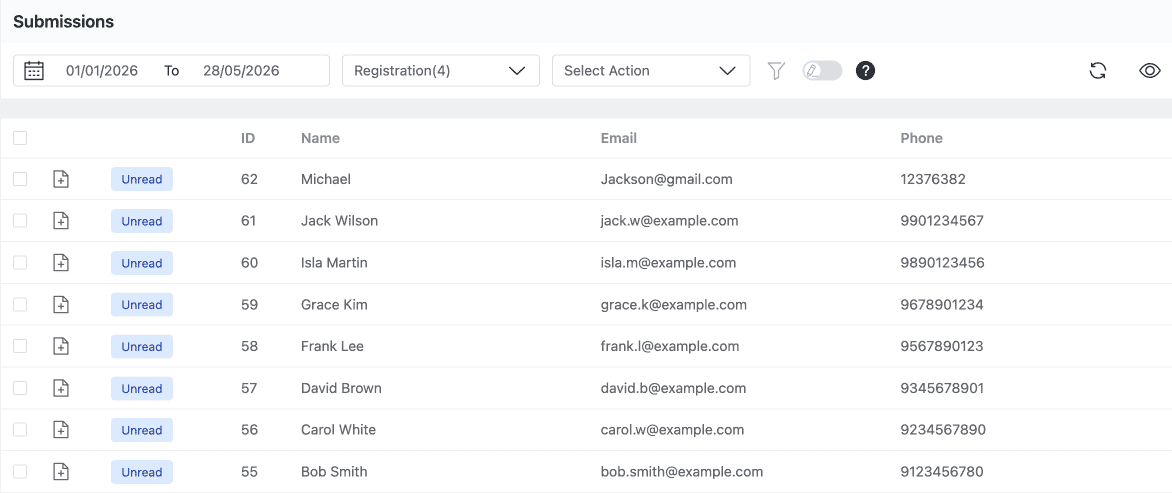
Form Vibes Pro adds a Submission Status system that lets you mark any Ninja Forms entry as Read, Unread, or Spam, individually or in bulk, and filter the submissions table by status. This gives a team a structured review queue for new entries rather than a flat unmanaged list.
Unified Dashboard for Multiple Form Plugins
If your site runs Ninja Forms alongside Contact Form 7, WPForms, Elementor Forms, or any other supported plugin, all submissions appear in the same Form Vibes dashboard. Switch between form plugins using the form dropdown without changing tools or screens.
For a full guide to saving and managing Forms submissions, see how to integrate Ninja Form with Form Vibes.
Pro: Submission Status and Notes are available in Form Vibes Pro. Status lets you triage entries as a team and Notes lets any team member leave a comment on a specific submission.
Conclusion
Ninja Forms provides a complete form building and submission management workflow, templates, a drag-and-drop builder, email actions, built-in entry storage, bulk export, and import/export tools, all in the free version. For advanced features, individual Pro add-ons let you pay only for the functionality you actually need.
For analytics showing submission trends, team-based status workflows, and a unified submission dashboard covering every form plugin on your site, Form Vibes adds those capabilities alongside Ninja Forms without replacing anything it already provides.
Want to understand why saving form submissions to the database matters? See the complete guide to saving contact form submissions in WordPress.

Never Lose Track of Important Ninja Forms Entries
Manage submissions, organize follow-ups, and monitor form activity directly inside your WordPress dashboard with
Form Vibes.
Frequently Asked Questions
Common questions about Ninja form.
Is Ninja Forms free to use?
Yes, Ninja Forms offers a free version with essential form-building, email notifications, and export features. Additional advanced functionality is available through Pro add-ons.
Can I export submissions in Ninja Forms?
Yes, Ninja Forms allows you to export submissions. You can export all submissions for a form or use the bulk export tool to export multiple forms’ submissions within a selected date range.
Can I edit form submissions after they are submitted?
Yes, you can open and edit individual submissions from the Ninja Forms → Submissions section in your WordPress dashboard.
How do I resend email notifications for a submission?
You can use the Trigger Email Action option from the Submissions section. Select the submission(s), choose “Trigger Email Action” from the Bulk Actions dropdown, and confirm to resend the selected email notification.
How can I manage a large number of Ninja Forms submissions more efficiently?
While Ninja Forms provides built-in submission management tools, websites handling large volumes of data may benefit from advanced filtering and centralized management. Integrating it with a dedicated submission manager like Form Vibes can help improve organization and analytics.




Leave a Reply