How to Export Elementor Form Submissions to CSV with Form Vibes
If your Elementor forms are running and submissions are saving, the next question is usually the same: how do I get this data out?
Elementor Pro already has a built-in export that works for basic needs. This guide focuses on how Form Vibes gives you more control filtered exports, field selection, saved export configurations, and automatic Google Sheets sync. If you have not yet set up Form Vibes to save your Elementor form submissions, start there first.
By the end you will know exactly which export method fits your situation and how to set it up.
Before You Start
Elementor Pro installed and active (the Form widget is a Pro-only feature)
At least one Elementor form published and receiving submissions
Form Vibes installed and active
Admin access to your WordPress dashboard
Does Elementor Pro let you export form submissions?
Yes. Go to Elementor → Submissions in your WordPress dashboard. Click Export All to CSV to download every entry, or tick checkboxes on specific rows and click Export Selected to CSV. A date filter is available to narrow entries before exporting. No row limit, no extra plugin needed.
That covers the basics. The rest of this guide is about what Form Vibes adds when you need more than a full download.
Notes: Elementor’s export includes every field column in the form. You cannot choose which columns to include, the full dataset comes through every time.
How do you export Elementor form Submissions with Form Vibes?
Form Vibes captures Elementor submissions automatically once installed, no changes to your Elementor forms needed. Exports run from Form Vibes → Submissions for quick downloads or Form Vibes → Export Profiles for saved configurations.
For a full overview of Export Profiles across all form plugins, see the Form Vibes export guide.
Quick Export – download all entries in one click
The fastest way to get your Elementor data out of WordPress. No configuration needed.
- Go to Form Vibes → Submissions in your WordPress dashboard.
- Click the form dropdown at the top and select your Elementor form from the list.
- Click the Quick Export button in the toolbar. Form Vibes generates a CSV file immediately and downloads it to your system. The file opens directly in Excel or Google Sheets.
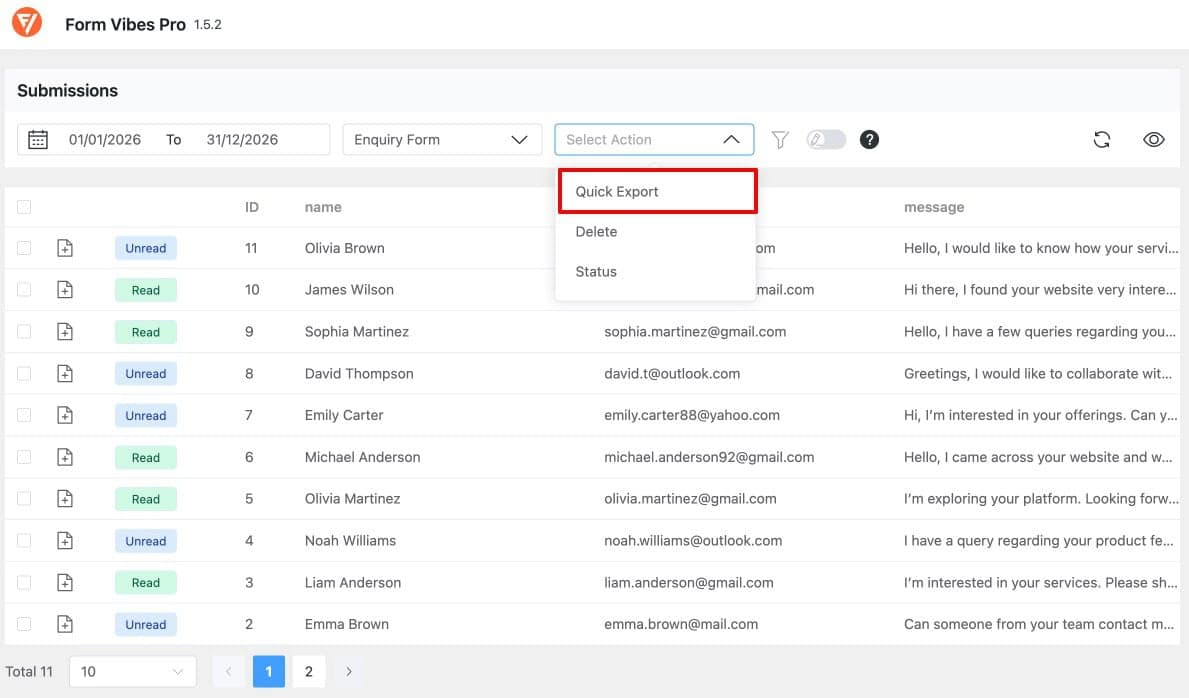
Notes: Form Vibes Free Quick Export is capped at 1,000 rows. If your Elementor form has more than 1,000 entries and you need the full dataset, Form Vibes Pro removes the cap entirely.
Filtered Export – export by date range or field value
When you need entries from a specific time period or matching specific criteria.
- Go to Form Vibes → Submissions and select your Elementor form.
- Click the date range selector and choose a preset – Today, Last Week, Last Month, or Last Quarter or use the custom date picker for a specific window.
- Click the filter icon to narrow down entries before exporting. Form Vibes Pro provides two filtering options:
- By submission status – filter to only Read, Unread, or Spam entries. Useful when you want to export only new unread leads, or pull out flagged spam entries separately.
- By field value – filter by a specific form field, for example only entries where a Service field equals “Web Design.” You can stack multiple conditions with AND or OR logic between them.
- Click Quick Export. Form Vibes exports only the entries matching your active filters.
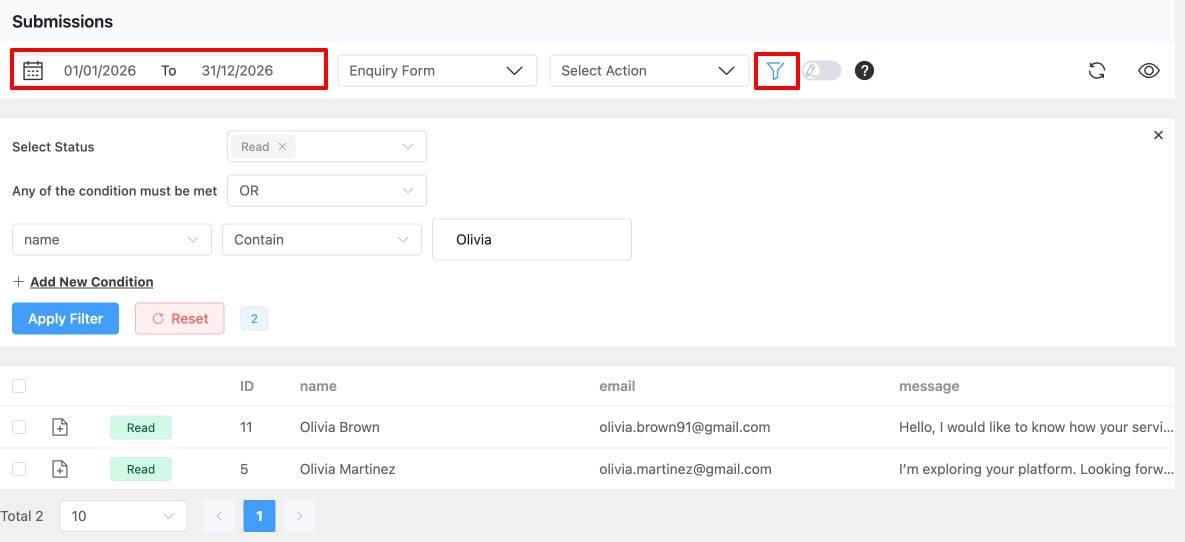
Tips: Both filter types can be combined – for example, Unread entries from the last month where Service equals “Web Design.”
Form Vibes captures every Elementor submission automatically and gives you filtered exports, saved report configurations, and Google Sheets sync, all on top of what Elementor already provides.
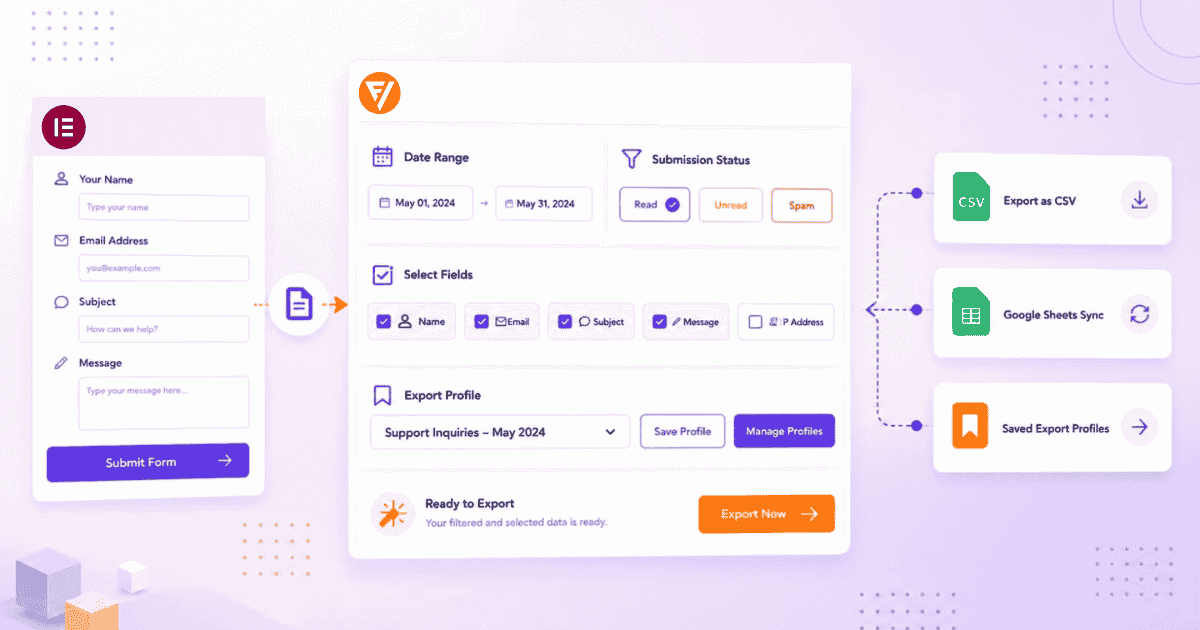
Advanced Export – save your settings and re-run in one click (Pro)
If you run the same export regularly, the Advanced Export removes the repetition entirely. You configure the form, date range, filters, and which fields to include once then run the same export any time with a single click.
- Go to Form Vibes → Export Profiles in your WordPress dashboard and click Add New.
- At the top of the settings page, select Local Download to export as a CSV file.
- Open the Data Source tab. Select your Elementor form from the form dropdown. Set a date range. Add any filter conditions you need, such as filtering by a specific field value or submission status. Stack multiple conditions with AND or OR logic between them.

- Open the Fields tab. Every field from your Elementor form is listed here with a visibility toggle. Turn off any fields you do not want in the CSV. Only the fields you leave enabled will appear as columns in the exported file.
- Click Publish to save the profile. To run it, go to Form Vibes → Export Profiles, and click Export to CSV. Form Vibes generates the CSV instantly using your saved settings and downloads it to your system.

Important: Every file you export is saved in the Exported Files tab inside your export profile configuration. You can re-download any previously generated file directly from there without running the export again useful when a client asks for a copy of last month’s data.
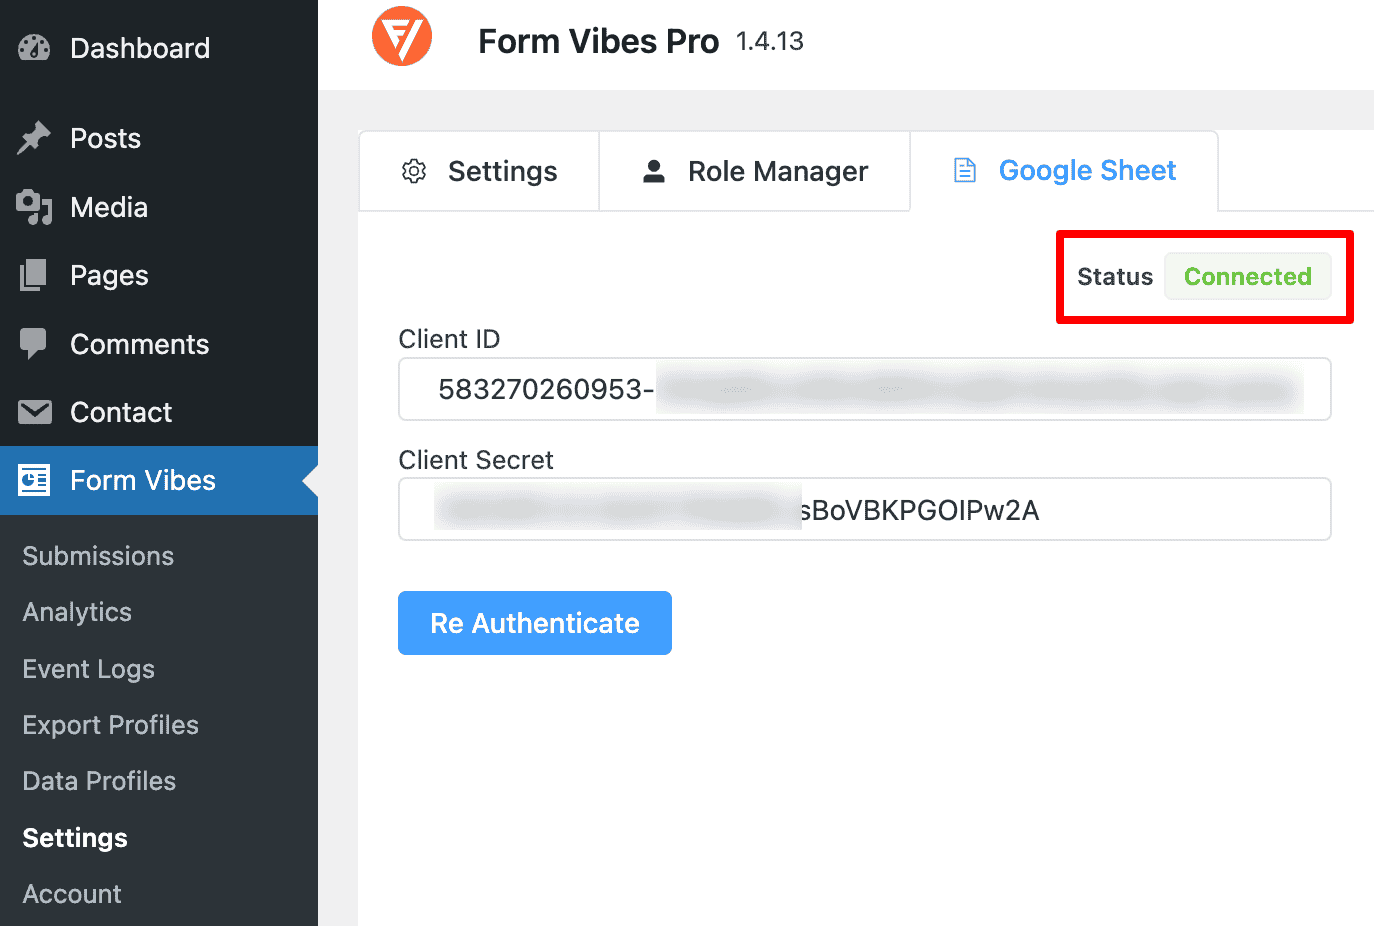
Google Sheets sync – Elementor submissions arrive automatically
Instead of downloading a CSV manually, Google Sheets sync pushes each new Elementor submission to a connected spreadsheet the moment it is received. No manual steps after the initial setup.
- First, connect Form Vibes to your Google account by following the connection guide to authorise Form Vibes with your Google account.
- Once connected, go to Form Vibes → Settings → Google Sheet and enter the keys generated during the connection step. Save your settings.
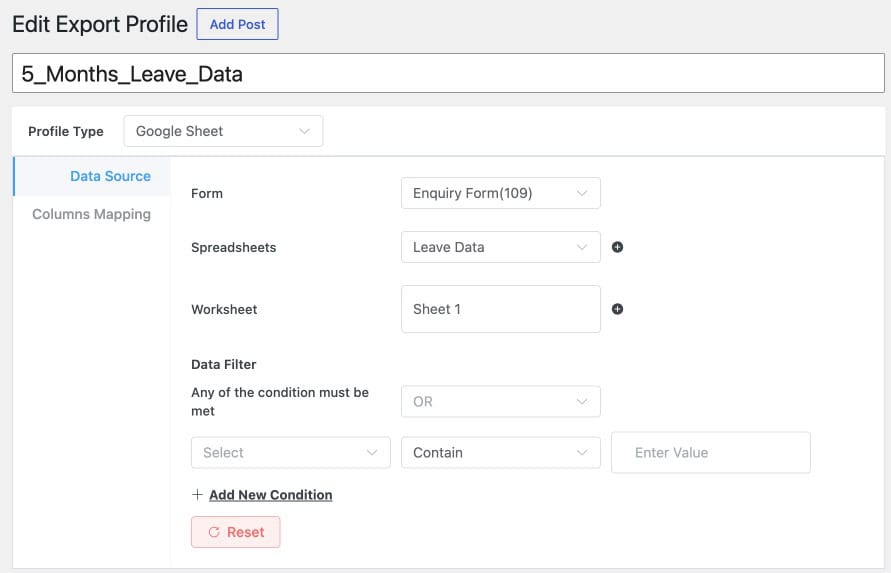
- Go to Form Vibes → Export Profiles and click Add New.
- At the top of the settings page, choose Google Sheet as the profile type.
- Open the Data Source tab. Select your Elementor form, choose the Google Spreadsheet and the specific sheet tab where submissions should be sent set. Then, set your date range, and add any filter conditions you need.
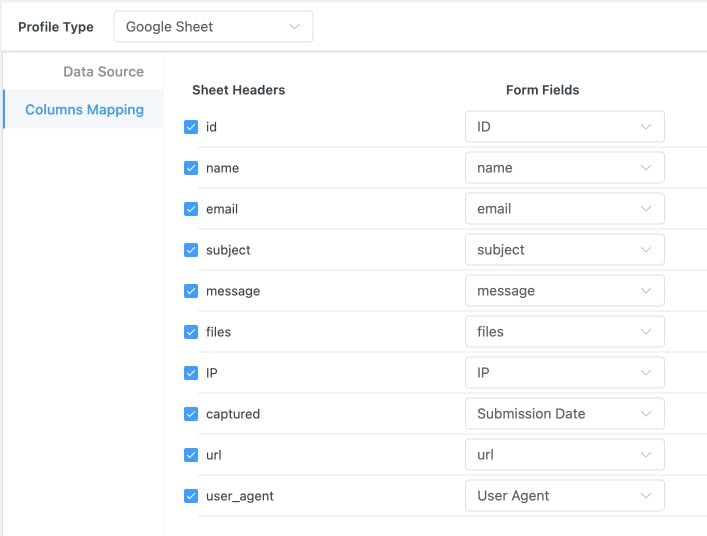
- In the field mapping section, assign each Elementor form field to the corresponding column in your Google Sheet.
- Click Publish to activate the sync. Submit a test entry through your Elementor form — it appears in your Google Sheet within moments.
Pro: Google Sheets sync is a Form Vibes Pro feature. Once active, every new Elementor submission appears in your connected sheet automatically, no manual exports needed.
Elementor vs Form Vibes – export comparison
| Feature | Elementor | Form Vibes |
|---|---|---|
| Export all entries to CSV | Yes | Yes |
| Export selected entries | Yes | Yes |
| Date range filter | Yes | Yes |
| Field selection – choose columns | No | Yes |
| Saved export configurations | No | Yes |
| Export file history, re-download past files | No | Yes |
| Google Sheets auto-sync | No | Yes |
| Cross-plugin unified export | No | Yes |
Key Takeaway:
Form Vibes and Elementor Pro’s native submissions panel work side by side without conflict. Both capture Elementor form submissions independently, you do not need to disable Elementor’s built-in storage to use Form Vibes.
Conclusion
Elementor Pro’s native export covers the basics well full dataset or selected entries, date filtering, no row limit. Use it when a one-time download is all you need.
Form Vibes takes it further. Filtered exports, field selection, saved configurations that re-run in one click, a full export file history, and automatic Google Sheets sync. If you run recurring reports, export for clients, or manage submissions across multiple form plugins, Form Vibes removes the manual work from every export after the first setup.
If you have not yet set up your Elementor form to capture leads, start with the Elementor form configuration guide first.
For a deeper look at everything you can do with Elementor submissions once they are saving, read the guide on how to save and manage Elementor form submissions. If you are deciding between plans, the Form Vibes Free vs Pro comparison covers every feature in full.
Get more from your Elementor form data
Form Vibes gives you filtered exports, field selection, saved export configurations, and automatic Google Sheets sync on top of everything Elementor already does.
Frequently Asked Questions
Common questions about exporting Elementor form submissions using Form Vibes.
Can Elementor Pro export form submissions without a plugin?
Yes. Elementor Pro includes a built-in CSV export under Elementor → Submissions. You can export all entries or selected entries with no row limit. Form Vibes adds field selection, saved export configurations, export history, and Google Sheets sync on top of that.
Is there a row limit when exporting Elementor form entries?
Elementor Pro’s native export has no row limit. Form Vibes Free Quick Export is capped at 1,000 rows. Form Vibes Pro removes that cap entirely.
Can I choose which fields appear in the exported CSV?
Not with Elementor’s native export, every form field is included and you cannot exclude columns before downloading. Form Vibes Pro lets you toggle individual fields on or off in the Export Profile Fields tab before generating the file.
Can I export Elementor form entries to Google Sheets automatically?
Not with Elementor Pro natively. Form Vibes Pro includes a Google Sheets sync that pushes each new Elementor submission to a connected spreadsheet automatically, with field-to-column mapping you configure once.
Does Form Vibes export work for forms other than Elementor?
Yes. Form Vibes exports submissions from Contact Form 7, WPForms, Gravity Forms, Ninja Forms, WS Form, and other supported plugin, all from the same dashboard. See the Form Vibes Free vs Pro comparison for the full feature breakdown.
Leave a Reply