How to Manage Gravity Forms Submissions in WordPress
Gravity Forms stores every submission automatically that part works from the moment your form goes live. The challenge starts when volume grows, multiple forms are running, and you need to do more than just read individual entries one by one.
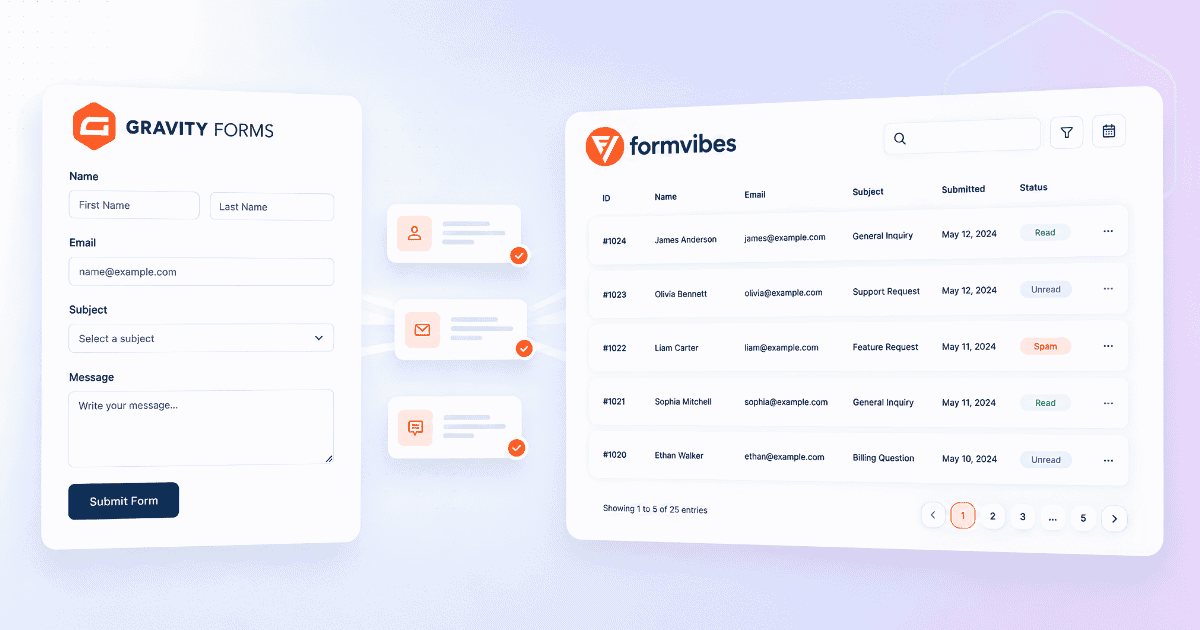
In this guide, you will learn how to view, filter, search, bulk-action, and export Gravity Forms submissions using the plugin’s built-in tools. The final section covers how to add analytics, submission status marking, deletion tracking, and a cross-plugin dashboard using Form Vibes alongside Gravity Forms, all without changing anything in your existing form setup.
If you’re new to Gravity Forms or want to explore its full capabilities, check out our complete guide on Gravity Form to learn how to create, customize, and optimize forms effectively.
Before You Start
Gravity Forms installed and active with a valid licence
At least one form created and published on a page
Admin access to your WordPress dashboard
Form Vibes (free) for the advanced management
Does Gravity Forms Save Submissions to the Database?
Yes. Gravity Forms automatically saves every form submission to the WordPress database the moment someone submits a form. Entries are stored in Gravity Forms’ own database tables and are accessible from Forms > Entries in your WordPress admin, no additional plugin or configuration is required.
This means your Gravity Forms submissions are never dependent on email delivery. Even if an email notification fails, the entry is already safely stored and viewable from your dashboard.
Not sure why saving to the database matters beyond preventing email failures? See why you should save contact form submissions in your database.
Already using Gravity Forms and capturing submissions? Form Vibes can help you manage submissions more efficiently without changing your existing setup.
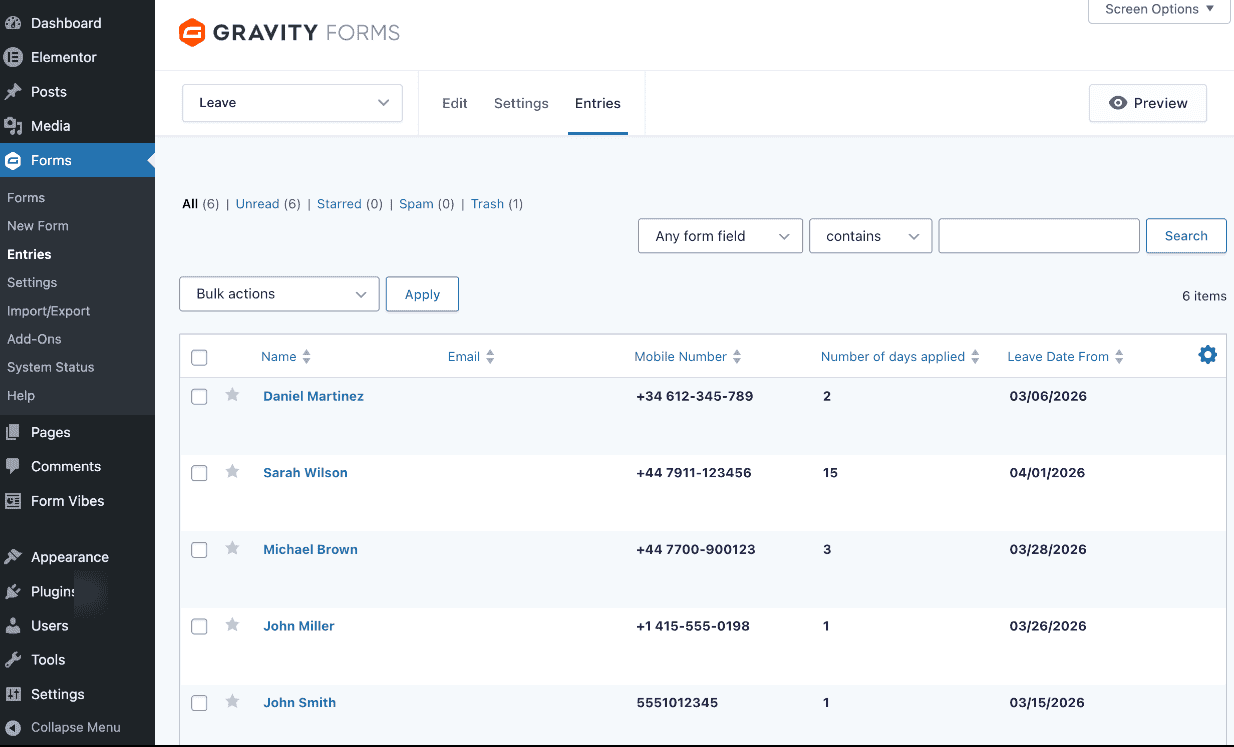
How Do You View Gravity Forms Submissions?
To view Gravity Forms submissions, go to Forms > Entries in your WordPress admin. If you have multiple forms, select the specific form from the dropdown at the top of the page. All entries submitted through that form appear in a list, showing key field values, the submission date, and the entry status.
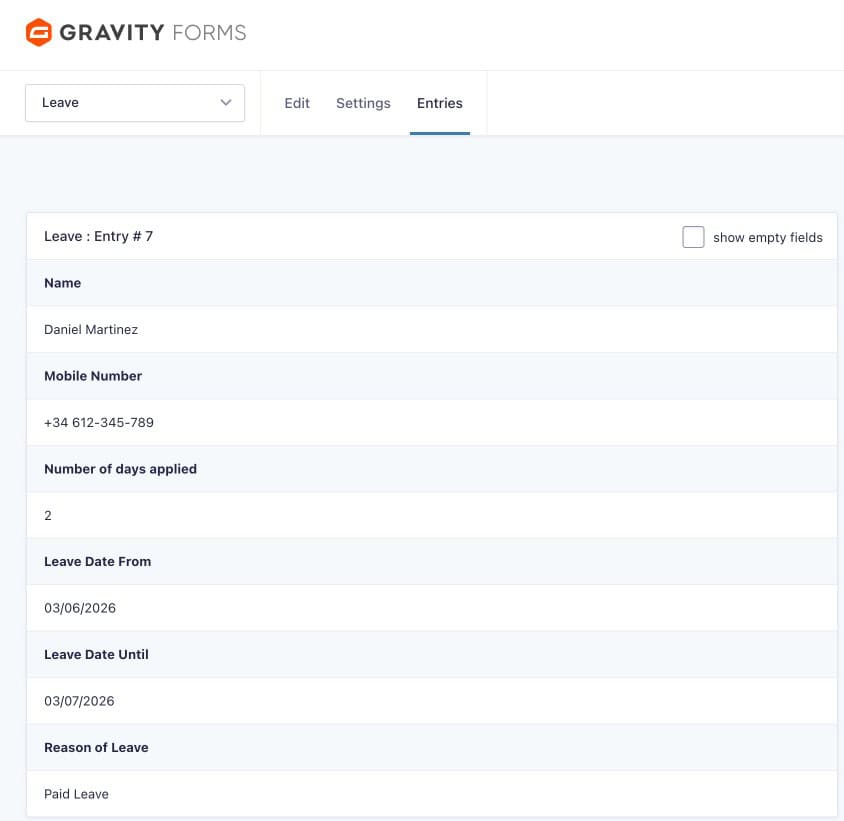
How Do You View a Single Entry in Detail?
Click on any row in the entry list to open the full detail view for that submission. The detail view shows every field value the visitor submitted, the submission date and time, the visitor’s IP address, the source URL of the page where the form was submitted, and any notes added to the entry.
How Do You Filter and Search Gravity Forms Submissions?
Gravity Forms provides filtering and search controls at the top of the Entries page. Use these to narrow down entries without scrolling through the full list manually.
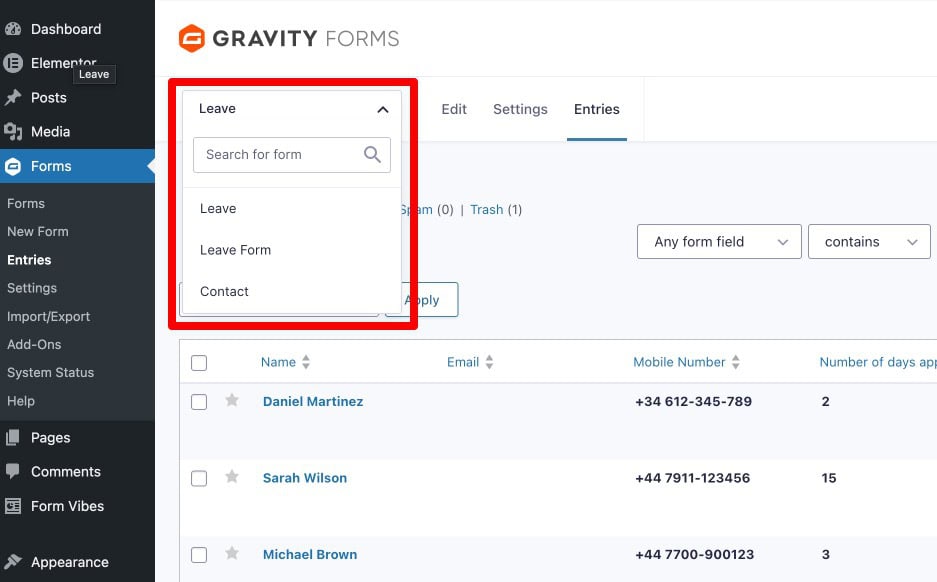
How Do You Filter by Form?
If your site has multiple Gravity Forms forms, the form dropdown at the top of Forms > Entries lets you switch between them. Select the form whose entries you want to view and the list updates immediately to show only submissions from that form.
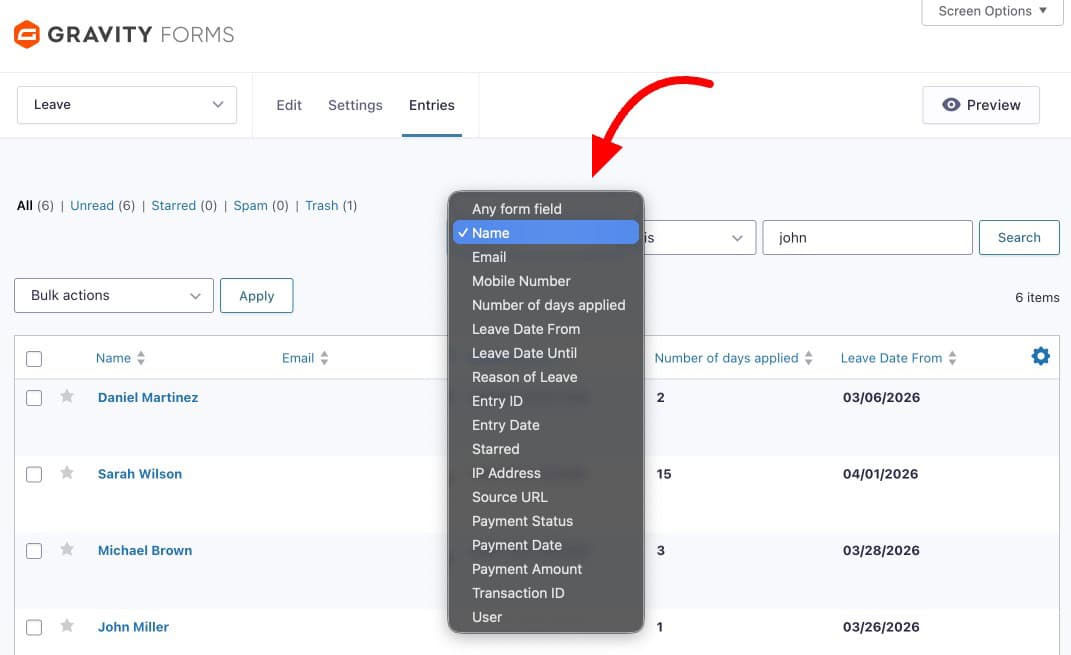
How Do You Filter by Field Value?
Gravity Forms includes field-level filtering on the Entries page. Use the filter controls to select a form field name, set a condition (is, is not, contains, starts with, ends with, greater than, less than), and enter a value. The entry list updates to show only matching submissions.
For example, to see only entries where the “Service” field equals “Consultation”, select that field, set the condition to “is”, and enter “Consultation”. You can add multiple filter conditions to narrow results further.
How Do You Use Bulk Actions on Gravity Forms Entries?
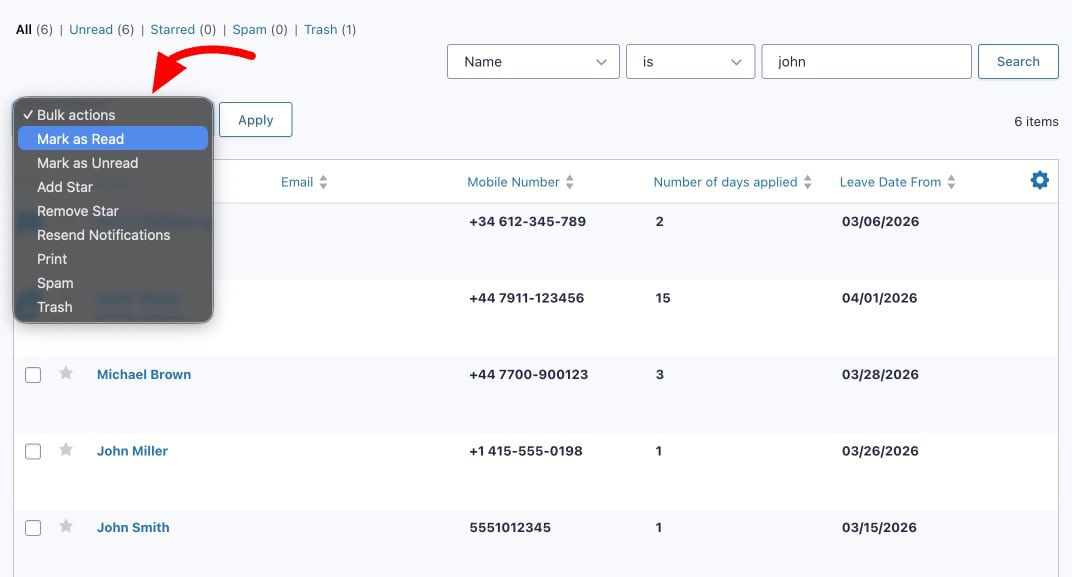
Select entries using the checkboxes on the left of each row. To select all entries on the current page, use the checkbox at the top of the column. Once entries are selected, open the Bulk Actions dropdown above the list. Available bulk actions include:
- Mark as Read – marks selected entries as reviewed
- Mark as Spam – flags selected entries as spam
- Delete – permanently removes selected entries
Click Apply after selecting your action.
How Do You Export Gravity Forms Entries?
Gravity Forms includes a built-in export tool under Forms > Import/Export. Follow these steps to export your form entries to a CSV file:
Steps to Export Entries
- Go to Forms → Import/Export
- Click on Export Entries
- Select the form you want to export
- Choose the fields you want to include in the export file
- Apply the Conditional Logic that allows you to export entries only if certain conditions are met.
- You can also export entries within a specific time period.
- Click Download Export File
Gravity Forms will generate a CSV file, which you can open in Excel, Google Sheets, or any spreadsheet tool.
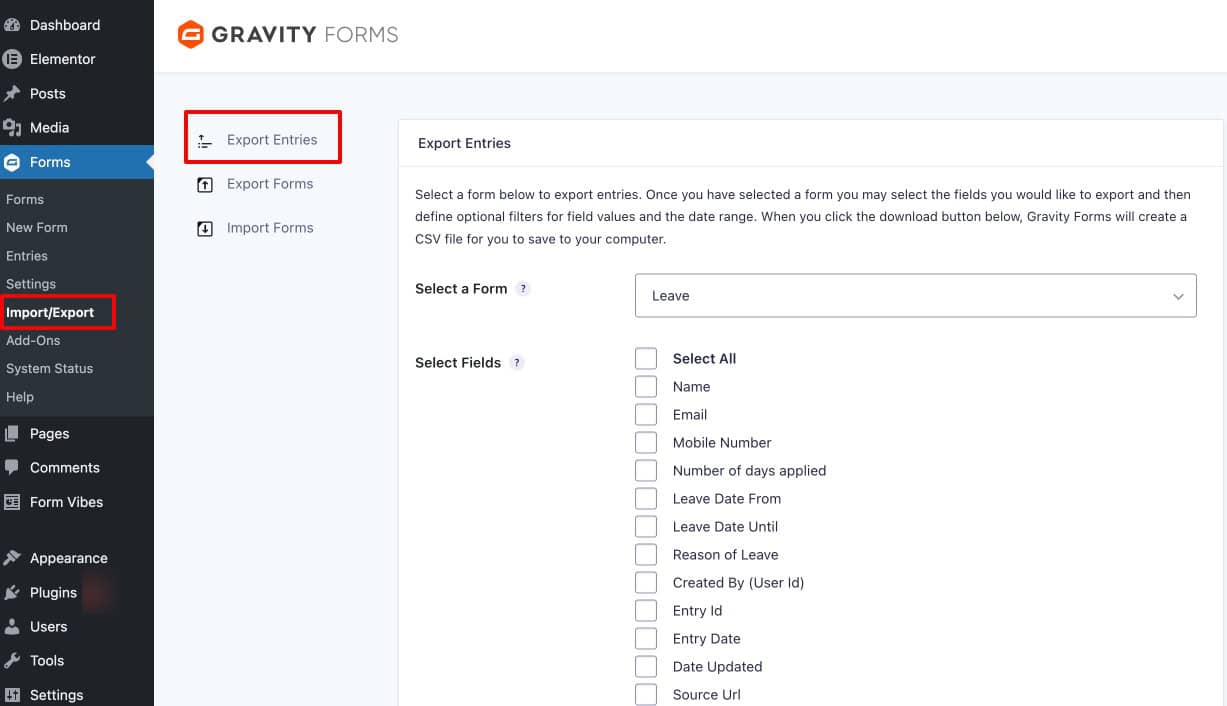
Tips: Use the Conditional Logic filter when you need a targeted export – for example, only entries from the last 30 days, or only entries where a specific field matches a certain value. This saves you filtering inside your spreadsheet after the fact.
How to Export Forms in Gravity Forms
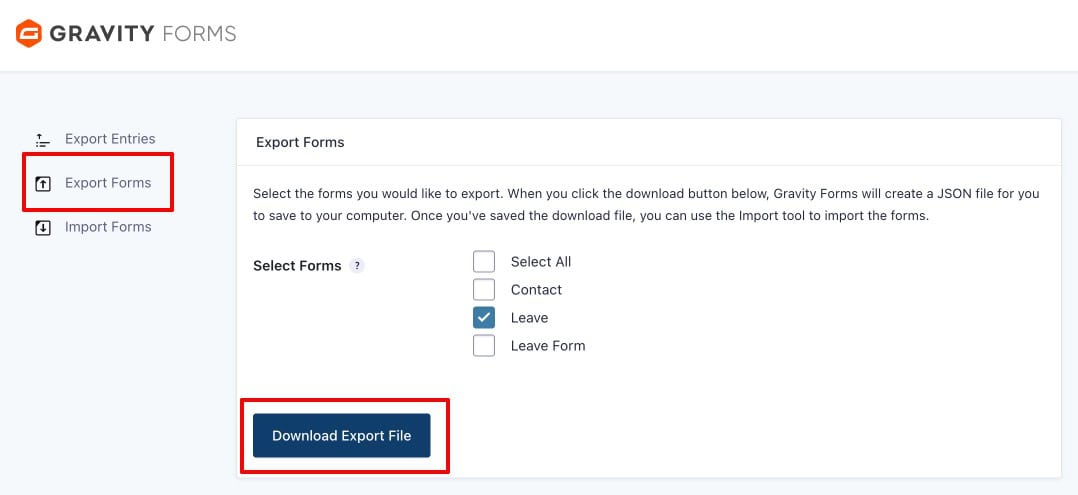
In addition to exporting entries, Gravity Forms also allows you to export entire forms.
Steps to Export Forms
- Move to the Export Forms tab
- Select the form(s) you want to export
- Click Download Export File
The form will be downloaded as a JSON file.
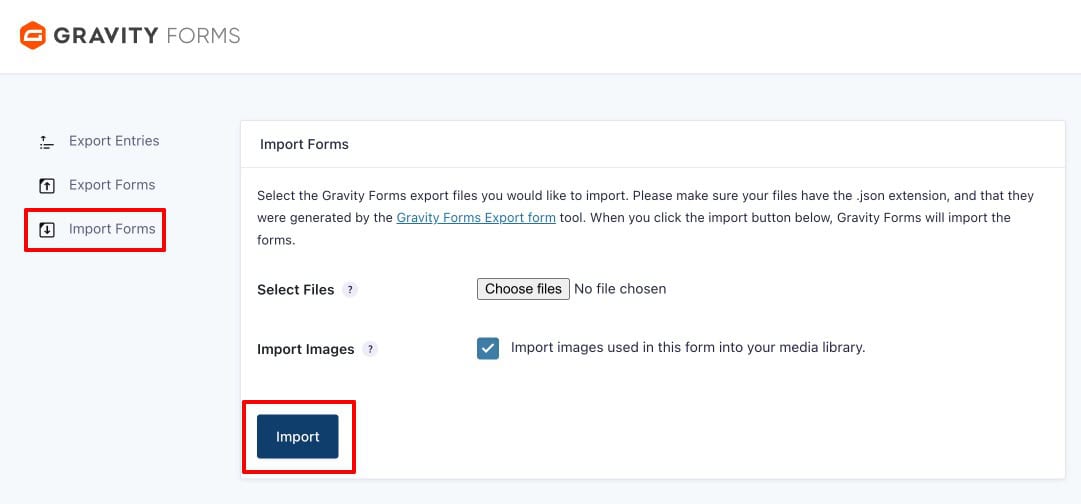
How to Import Forms in Gravity Forms
If you have previously exported a form, Gravity Forms allows you to import it easily.
Forms are imported using a JSON file, which contains the complete form structure and configuration.
Steps to Import Forms
- Move to the Import Forms tab
- Click Choose Files and select the .json file
- The Import Images checkbox allows you to import images used inside the form into your WordPress media library.
- Click the Import button
Once imported, the form will appear under: Forms → All Forms.
You can then edit, preview, or embed the form as needed.
How Do You Manage Gravity Forms Submissions Efficiently?
Gravity Forms’ built-in entry management is solid for viewing, basic filtering, and exporting. As your site grows more forms, higher submission volumes, or a team reviewing entries together, three things are noticeably missing: analytics showing submission trends over time, a status workflow for tracking which entries have been handled, and a way to manage Gravity Forms entries alongside submissions from other form plugins in one place.
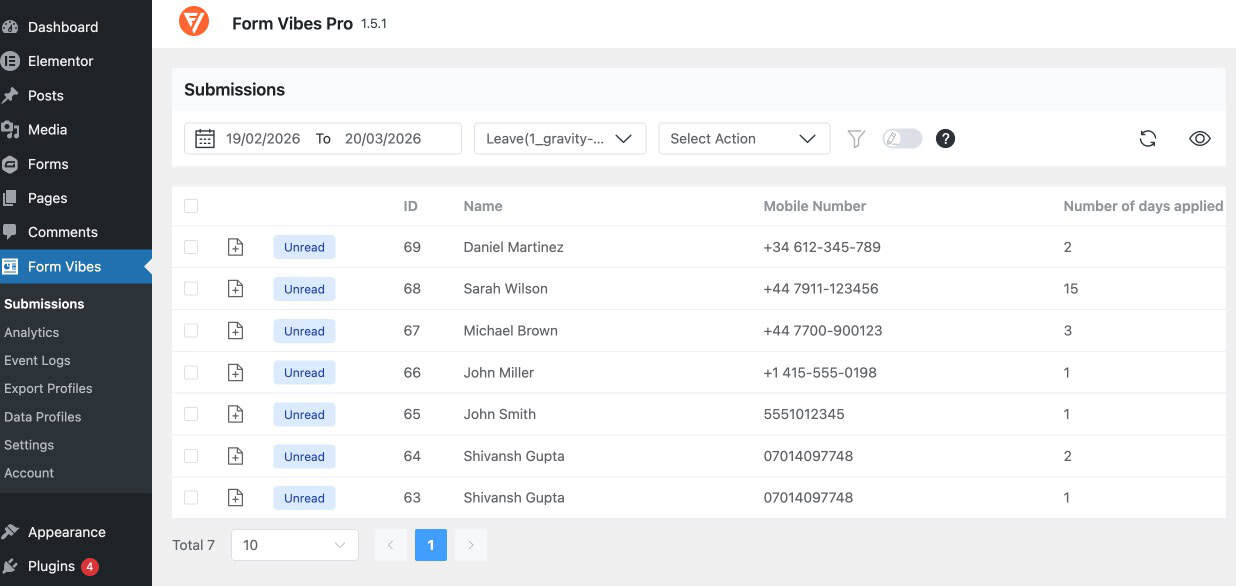
Form Vibes adds all of this. Install it from Plugins > Add New (search “Form Vibes”, install, activate). Form Vibes begins capturing Gravity Forms submissions automatically from that point, no configuration inside Gravity Forms is needed. All captured entries are available at Form Vibes > Submissions.
If you want a more organized and analytics-driven way to handle Gravity Forms submissions, integrating Gravity Forms with Form Vibes can make entry management much more efficient.
Analysing Gravity Forms Trends with Form Vibes
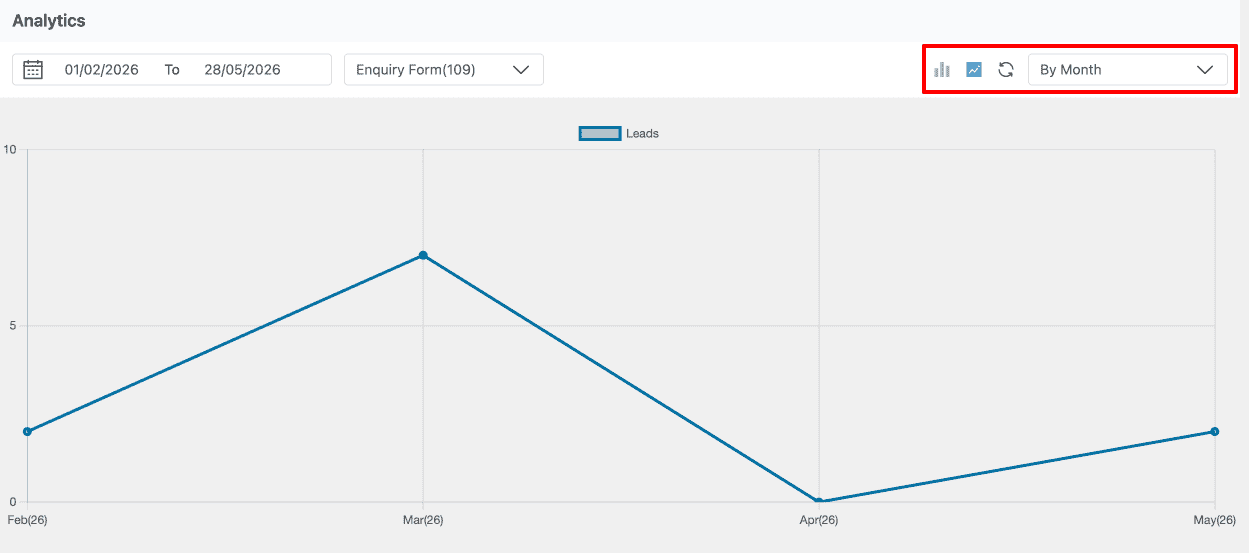
Go to Form Vibes > Analytics and select your Gravity Forms form from the dropdown. Form Vibes shows a bar chart and a line chart of submission volume across your chosen time period — daily, weekly, or monthly. Gravity Forms has no native analytics view, so this is the only way to see whether your forms are receiving more or fewer submissions over time.
The Form Vibes dashboard widget gives you a quick submission count and trend line every time you log into WordPress without navigating anywhere.
Track Every Change Made to Every Entry
Gravity Forms has no record of what happens to an entry after it is submitted. If a team member edits a field value, marks an entry as spam, or deletes a lead, there is nothing in Gravity Forms that tells you it happened.
Form Vibes keeps a complete Event Log for every submission. Every edit, every deletion, every status change, every note added, all logged with a timestamp and the username of the person who made the change. If a lead goes missing, you know exactly what happened and when. This is a free Form Vibes feature.

Leave Notes Directly on Any Entry
Gravity Forms has no way to add internal comments to a submission. If your team needs to track that a lead was followed up, a quote was sent, or a callback is scheduled that context lives in someone’s inbox or a separate spreadsheet.
Form Vibes Pro lets you attach notes directly to any Gravity Forms entry. Add something like “Called back on 5th May — awaiting decision” and it stays with the submission record, visible to every team member with Form Vibes access. Each note is timestamped so you always know the timeline.
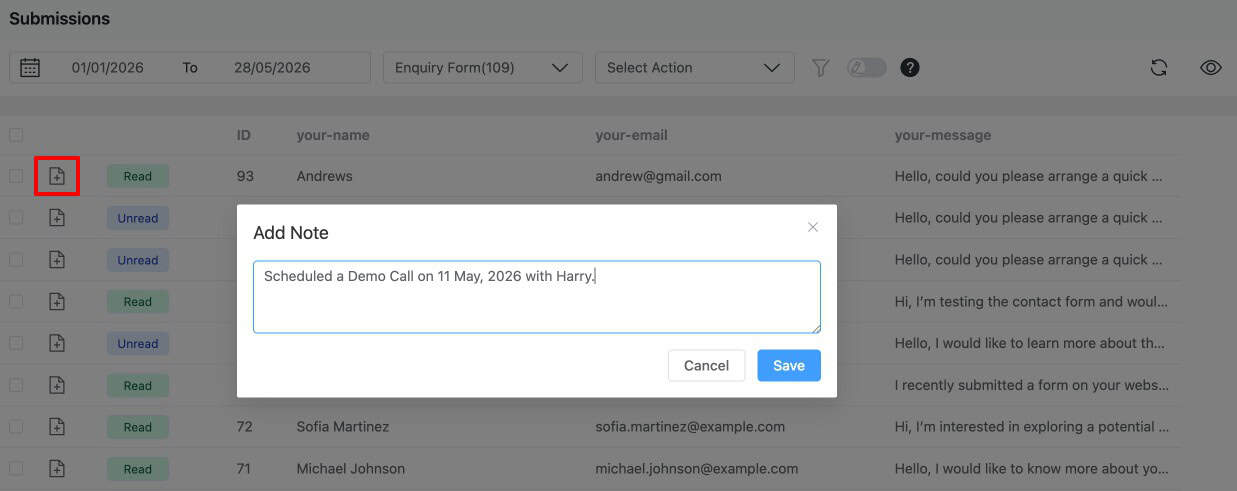
Pro: Submission Notes are a Form Vibes Pro feature. The Event Log, analytics charts, and the dashboard widget are all included in the free version.
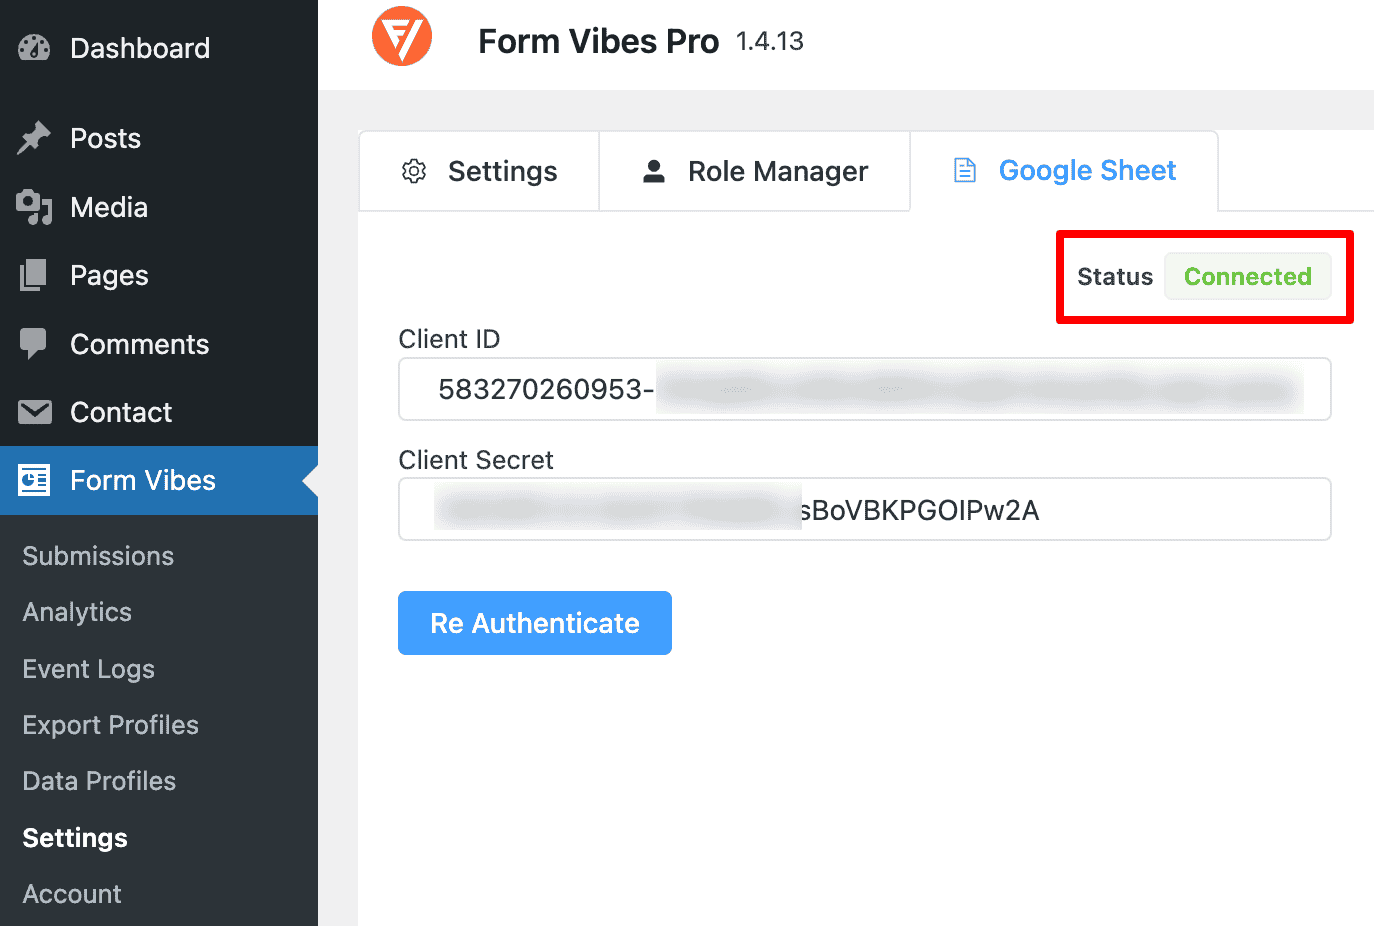
Send New Submissions to Google Sheets Automatically
Gravity Forms can export entries to CSV on demand. But there is no way to automatically push new Gravity Forms submissions to a Google Spreadsheet in real time without a third-party automation tool.
Form Vibes Pro handles this natively. Connect your Google account once via OAuth, select your spreadsheet and worksheet, map your form fields to columns, and every new Gravity Forms submission is pushed to the sheet automatically the moment it arrives.
Show Submission Data Anywhere on Your Site
Gravity Forms has no way to display submission data on the frontend of your WordPress site. If you want visitors or logged-in users to see a table of entries, a public directory, a member submission list — Gravity Forms cannot do this without custom development.
Form Vibes Pro’s Data Profiles feature lets you display captured submissions as a table or counter directly on any page or post using a shortcode. Control which fields are visible, who can see the data, and how it is formatted without touching a line of code.
Key Takeaway:
Gravity Forms handles storage and basic management really well. Form Vibes fills the three gaps that most growing sites eventually hit – seeing trends over time, managing entries as a team, and keeping all your form plugin submissions in one place.
Conclusion
Gravity Forms provides a capable built-in entry management system, submissions are stored automatically, entries can be filtered by field value, and CSV exports give you full control over what data you download. For many sites, that is enough.
When you need more, analytics showing how submission volume changes over time, a status workflow for teams reviewing entries, deletion tracking, or a single dashboard covering Gravity Forms alongside other form plugins Form Vibes adds all of that on top without requiring any changes to your Gravity Forms setup.
Need a complete walkthrough of exporting and managing form submissions across all your form plugins? See the guide on how to export and manage WordPress form submissions.
More from your Gravity Forms Submissions
You are already capturing entries with Gravity Forms. Form Vibes adds analytics, team review workflows, deletion tracking, and a unified dashboard for every form plugin on your site.
Frequently Asked Questions
Common questions about Managing Gravity Form Submissions in WordPress.
Does Gravity Forms save submissions to the database automatically?
Yes. Gravity Forms stores every form submission automatically in the WordPress database from the moment the form goes live. Entries are accessible under Forms > Entries in your WordPress admin.
How do I see analytics and trends for Gravity Forms submissions?
Gravity Forms does not include a native analytics view. For visual submission trend data – daily, weekly, and monthly charts showing submission volume per form, Form Vibes provides a free Analytics dashboard at Form Vibes > Analytics. A dashboard widget also shows quick submission counts and a trend line directly on the main WordPress admin screen.
Can I mark Gravity Forms submissions as Read or Unread?
Gravity Forms allows you to mark entries as read or unread individually from the entry detail view, and in bulk from the Entries list using the Bulk Actions dropdown.
How do I export Gravity Forms entries to CSV?
Go to Forms > Import/Export > Export Entries. Select your form, tick the fields you want to include in the export, optionally apply conditional logic or a date range filter, and click Download Export File. Gravity Forms generates a CSV file immediately. For saved, reusable export configurations, Form Vibes Pro’s Export Profiles feature lets you set up an export once and re-run it in one click.
Can I manage Gravity Forms submissions alongside other form plugins
Not within Gravity Forms itself, it only shows its own entries. If you are running multiple form plugins on the same site, Form Vibes captures submissions from all nine supported plugins and shows them in one unified dashboard.


Leave a Reply